12
thermostat calls for heat. At the end of the timing period,
the unit’s defrost cycle will be initiated provided the sensor
remains closed. When the sensor opens (approximately 60
± 5°F), the defrost cycle is terminated and the timing period
is reset. If the defrost cycle is not terminated due to the
sensor temperature, a twelve minute override interrupts the
unit’s defrost period.
SUGGESTED FIELD TESTING/TROUBLE
SHOOTING
Testing Defrost Control
NOTE: PCBDM133 defrost controls have a three (3)
minute compressor off cycle delay.
NOTE: The PCBDM133 defrost controls are shipped
from the factory with the compressor delay option
selected. This will de-energize the compressor
contactor for 30 seconds on defrost initiation and
defrost termination. If the jumper is set to Normal,
the compressor will continue to run during defrost
initiation and defrost termination. The control will
also ignore the low-pressure switch connected to
R-PS1 and PS2 for 5 minutes upon defrost initiation
and 5 minutes after defrost termination.
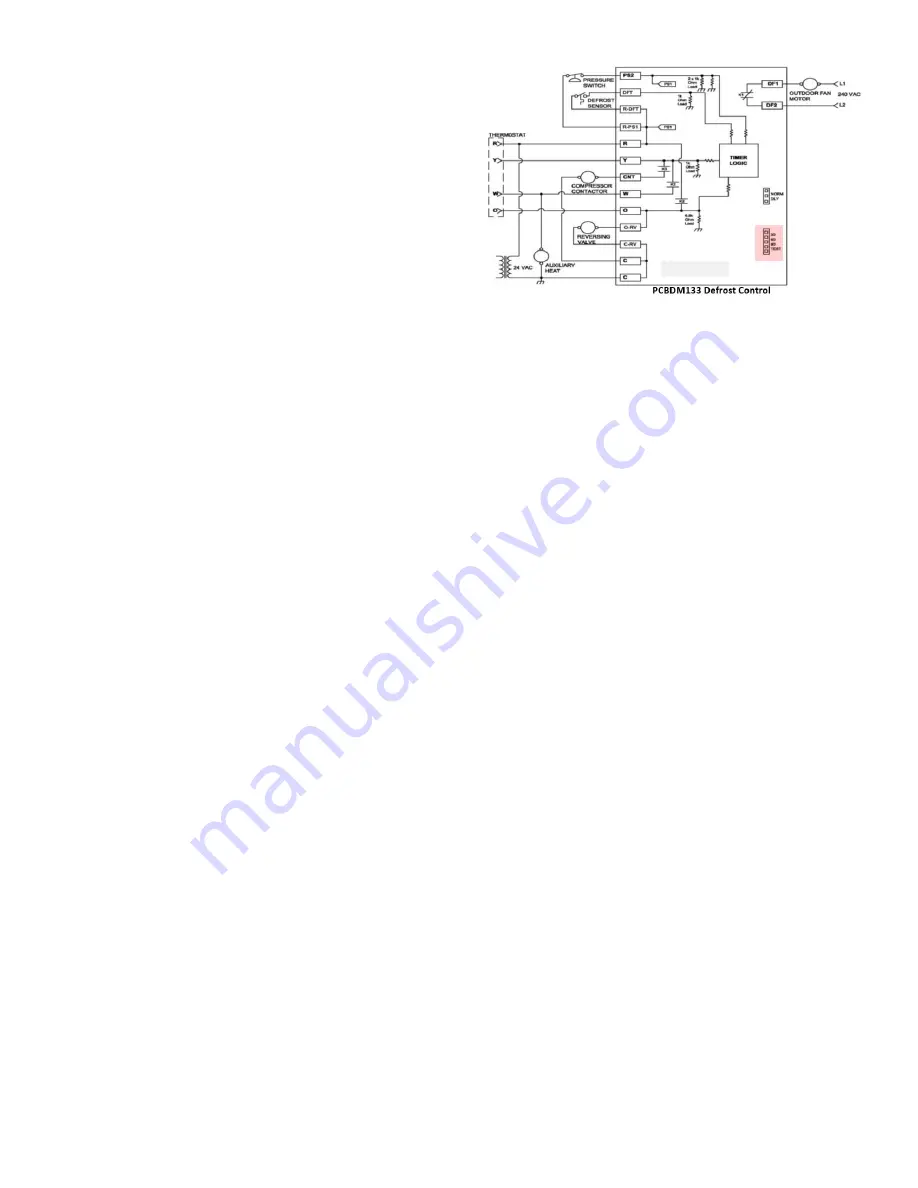
To check the defrost control for proper sequencing,
proceed as follows: With power ON; unit not running.
1. Jumper defrost thermostat by placing a jumper wire
across the terminals “DFT” and “R”/” R-DFT” at
defrost control board.
2. Remove jumper from timer pins and jump across test
pins on defrost control board.
NOTE:
Do not use screwdriver or field supplied
jumper to test the control.
3. Set thermostat to call for heating. System should go
into defrost within 21 seconds.
4. Immediately remove jumper from test pins.
5. Using VOM check for voltage across terminals “C &
O”. Meter should read 24 volts.
6. Using VOM check for voltage across fan terminals
DF1 and DF2 on the board. Should read line voltage
(208-230 VAC) indicating the relay is open in the
defrost mode.
7. Using VOM check for voltage across “W”/”W2” & “C”
terminals on the board. Should read 24 volts.
8. If not as above, replace control board.
9. Set thermostat to off position and disconnect power.
Remove jumper from defrost thermostat and replace
timer jumper to the desired defrost time.
NOTE: Remove jumper across defrost thermostat
before returning system to service. See figure 11 -
Defrost Control Wiring Diagram.
Defrost Control Wiring Schematic
Figure 11
Testing Defrost Thermostat
1.
Install a thermocouple type temperature test lead on
the tube adjacent to the defrost control. Insulate the
lead point of contact.
2. Check the temperature at which the control closes its
contacts by lowering the temperature of the control. It
should close at approximately 30°F.
3. Check the temperature at which the control opens its
contacts by raising the temperature of the control. It
should open at approximately 60°F. If not as above,
replace control.
AIR FLOW MEASUREMENT AND
ADJUSTMENT
Please review the
Duct Work
section before
proceeding with the airflow measurements and
adjustments in this section.
Unit blower curves (see Specification Sheets) are based
on external static pressure (ESP per in/W.C.). The
duct openings on the unit are considered internal static
pressure. As long as ESP is maintained, the unit will deliver
the proper air up to the maximum static pressure listed for
the CFM required by the application (i.e. home, building,
etc.).
In general, 400 CFM per ton of cooling capacity is a rule
of thumb. Some applications depending on the sensible
and latent capacity requirements may need only 350
CFM or up to 425 CFM per ton. Check condition space
load requirements (from load calculations) and equipment
expanded ratings data to match CFM and capacity.
After unit is set and duct work completed, verify the ESP
with a 1-inch inclined manometer with pilot tubes or a
Magnahelic gauge and confirm CFM to blower curves in
the Specification Sheets. All units have multiple speed
blower motors. If factory selected speed is not utilized, the
speed tap can be changed.


