background image

1

A

B

C

D

Summary of Contents for homecontrols EKRSENDI1BA

Page 1: ...Installer and user reference guide Daikin Home Controls Room Sensor EKRSENDI1BA ...

Page 2: ...1 A B C D ...

Page 3: ...2 3 ...

Page 4: ...4 5 E F G H G H ...

Page 5: ...7 6 I ...

Page 6: ...c mechanical or chemical means without the written consent of the publisher Typographical and printing errors cannot be excluded However the information contained in this manual is reviewed on a regular basis and any necessary corrections will be implemented in the next edition We accept no liability for technical or typographical errors or the consequences thereof All trademarks and industrial pr...

Page 7: ...1 Connecting to the DHC Access Point 12 5 2 Mounting 13 5 2 1 Adhesive strip mounting 13 5 2 2 Screw mounting 14 5 2 3 Flush mounted box mounting 15 6 Replacing batteries 17 7 Troubleshooting 18 7 1 Weak battery 18 7 2 Duty cycle 19 7 3 Error codes and flashing sequences 20 8 Restore factory settings 22 9 Maintenance and cleaning 23 10 General information about radio operation 24 11 Technical spec...

Page 8: ...sory to other persons for use hand over this manual as well Symbols used Attention This indicates a hazard Please note This section contains important additional informa tion 2 Hazard information Do not open the accessory It does not contain any parts that can be maintained by the user In the event of an error have the accessory checked by an expert For safety and licensing reasons CE unautho rize...

Page 9: ... pieces of polystyrene etc can be dangerous in the hands of a child We do not assume any liability for damage to prop erty or personal injury caused by improper use or the failure to observe the hazard information In such cases any claim under warranty is extin guished For consequential damages we assume no liability The accessory may only be operated within resi dential buildings Using the access...

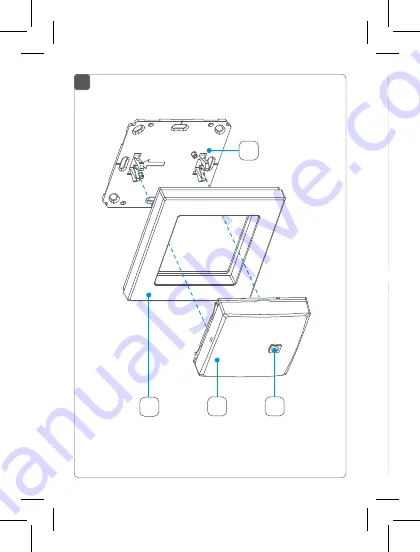
Page 10: ...ured comfort ably and individually via the ONECTA app The available functions provided by the DHC ecosystem in combina tion with other accessories are described in the DHC Application Guide All current technical documents and updates can be found on the product pages https qr daikin eu N EKRSENDI1BA 4 The DH and hu DHC A to regu a look formed the cor Mounti on fram sory int Access A B C D ...

Page 11: ...to regulate the room climate according to your needs Take a look at the home screen of the app and you will be in formed about the temperature and the current humidity of the corresponding room Mounting and removal are particularly easy using the clip on frame supplied It is also possible to integrate the acces sory into existing switches of other manufacturers Accessory overview see figure 1 A Cl...

Page 12: ...tem and enable it to communicate with other DHC accessories you must connect it to your DHC Access Point first To do so proceed as follows 1 Open the ONECTA app 2 Click on the plus symbol 3 Select the menu item Add Daikin Home Controls 4 Select Add DHC Accessory 5 Remove the sensor B from the frame by grab bing the sides of the sensor and pulling it out see figure 2 6 Turn over the sensor 7 Remove...

Page 13: ...efore starting to mount the accessory You can use the supplied clip on frame A to mount the DHC Room Sensor or easily integrate it into an existing switch see 5 2 2 Screw mounting on page 14 You can fix the DHC Room Sensor to a wall with the supplied double sided adhesive strips or the supplied screws You can also mount the DHC Room Sensor on a flush mounted box 5 2 1 Adhesive strip mounting To mo...

Page 14: ...e assembled DHC Room Sensor with the back side to the wall 5 2 2 Screw mounting To mount the DHC Room Sensor with screws proceed as follows 1 Choose a site for installation Make sure that no electricity or similar lines run in the wall at this location 2 Position the mounting plate D on the desired site on the wall Make sure that the arrow on the back side of the mounting plate is pointing upwards...

Page 15: ...me A to the mounting plate 7 Place the DHC Room Sensor B into the frame see figure 1 Make sure that the clips on the mounting plate latch into the openings on the DHC Room Sensor 5 2 3 Flush mounted box mounting You can mount the DHC Room Sensor on a flush mounted box using the screw holes G see figure 5 If the accessory is mounted to a flush mounted box there may be no open conductor ends If chan...

Page 16: ...owledge is particularly important during installation The 5 safety rules to be used Disconnect from mains Safeguard from switching on again Check that system is de energised Earth and short cir cuit Cover or cordon off neighbouring live parts Select suitable tools measuring equipment and if necessary personal safety equipment Evaluation of measuring results Selection of electrical installation mat...

Page 17: ...e electronic unit B can easily be pulled out of the clip on frame A or removed from the mounting plate D Grab the sides of the electronic unit and pull it out see figure 2 You do not need to open the accessory 2 Turn the electronic unit over to replace the batte ries 3 Insert two new 1 5 V LR03 micro batteries Make sure that you insert them the right way round see figure 7 4 Place the electronic u...

Page 18: ...eg ular domestic waste Instead take them to your local battery disposal point 7 Troubleshooting 7 1 Weak battery Provided that the voltage value permits it the accessory will remain ready for operation even if the battery voltage is low Depending on the particular load it may be possible to send transmissions again repeatedly once the batteries have been allowed a brief recovery period If the volt...

Page 19: ... is the maximum transmission time It is the ratio of the time that a device is actively transmitting in comparison to the measurement period 1 hour and is expressed as a percentage of 1 hour If the total amount of allowed transmission time is reached the DHC accessory will stop transmitting until the time limit is reached For example when a device has a duty cycle limit of 1 it is only allowed to ...

Page 20: ...hort orange flashing Radio transmission attempting to transmit data transmission Wait until the trans mission is completed 1x long green lighting Transmission confirmed Continue operation 1x long red lighting Transmission operation failed or duty cycle limit is reached Try again see 7 2 Duty cycle on page 19 Short orange lighting after green or red confirmation Batteries empty Replace the batterie...

Page 21: ...hing every 10 seconds Connection mode active Follow the instruc tions in the app to add accessory see 5 1 Connecting to the DHC Access Point on page 12 6x long red flashing Accessory defective Contact your reseller 1x orange and 1 x green light ing after insert ing batteries Test LED After the test LED has stopped you can continue ...

Page 22: ...of the clip on frame Grab the sides of the electronic unit and pull it out see figure 2 2 Remove a battery 3 Insert the battery again see figure 7 and long press the system button C at the same time until the LED quickly starts flashing orange see figure 3 4 Release the system button again 5 Long press the system button again until the LED lights up green 6 Release the system button to finish the ...

Page 23: ...out any maintenance other than replacing the battery when necessary Enlist the help of an expert to car ry out any repairs Clean the accessory using a soft lint free cloth that is clean and dry You may dampen the cloth a little with lukewarm water in order to remove more stubborn marks Do not use any detergents containing solvents as they could corrode the plastic housing and label ...

Page 24: ...lable in the open air Be sides the transmitting power and the reception characteristics of the receiver environmental fac tors such as humidity in the vicinity have an import ant role to play as do on site structural screening conditions Hereby Daikin Europe N V declares that the radio equip ment type DHC EKRSENDI1BA is in compliance with the Directive 2014 53 EU The original declaration of confor...

Page 25: ... consumption 20 mA max Battery life typ 2 years Degree of protection IP20 Ambient temperature 5 to 35 C Dimensions W x H x D Without frame 55 x 55 x 19 mm Including frame 86 x 86 x 20 mm Weight 85 g including batteries Radio frequency band F1 868 0 868 6 MHz F2 869 4 869 65 MHz Maximum radiated power 10 dBm Receiver category SRD category 2 Typ open area RF range 130 m Duty cycle F1 1 per h F2 10 p...

Page 26: ... of at local collection points for waste electronic equip ment in compliance with the Waste Electrical and Electronic Equipment Directive Information about conformity The CE sign is a free trading sign addressed exclu sively to the authorities and does not include any warranty of any properties For technical support contact your specialist deal er ...

Page 27: ...omestic osed of equip cal and d exclu de any st deal ...

Page 28: ...Free download of the ONECTA app 4P687368 1 2022 04 ...

Reviews: