background image

SiENBE28-901

Field Settings

Air Cooled Refrigeration Condensing Unit

33

„

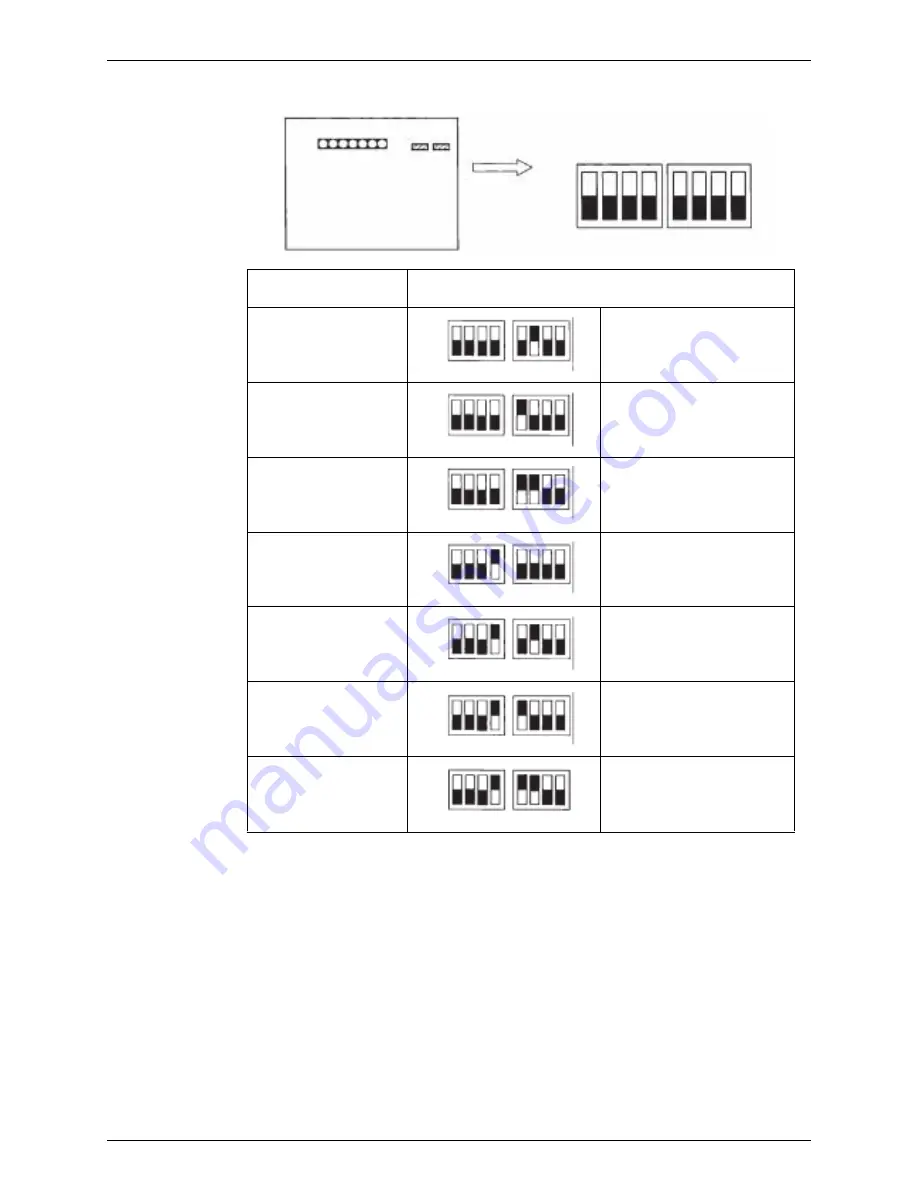
Refrigerator: LRMEQ5~20AY1 (E)

Applicable model

Setting method (

„

the position of switches)

LRMEQ5AY1 (E)

Set DS2-2 to ON

LRMEQ6AY1 (E)

Set DS2-1 to ON

LRMEQ8AY1 (E)

Set DS2-1 and DS2-2 to 
ON

LRMEQ10AY1 (E)

Set DS1-4 to ON

LRMEQ12AY1 (E)

Set DS1-4 and DS2-2 to 
ON

LRMEQ15AY1 (E)

Set DS1-4 and DS2-1 to 
ON

LRMEQ20AY1 (E)

Set DS1-4, DS2-1 and 
DS2-2 to ON

LED

EB****

DS1DS2

Factory Set (

„

the position of a switch)

ON

OFF

1

2

3

4

1

2

3

4

DS1

DS2

ON

OFF

1 2 3 4

1 2 3 4

ON

OFF

1 2 3 4

1 2 3 4

ON

OFF

1 2 3 4

1 2 3 4

ON

OFF

1 2 3 4

1 2 3 4

ON

OFF

1 2 3 4

1 2 3 4

ON

OFF

1 2 3 4

1 2 3 4

ON

OFF

1 2 3 4

1 2 3 4

Summary of Contents for LRLEQ5AY1(E)

Page 1: ...Manual Air Cooled Refrigeration Condensing Unit LRLEQ5AY1 E LRLEQ6AY1 E LRLEQ8AY1 E LRLEQ10AY1 E LRLEQ12AY1 E LRLEQ15AY1 E LRLEQ20AY1 E LRMEQ5AY1 E LRMEQ6AY1 E LRMEQ8AY1 E LRMEQ10AY1 E LRMEQ12AY1 E LRMEQ15AY1 E LRMEQ20AY1 E ...

Page 2: ...ing From Outdoor Unit 30 4 Description of Functions and Operation 40 4 1 Operating Mode 40 4 2 Outline of Functions 47 4 3 Detailed Description of Functions 48 5 Test Operation 57 5 1 Refrigerant Piping 57 5 2 Field Wiring 63 5 3 Inspection and Pipe Insulation 66 5 4 Checks after Work Completion 69 5 5 Additional Refrigerant Charge 69 5 6 Test Run 71 6 Troubleshooting 73 6 1 Checking Points at Ser...

Page 3: ...ited acts Sections under or in the vicinity of this symbol provide the specific descriptions of prohibited acts This symbol alerts you to mandatory acts or instructions Sections under or in the vicinity of this symbol provide the specific descriptions of instructions I Precautions for Construction and Repair WARNING 1 To overhaul the equipment be sure to turn OFF all power supplies 2 If a refriger...

Page 4: ...ck whether or not the refrigerating cycle part gets hot and then repair the equipment Not doing so may result in a burn 13 Use a welder in well ventilated areas Using the welder in an enclosed room may result in lack of oxygen II Precautions for Equipment after Construction and Repair WARNING 14 To repair the equipment be sure to use parts listed in the List of Service Parts for the applicable mod...

Page 5: ...n an electric shock or a fire Putting heavy things on heating or pulling the power supply cord will result in damage to it 20 Do not cause anything other than the specified refrigerant e g air to get mixed in the refrigerant system Doing so will cause the refrigerant system to have abnormally high internal pressure thus resulting in damage to the equipment or bodily injury Doing so will cause the ...

Page 6: ...ions and wiring conditions of parts as well as the connections of soldered parts and crimpstyle terminals are all normal 30 After the completion of repair be sure to make measurement of insulation resistance to prove that it is not less than 1MΩ Insulation failures may result in an electric shock If any of these items is abnormal an electric shock heat generation or a fire may result 28 If the ins...

Page 7: ...utdoor unit LR M E Q 5 A Y1 Power supply symbol Y1 3φ 380 415V 50Hz Indicates major design category Capacity indication 5 5HP Refrigerant Q R 410A Compressor type E Intermediate INJ type Temperature zone to be used M Medium temperature MT L Low temperature LT Product category L Low temperature air conditioner R Outdoor unit ...

Page 8: ...ensions H W D mm 1680 635 765 Heat Exchanger Cross fin coil Compressor Type Hermetically sealed scroll type Piston Displacement m3 h 10 04 13 85 Number of Revolutions r p m 4740 6540 Motor Output Number of Units kW 2 3 3 2 Starting Method Direct on line Inverter system Fan Type Propeller fan Motor Output kW 0 35 1 Air Flow Rate m3 min 95 102 Drive Direct drive Connecting Pipes Liquid Pipe φ9 5 C12...

Page 9: ...ger Cross fin coil Compressor Type Hermetically sealed scroll type Piston Displacement m3 h 19 68 23 36 25 27 Number of Revolutions r p m 4320 2900 6060 2900 6960 2900 Motor Output Number of Units kW 2 1 3 6 3 0 3 6 3 4 3 6 Starting Method Direct on line Inverter system Fan Type Propeller fan Motor Output kW 0 75 1 Air Flow Rate m3 min 171 179 191 Drive Direct drive Connecting Pipes Liquid Pipe φ9...

Page 10: ...er Cross fin coil Compressor Type Hermetically sealed scroll type Piston Displacement m3 h 30 00 35 80 Number of Revolutions r p m 5640 2900 6960 2900 Motor Output Number of Units kW 2 8 3 6 3 6 3 4 3 6 3 6 Starting Method Direct on line Inverter system Fan Type Propeller fan Motor Output kW 0 75 2 Air Flow Rate m3 min 230 240 Drive Direct drive Connecting Pipes Liquid Pipe φ12 7 C1220T Brazing co...

Page 11: ...765 Heat Exchanger Cross fin coil Compressor Type Hermetically sealed scroll type Piston Displacement m3 h 10 04 13 85 Number of Revolutions r p m 4740 6540 Motor Output Number of Units kW 2 3 3 2 Starting Method Direct on line Inverter system Fan Type Propeller fan Motor Output kW 0 35 1 Air Flow Rate m3 min 95 102 Drive Direct drive Connecting Pipes Liquid Pipe φ9 5 C1220T Brazing connection Gas...

Page 12: ...er Cross fin coil Compressor Type Hermetically sealed scroll type Piston Displacement m3 h 19 68 23 36 25 27 Number of Revolutions r p m 4320 2900 6060 2900 6960 2900 Motor Output Number of Units kW 2 1 3 6 3 0 3 6 3 4 3 6 Starting Method Direct on line Inverter system Fan Type Propeller fan Motor Output kW 0 75 1 Air Flow Rate m3 min 171 179 191 Drive Direct drive Connecting Pipes Liquid Pipe φ9 ...

Page 13: ...ger Cross fin coil Compressor Type Hermetically sealed scroll type Piston Displacement m3 h 30 00 35 80 Number of Revolutions r p m 5640 2900 6960 2900 Motor Output Number of Units kW 2 8 3 6 3 6 3 4 3 6 3 6 Starting Method Direct on line Inverter system Fan Type Propeller fan Motor Output kW 0 75 2 Air Flow Rate m3 min 230 240 Drive Direct drive Connecting Pipes Liquid Pipe φ12 7 C1220T Brazing c...

Page 14: ...UKV A023 UKV A024 DC12V 0 26A DC12V 0 26A DC12V 0 26A Body UKV 18D20 0 480pls Coil Y3E M1C UKV A023 UKV A024 DC12V 0 26A DC12V 0 26A Body UKV 32D49 0 480pls Four way valve Coil Y3S STF G01AQ531A1 STF G01AQ532A1 STF G01AQ537A1 Body STF 0404G STF 0713G STF2011G Solenoid valve Coil Y2S M2C NEV MOAJ562D1 NEV MOAJ562D1 Body VPV 603D VPV 603D Coil Y5S M3C NEV MOAJ562C1 Body VPV 603D Pressure protection ...

Page 15: ... for continuous operation Range for pull down operation Evaporating temperature C 4D064913 40 35 30 25 20 15 10 5 10 5 0 15 45 40 35 30 25 20 15 5 10 30 35 40 DO NOT SELECT THE MODEL IN THE RANGE FOR PULL DOWN OPERATION TO BE MORE THAN 3 C HOUR THAT THE TEMPERATURE OF INDOOR UNIT DROPS DO NOT OPEN THE DOOR AND DO NOT ENTER THE GOODS IN PULL DOWN OPERATION AS MUCH AS Outdoor temperature CDB Range f...

Page 16: ... 2 3 4 IS CONNECTOR COLOR FOR PRINTED CIRCUIT BOARD IS CONNECTOR COLOR FOR COMPONENT IS DISCRIMINATION COLOR FOR COMPONENT LEAD WIER X36A X18A X31A X32A X21A BLK X22A P S4PH t R1T S1NPL S1NPH 5 Y1E M WHT BLK 5 Y2E M TERMINAL OF M1C U V W LAYOUT OF M1C M1F CONTROL BOX M1C M1F OUTER SHELL CONTROL BOX A1P S1S X2M A9P X1A X2A X1M A5P X3M FRONT A3P A2P L1R A4P BACK NOTES A1P PRINTED CIRCUIT BOARD MAIN ...

Page 17: ...SUPPLY A1P A3P X1A X2A CONNECTOR M1F C63 C66 CAPACITOR A3P Q1RP PHASE REVERSAL DETECT CIRCUIT X1M TERMINAL STRIP POWER SUPPLY DS1 DS2 DIP SWITCH A1P R10 RESISTOR CURRENT SENSOR A4P A5P X1M TERMINAL STRIP OPERATION A5P F1U FUSE 8A DC650V A4P R50 R59 RESISTOR A3P X2M TERMINAL STRIP F1U F2U FUSE T 3 15A 250V A1P R95 RESISTOR CURRENT LIMITING X3M TERMINAL STRIP REMOTE SWITCH F3U F4U FUSE T 1 0A 250V R...

Page 18: ...A4P A8P X1M TERMINAL STRIP OPERATION A5P F1U FUSE 8A DC650V A4P A8P R50 R59 RESISTOR A3P X2M TERMINAL STRIP F1U F2U FUSE T 3 15A 250V A1P R95 RESISTOR CURRENT LIMITING X3M TERMINAL STRIP REMOTE SWITCH F3U F4U FUSE T 1 0A 250V R1T THERMISTOR AIR A1P Y1E ELECTRONIC EXPANSION VALVE MAIN F400U FUSE T 6 3A 250V A2P R1T THERMISTOR FIN A3P Y2E ELECTRONIC EXPANSION VALVE GAS H1P 8P PILOTLAMP SERVICE MONIT...

Page 19: ...TER RECEIVER FUSIBLE PLUG CHECK VALVE PRESSURE REGULATING VALVE FAN M HEAT EXCHANGER FILTER STOP VALVE HIGH PRESSURE SWITCH DEFROST FOUR WAY VALVE STOP VALVE SERVICE PORT GAUGE PORT HIGH PRESSURE SENSOR SENPH HPS CHECK VALVE FILTER CAPILLARY TUBE OIL SEPARATOR HIGH PRESSURE SWITCH HPS COMPRESSOR INV LOWPRESSURE SENSOR SENPL GAUGE PORT SERVICE PORT LIQUID PIPE φ9 5 C1220T GAS PIPE φ19 1 C1220T STOP...

Page 20: ...GER FILTER STOP VALVE HIGH PRESSURE SWITCH DEFROST FOUR WAY VALVE STOP VALVE SERVICE PORT GAUGE PORT HIGH PRESSURE SENSOR S1NPH S4PH CHECK VALVE FILTER CAPILLARY TUBE OIL SEPARATOR HIGH PRESSURE SWITCH COMPRESSOR INV LOWPRESSURE SENSOR S1NPL GAUGE PORT SERVICE PORT LIQUID PIPE φ9 5 C1220T GAS PIPE φ25 4 C1220T STOP VALVE WITH SERVICE PORT φ7 9mm FLARE CONNECTION CHECK VALVE FILTER S1PH ELECTRONIC ...

Page 21: ...P VALVE SERVICE PORT GAUGE PORT HIGH PRESSURE SENSOR S1NPH S4PH CHECK VALVE FILTER CAPILLARY TUBE OIL SEPARATOR HIGHPRESSURE SWITCH COMPRESSOR INV LOWPRESSURE SENSOR S1NPL GAUGE PORT SERVICE PORT LIQUID PIPE φ12 7 C1220T GAS PIPE φ31 8 C1220T STOP VALVE WITH SERVICE PORT φ7 9mm FLARE CONNECTION CHECK VALVE FILTER S1PH ELECTRONIC EXPANSION VALVE OIL SEPARATOR CAPILLARY TUBE HIGHPRESSURE SWITCH S3PH...

Page 22: ...vice port For gas high pressure 16 Service port For liquid high pressure 17 Service port For gas low pressure 18 Oil separator Refrigerant gas discharged from the compressor contains lubricating oil in the compressor If the amount of this lubricating oil is large the oil quantity in the compressor will become short which may result in defective lubrication Furthermore this oil stains the heat tran...

Page 23: ...E REGULATING VALVE FAN M HEAT EXCHANGER FILTER STOP VALVE HIGH PRESSURE SWITCH DEFROST FOUR WAY VALVE STOP VALVE SERVICE PORT GAUGE PORT HIGH PRESSURE SENSOR S1NPH S4PH CHECK VALVE FILTER CAPILLARY TUBE OIL SEPARATOR HIGHPRESSURE SWITCH S1PH COMPRESSOR INV LOWPRESSURE SENSOR S1NPL GAUGE PORT SERVICE PORT LIQUID PIPE φ9 5 C1220T GAS PIPE φ19 1 C1220T STOP VALVE WITH SERVICE PORT φ7 9mm FLARE CONNEC...

Page 24: ...ndard Specification Air Cooled Refrigeration Condensing Unit 23 LRMEQ5 6AY1 LRLEQ5 6AY1 19 10 18 C R31T 2 M1F 6 7 S1NPH S1NPL 15 B A F 8 1 M1C S1PH R6T R1T R2T 20 11 E D R3T R5T 16 14 9 3 Y1E 13 Y2E 4 5 Y3S 12 17 S4PH ...

Page 25: ...n primary side Used to service 18 Stop valve Double pipe heat exchanger on secondary side Used to service 19 Service port For gas high pressure 20 Service port For liquid high pressure 21 Service port For gas low pressure 22 Oil separator Refrigerant gas discharged from the compressor contains lubricating oil in the compressor If the amount of this lubricating oil is large the oil quantity in the ...

Page 26: ...STOP VALVE SERVICE PORT HIGH PRESSURE SENSOR S1NPH S4PH CHECK VALVE FILTER CAPILLARY TUBE OIL SEPARATOR HIGHPRESSURE SWITCH COMPRESSOR INV LOWPRESSURE SENSOR S1NPL GAUGE PORT SERVICE PORT LIQUID PIPE φ9 5 C1220T GAS PIPE φ25 4 C1220T STOP VALVE WITH SERVICE PORT φ7 9mm FLARE CONNECTION CHECK VALVE FILTER S1PH ELECTRONIC EXPANSION VALVE OIL SEPARATOR FILTER CAPILLARY TUBE HIGHPRESSURE SWITCH S2PH C...

Page 27: ... Air Cooled Refrigeration Condensing Unit LRMEQ8 10 12AY1 LRLEQ8 10 12AY1 16 C R31T S1NPH 23 14 22 6 7 Y3E Y2S D R32T 3 M1F 9 21 10 S1NPL B 11 R2T S1PH 12 S2PH A 1 2 M1C R1T M2C R5T Y2E Y3S S4PH 18 F R3T E R6T G 15 24 20 5 Y1E 4 13 8 17 19 ...

Page 28: ...e liquid receiver 21 Stop valve Heat exchanger on primary side Used to service 22 Stop valve Double pipe heat exchanger on secondary side Used to service 23 Service port For gas high pressure 24 Service port For liquid high pressure 25 Service port For gas low pressure 26 Oil separator Refrigerant gas discharged from the compressor contains lubricating oil in the compressor If the amount of this l...

Page 29: ...NSOR S1NPH S4PH CHECK VALVE FILTER CAPILLARY TUBE OIL SEPARATOR HIGHPRESSURE SWITCH COMPRESSOR INV LOWPRESSURE SENSOR S1NPL GAUGE PORT SERVICE PORT LIQUID PIPE φ12 7 C1220T GAS PIPE φ31 8 C1220T STOP VALVE WITH SERVICE PORT φ7 9mm FLARE CONNECTION CHECK VALVE FILTER S1PH ELECTRONIC EXPANSION VALVE OIL SEPARATOR CAPILLARY TUBE HIGH PRESSURE SWITCH S3PH COMPRESSOR STD2 CHECK VALVE CHECK VALVE SOLENO...

Page 30: ...ration Condensing Unit 29 LRMEQ15 20AY1 LRLEQ15 20AY1 C R31T 26 8 Y3E Y2S D R32T 13 S1NPL B R2T A 1 2 M1C R1T M2C R5T Y2E Y3S S4PH G 9 Y2S Y5S 11 18 27 20 R33T E 4 12 S1NPH 16 S3PH 15 S2PH 3 M2C M3C R6T H R3T F 28 22 6 Y1E 24 19 7 17 21 10 25 23 5 14 S1PH ...

Page 31: ...temperature may be lower than that specified if the outdoor temperature is too low This is intended to protect the compressors Do not set the evaporation temperature to less than the values below This may damage the compressors MT series 20 C LT series 45 C 1 Field settings by dip switches Be sure to turn off the power before changing the DIP switch settings DS1 1 to 3 enable setting the saturated...

Page 32: ...1 Tsd LRMEQ LRLEQ LRMEQ LRLEQ 10 C 0 47MPa 35 C 0 11MPa 0 C 0 69MPa 25 C 0 22MPa 20 C 0 29MPa 45 C 0 03MPa 5 C 0 82MPa 20 C 0 29MPa 15 C 0 37MPa 40 C 0 07MPa 10 C 0 98MPa 5 C 0 56MPa 30 C 0 16MPa ON OFF 1 2 3 4 Factory set ON OFF 1 2 3 4 ON OFF 1 2 3 4 ON OFF 1 2 3 4 ON OFF 1 2 3 4 ON OFF 1 2 3 4 ON OFF 1 2 3 4 ON OFF 1 2 3 4 Factory set ...

Page 33: ...ng the switch of subject Freezer LRLEQ5 20AY1 E Applicable model Setting method the position of switches LRLEQ5AY1 E Set DS2 2 and DS2 4 to ON LRLEQ6AY1 E Set DS2 1 and DS2 4 to ON LRLEQ8AY1 E Set DS2 1 DS2 2 and DS2 4 to ON LRLEQ10AY1 E Set DS1 4 and DS2 4 to ON LRLEQ12AY1 E Set DS1 4 DS2 2 and DS2 4 to ON LRLEQ15AY1 E Set DS1 4 DS2 1 and DS2 4 to ON LRLEQ20AY1 E Set DS1 4 DS2 1 DS2 2 and DS2 4 t...

Page 34: ... E Set DS2 1 and DS2 2 to ON LRMEQ10AY1 E Set DS1 4 to ON LRMEQ12AY1 E Set DS1 4 and DS2 2 to ON LRMEQ15AY1 E Set DS1 4 and DS2 1 to ON LRMEQ20AY1 E Set DS1 4 DS2 1 and DS2 2 to ON LED EB DS1DS2 Factory Set the position of a switch ON OFF 1 2 3 4 1 2 3 4 DS1 DS2 ON OFF 1 2 3 4 1 2 3 4 ON OFF 1 2 3 4 1 2 3 4 ON OFF 1 2 3 4 1 2 3 4 ON OFF 1 2 3 4 1 2 3 4 ON OFF 1 2 3 4 1 2 3 4 ON OFF 1 2 3 4 1 2 3 4...

Page 35: ...eck the contents set in Setting mode 2 While in each mode use the MODE button to change settings as shown below BS1 MODE BS2 SET BS3 RETURN BS4 BS5 RESET Setting mode 2 MODE H1P ON Setting mode 1 MODE H1P OFF Monitor mode MODE H1P BLINK Setting mode 3 Simultaneously press and hold the BS1 MODE and BS3 RETURN for a period of 5 seconds Press and hold the BS1 MODE for a period of five seconds Press t...

Page 36: ... the first five seconds when the power supply is turned on If the equipment is normal H2P will be turned off in five seconds H2P lights for abnormality k ON h OFF l BLINK No H1P H2P H3P H4P H5P H6P H7P Immediately after power on 1 h l k h h h h No H1P H2P H3P H4P H5P H6P H7P 5 seconds after power on 1 h h k h h h h ...

Page 37: ... h k h h 5 C k h h h k h k 1 C k h h h k k h 2 C k h h h k k k 3 C k h h k h h h 4 C k h h k h h k 5 C k h h k h k h LRM L EQ H1P H2P H3P H4P H5P H6P H7P 5 6AY1 8 10 12AY1 15 20AY1 No limitation Factory set k h h h h h k 10A 20A 36A k h h h h k h 9A 18A 30A k h h h k h h 7A 14A 27A k h h k h h h H1P H2P H3P H4P H5P H6P H7P Details depend on the following 1 Factory set k h h h h h k Setting 1 k h h...

Page 38: ...g step 1 Setting step 2 k h h h h h k Setting step 2 Setting step 4 k h h h h k h Setting step 3 Setting step 6 k h h h h k k Setting step 4 Setting step 8 k h h h k h h Setting step 5 Setting step 10 k h h h k h k Setting step 6 Setting step 12 k h h h k k h H1P H2P H3P H4P H5P H6P H7P Highpressurecorrection 0 Factoryset k h h h h h k High pressure correction 0 2 k h h h h k h High pressure corre...

Page 39: ...ons Setting item H1P H2P H3P H4P H5P H6P H7P 6 AIRNET address k h h h k k h 16 Virtual indoor unit address setting k h k h h h h When there is 1 outdoor unit set the address to 1 When there are multiple outdoor units outdoor outdoor transmission connection contact the After Sales Service Division H1P H2P H3P H4P H5P H6P H7P Pleasegivethe addressof 1or moretowhenyou dotheAIRNET Usesbinary numbersfo...

Page 40: ... a remote switch connect the wire to the terminal using a ring connector refer to Figure 2 or connect it to terminal C refer to Figure 3 The terminal connectors must be protected with insulation sleeves By using the Setting Mode 2 8 9 you can change the amount of evaporation temperature shift that is allowed during the night time evaporation temperature correction The shift amount is factory set t...

Page 41: ...le This includes a mode in which the system is stopped 2 Operating modes 5 6 and 7 are INV compressor abnormal operation modes If operating mode is 4 or 7 the STD1 compressor may be defective If operating mode is 1 2 or 5 the STD2 compressor may be defective 3 The state in which all the compressors are stopped is operating mode 0 Compressor Cooling operation Operating Mode 1 compressor 2 compresso...

Page 42: ...d Operation Air Cooled Refrigeration Condensing Unit 41 1 Operation Mode 1 In case of 1 compressor In case of 2 compressors HPSL HPS1 HP Td1 INV Tg LP EV2 TL EV1 Tce Ti Ta HPSL HPS1 HPS2 HP Td1 Td2 LP Ti EV3 SV2 INV STD1 Tg EV2 TL EV1 Tce Ta ...

Page 43: ...scription of Functions and Operation SiENBE28 901 42 Air Cooled Refrigeration Condensing Unit In case of 3 compressors HPSL HPS1 HPS2 HP Td1 Td2 EV3 SV2 INV STD1 Tg EV2 TL EV1 Tce Ta HPS3 Td3 SV3 STD2 Ti ...

Page 44: ...led Refrigeration Condensing Unit 43 2 Operation Mode 2 In case of 2 compressors In case of 3 compressors HPSL HPS1 HPS2 HP Td1 Td2 LP Ti EV3 SV2 INV STD1 Tg EV2 TL EV1 Tce Ta HPSL HPS1 HPS2 HP Td1 Td2 EV3 SV2 INV STD1 Tg EV2 TL EV1 Tce Ta HPS3 Td3 SV3 STD2 Ti ...

Page 45: ...ion Condensing Unit 3 Operation Mode 3 In case of 3 compressors 4 Operation Mode 4 In case of 3 compressors HPSL HPS1 HPS2 HP Td1 Td2 EV3 SV2 INV STD1 Tg EV2 TL EV1 Tce Ta HPS3 Td3 SV3 STD2 Ti HPSL HPS1 HPS2 HP Td1 Td2 EV3 SV2 INV STD1 Tg EV2 TL EV1 Tce Ta HPS3 Td3 SV3 STD2 Ti ...

Page 46: ...igeration Condensing Unit 45 5 Operation Mode 5 Defective of INV In case of 2 compressors In case of 3 compressors HPSL HPS1 HPS2 HP Td1 Td2 LP EV3 SV2 INV STD1 Tg EV2 TL EV1 Tce Ta Ti HPSL HPS1 HPS2 HP Td1 Td2 EV3 SV2 INV STD1 Tg EV2 TL EV1 Tce Ta HPS3 Td3 SV3 STD2 Ti ...

Page 47: ...it 6 Operation Mode 6 Defective of INV In case of 3 compressors 7 Operation Mode 7 Defective of INV In case of 3 compressors HPSL HPS1 HPS2 HP Td1 Td2 EV3 SV2 INV STD1 Tg EV2 TL EV1 Tce Ta HPS3 Td3 SV3 STD2 Ti HPSL HPS1 HPS2 HP Td1 Td2 EV3 SV2 INV STD1 Tg EV2 TL EV1 Tce Ta HPS3 Td3 SV3 STD2 Ti ...

Page 48: ...tor Outdoor heat exchanger outlet thermistor Outdoor air thermistor High pressure switch Protection device Startup control Thermostat ON OFF Compressor control Outdoor fan control Electronic expansion valve control Solenoid valve control Oil return control Four way valve control High pressure protection control Low pressure protection control Overheat protection control STD compressor overcurrent ...

Page 49: ... Lpm1 obtained after an outdoor temperature correction is made Lpm1 Pressure equivalent to the evaporation temperature set by the dip switches Tsd Evaporation temperature set by the dip switches LP The pressure detected by the low pressure sensor S1NPL Inverter compressor Activation complete Operation output Fan Operation prior to compressor activation Air flow rate corresponding to the outdoor te...

Page 50: ...hes to determine its pressure equivalent DS1 Tsd Lpm1 DS1 Tsd Lpm1 LRMEQ LRLEQ LRMEQ LRLEQ 10 C 0 47MPa 35 C 0 11MPa 0 C 0 69MPa 25 C 0 22MPa 20 C 0 29MPa 45 C 0 03MPa 5 C 0 82MPa 20 C 0 29MPa 15 C 0 37MPa 40 C 0 07MPa 10 C 0 98MPa 5 C 0 56MPa 30 C 0 16MPa ON OFF 1 2 3 4 Factory set ON OFF 1 2 3 4 ON OFF 1 2 3 4 ON OFF 1 2 3 4 ON OFF 1 2 3 4 ON OFF 1 2 3 4 ON OFF 1 2 3 4 ...

Page 51: ...actual differential pressure This is intended to maintain lubrication See the Oil return control section Reduces the number of compressors being operated or the compressor speed according to the actual low pressure and the speed at which the pressure is reduced When stopping the STD compressor Operation mode is not 1 5 or 7 Low pressure LP Rapidly dropping LP When reducing the INV compressor speed...

Page 52: ...6 46 80 STD 2 6 6 80 7 27 88 STD 1 7 47 88 STD 2 7 7 88 8 28 96 STD 1 8 48 96 STD 2 8 8 96 8 10 12 15 20AY1 9 29 104 STD 1 15 20AY1 9 49 104 STD 2 9 9 104 10 30 110 STD 1 10 50 110 STD 2 10 10 110 11 31 116 STD 1 11 51 116 STD 2 11 11 116 12 32 124 STD 1 12 52 124 STD 2 12 12 124 13 33 132 STD 1 8AY1 13 53 132 STD 2 13 13 132 14 34 144 STD 1 14 54 144 STD 2 14 14 144 15 35 158 STD 1 15 55 158 STD ...

Page 53: ...g sound Outdoor fan Lpm Pressure equivalent to the target evaporation temperature HP High pressure or Fan control Fan speed up control Fan speed down control Every 20 to 60 seconds Every 60 seconds Increases the speed by 1 tap Reduces the speed by 1 tap High pressure fan control INVfintemperature control Lpm 0 59 MPa HP 1 86 MPa For 5 6 15 and 20AY1 models Lpm 0 59 MPa HP Lpm 1 27 MPa For 8 10 and...

Page 54: ... 400 460 560 630 680 795 870 Fan Fan tap 0 1 2 3 4 5 6 7 8 9 Outdoor fan standard mode Revolution rpm 0 350 370 400 460 530 630 710 760 795 Fan Fan tap 0 1 2 3 4 5 6 7 8 9 Outdoorfan highstaticpressuremode Revolution rpm 0 350 370 400 460 560 630 760 821 870 Fan Fan tap 0 1 2 3 4 5 6 7 8 9 Outdoor fan standard mode Revolution rpm 0 350 370 400 460 560 680 795 821 850 Fan Fan tap 0 1 2 3 4 5 6 7 8 ...

Page 55: ...and 20 AY1 models a solenoid valve is installed in the intermediate injection line of the STD compressor The valve will operate in synch with STD compressor and allow the refrigeration oil to be returned to the STD compressor s that are in operation Additionally the valve will create a gas injection economizer circuit OutdoorEV2condensation avoidancecontrol or The discharge pipe temperature thermi...

Page 56: ... high pressure switch operating pressure 3 8 MPa is activated high pressure sensor reading 3 567 MPa the compressor will stop and declare a problem abnormal stop To reset turn off the power switch or operation switch and turn it back on again Oil return control Objective Recovers the refrigeration oil from the evaporator by putting the refrigerant into a wet state by utilizing a delay in response ...

Page 57: ...rmal stop The discharge gas temperature 150 C 12 STD compressor overcurrent protection control The following condition is met the system will stop operation STD compressors will resume operation after 30 minutes in standby If a compressor repeats this procedure twice E0 will be sent to the AIRNET If it repeats it three times the relevant compressor will stop The STD compressor current 14 95A for 2...

Page 58: ... replenishment Refer to 5 4 CHECKS AFTER WORK COMPLETION and the label of instructions on refrigerant replenishment on the cover surface of the control box Important information regarding the refrigerant used This product contains fluorinated greenhouse gases covered by the Kyoto Protocol Do not vent gases into the atmosphere Refrigerant type R410A GWP 1 value 2090 1 GWP global warming potential P...

Page 59: ...of residual substances such as the oxidation of refrigerant oil and the generation of scale is considered If the indoor unit or outdoor unit is disconnected from the piping for a long time The intrusion of water and dust into the piping is considered The copper pipe is corroded The refrigerant of the condensing unit previously used was other than R410A e g R404A R507 or R407C The contamination of ...

Page 60: ...34 9 1 1 1 2H type Piping between branching areas B b C c Select the piping from the following table in accordance with the total capacity of indoor units connected downstream No size after branching can exceed the size of any upstream piping Piping between branching areas and each unit Adjust the size of the piping so that it will coincide with the size of piping connecting to the indoor unit LT ...

Page 61: ...ons is completed Do not leave the shutoff valve opened without turning the power on otherwise refrigerant may be condensed in the compressor and the insulation of the main power supply circuit may be degraded Be sure to use an exclusive tool to handle the shutoff valve The shutoff valve is not of back sheet type Excessive force imposed may break the valve Use a charge hose when using the service p...

Page 62: ... Be sure to tighten the valve cover securely after operating the valve Refer to Operation Method of Shutoff Valves for the tightening torque of the valve Handling Precautions for Service Port Work on the service port with a charge hose provided with a pushing rod At the time of mounting the cap apply a screw lock agent to the screw thread Do not apply a screw lock agent for flare nut use to the se...

Page 63: ...not in operation Use a Y joint for the liquid refrigerant branch and have the piping branch horizontally Use a T joint for the gas refrigerant branch and connect from the top of the main piping Make sure that the horizontal portion of the gas piping slants downward to the outdoor unit see the illustration above If the outdoor unit is located above make a trap on the gas pipe at 5 m intervals from ...

Page 64: ...ts A power circuit see the following table must be provided for connection of the unit This circuit must be protected with the required safety devices i e a main switch a slow blow fuse on each phase and an earth leakage circuit breaker When using residual current operated circuit breakers be sure to use a high speed type 1 second or less 200mA rated residual operating current Use copper conductor...

Page 65: ...ue 1 European International Technical Standard setting the limits for voltage changes Voltage fluctuations and flicker in public low voltage supply systems for equipment with rated current 75A 2 European International Technical Standard setting the limits for harmonic currents produced by equipment connected to public low voltage systems with input current 16A and 75A per phase Warning alarm and o...

Page 66: ...lowing diagram X3M wire specifications Caution For Remote switch use non voltage contact for microcurrent not more than 1mA 12VDC If the remote operating switch will be used to start and stop the unit set the operating switch to REMOTE Electric wire thickness 0 75 1 25mm2 Max wiring length 130m X3M Secure remote operating switch wiring to the resin block using a clamp field supply 1 2 ...

Page 67: ...pply from the service port 2 do not exceed the design pressure The system is considered to have passed if there is no decrease in the pressure over a period of 24 hours If there is a decrease in the pressure check for and repair leaks Vacuum drying Connect a vacuum pump to the service ports of both the liquid and gas pipes for at least 2 hours and vacuum the unit down to 100 7 kPa or below Then le...

Page 68: ... piping Failure to do so may result in water leakage Consult the following chart as a general guide when selecting the insulation thickness Liquid pipe arrival minimum temperature 10 C Gas pipe arrival minimum temperature 20 C MT Medium Temperature 40 C LT Low Temperature Reinforce the insulation material for the refrigerant piping according to the environment of thermal installation Otherwise the...

Page 69: ... Wiring 2 Has the insulation of the main power circuit deteriorated Measure the insulation and check the insulation is above regular value in accordance with relevant local and national regulations For those doing pipe work 1 Make sure piping size is correct See 5 1 2 Selection of Piping Material 2 Make sure insulation work is done See 5 3 2 Thermal Insulation Work 3 Make sure there is no faulty r...

Page 70: ... the inspection hole on the right hand side of the control box lid after the outdoor unit is turned on see the illustration The compressor will not operate for approximately 2 minutes after the outdoor unit is turned on H2P blinks for the first five seconds when the power supply is turned on If the equipment is normal H2P will be turned off in five seconds H2P lights for abnormality Warning Use pr...

Page 71: ...door unit and replenish refrigerant while the outdoor unit is in operation d Turn off the RUN switch of the outdoor unit after the specified amount of refrigerant is replenished e Caution Fully open the shutoff valves on the gas and liquid sides promptly Otherwise a piping explosion may result from liquid sealing 1 The cylinder s internal pressure will drop when there is little refrigerant remaini...

Page 72: ...tdoor switch to ON Note Before turning power on check that the piping cover and control box lid of the outdoor unit are closed 3 Check the sealing condition of the outdoor unit through the sight glass Make sure that the amount of refrigerant is sufficient 4 Make sure that cold air blows from the indoor unit Check that the internal temperature is dropping Check that the temperature will drop and re...

Page 73: ...med for several seconds after the operating switch is set to ON and each compressor starts operating so disconnecting the power supply during that time will result in a false detection LED indication Installation failure Remedy BS3 switch pressed once BS2 switch pressed once H1P H2P H3P H4P H5P H6P H7P H1P H2P H3P H4P H5P H6P H7P l h k h h l l l k h h h l l The shutoff valves were left closed Full...

Page 74: ...Remove the obstacles Equipmentdoes not run Check to be sure the malfunction code on the remote controller Countermeasure to the malfunction code Check to be sure the malfunction LED display on the outdoor unit PCB Countermeasure to the malfunction LED display Symptoms Causes Equipmentdoes not operate When the equipment is restart immediately after it stops The equipment is controlled in an afforda...

Page 75: ...circuit breaker of the outdoor unit to ON 2 Set the main circuit breaker to ON again The forced backup operation will be initiated Precautions Item Measuring method Right range High pressure MPa Measure with a service checker or pressure gauge in a stable state 20 minutes or more after starting operation 2 1 2 7 MPa Low pressure MPa Measure with a service checker or pressure gauge in a stable stat...

Page 76: ...itch from OFF to LOCAL or REMOTE 3 Contact our service department for details about the setting procedures for the AIRNET and service checker and the precautions for use 3 1 When using the AIRNET Specify the outdoor unit AirNet address settings Setting Mode 2 06 Specify the virtual indoor unit address settings Setting Mode 2 16 The settings described above are necessary even if you are not using t...

Page 77: ...ec or more Discharge pipe temp 130 C 14 Shutdown ON Alarm ON Alarm ON Discharge pipe temp 110 C and EV2_pls 450 pls and EV3_pls 450 pls continuously for 60 sec 3 Shutdown ON Alarm ON Alarm ON 5 Shutdown ON Alarm ON 7 Shutdown ON 9 3 sensor malfunction H0 Outdoor air thermistor Suction pipe thermistor Discharge pipe thermistor Heatexchanger intermediate inlet thermistor Heatexchanger intermediate o...

Page 78: ...ED Steps Operate the pushbuttons on the PCB in Setting Mode 1 and malfunction codes will be displayed by LEDs Follow the steps below to check your unit 1 Press the MODE button BS1 Setting Mode 1 will be entered 2 Pressing the SET button BS2 will go to item No 1 see the list of output items 3 Pressing the RETURN button BS3 will display any error for item No 1 using the LED Normal OFF Error Blinking...

Page 79: ...2 H6P blinks when CT2 sensor error occurs 19 Setting Mode 1 No 7 Protection device HPS H7P blinks when HPS is detected 20 Setting Mode 1 No 7 HPSL H6P blinks when HPSL is detected 21 Setting Mode 1 No 8 Transmission INV H7P blinks when INV transmission error occurs 22 Setting Mode 1 No 9 INV error 1 L1 H7P blinks when L1 error occurs 23 Setting Mode 1 No 9 L4 H6P blinks when L4 error occurs 24 Set...

Page 80: ...tronic Expansion Valve Coil P 97 l h k h l h l l k h h h l l F3 Abnormal Discharge Pipe Temperature P 99 l h k h l h h l k h h h h h H0 Three sensor Malfunction P 101 h h l l H3 Malfunction Related to High Pressure Switch P 103 h l l l H7 Abnormal Outdoor Fan Motor Signal P 104 l h h l H9 Malfunction of Outdoor Air Thermistor P 106 l h k h l l h l k h h h l h J2 Current Sensor Malfunction P 107 h ...

Page 81: ...he software for PCB Hp_code The comparison between HP_code and the model on the RAM Monitor screen is as follows 1 5AY1 2 6AY1 3 8AY1 4 10AY1 5 12AY1 6 15AY1 7 20AY1 Operation_SW OPERATION switch bits OFF ON 0 1 unit_driving No need for checking because it is not used Mode Present mode of operation Next_mode The following mode of operation Before_mode The previous mode of operation Mode_complete D...

Page 82: ...condensation pressure equivalent saturation temperature calculation value Teg Gas side evaporation pressure equivalent saturation temperature calculation value Mark on RAM Monitor Mark of paragraph of trouble repair Mark of electric wiring diagram chart Meaning 52ci INV M1C INV compressor driven bits OFF ON 0 1 52C1_ X5A STD1 M2C STD1 compressor driven bits OFF ON 0 1 52C2_ X6A STD2 M3C STD2 compr...

Page 83: ...onitor Meaning Inv_1_Amp The first inverter current Inv_2_Amp The second inverter current Fin_Temp Temperature of INV fin Fan1_1_Amp The first fan1 current Fan1_2_Amp The second fan1 current Fan2_1_Amp The first fan2 current Fan2_2_Amp The second fan2 current Mark on RAM Monitor Meaning Irregular stop Irregular stop bits Normality abnormality 0 1 Inv_Abnomal_fixation Inverter compressor abnormalit...

Page 84: ...ing of Inverter Compressor Overload F12 L5 Frequency of retrying of Inverter Compressor instantaneous Overcurrent F13 U2 Frequency of retrying of Abnormal Power Supply Voltage F14 L4 Frequency of retrying of Malfunction of Inverter Radiating Fin Temperature Rise F17 P1 Frequency of retrying of Power Supply Voltage Imbalance F21 E7 Frequency of retrying of Malfunction of Outdoor Unit Fan1 Motor F22...

Page 85: ...MEQ8 20AY1 LRLEQ8 20AY1 Method of Malfunction Detection Detects the overcurrent with current sensor CT Malfunction Decision Conditions Malfunction is decided when the detected current value exceeds 14 95A for 2 seconds Supposed Causes Closed stop value Obstacles at the air outlet Improper power voltage Faulty magnetic switch Faulty compressor Faulty current sensor A6P A7P Defect of outdoor unit PC...

Page 86: ...onnect connector or parts damage may be occurred Is the stop valve open Obstacle exists around the air outlet Is the power supply voltage normal Is the magnetic switch K2M K3M normal 1 Check the wiring from power supply current sensor A6P A7P MgS K2M K3M compressor Is above wiring correct Is current sensor correct 1 NO YES YES NO NO YES NO YES NO YES NO YES Open the stop valve Remove the obstacle ...

Page 87: ...e device circuit Malfunction Decision Conditions When there is a earth leakage breaker ON OFF Within 10 seconds after the power is turned on When there is a earth leakage leakage detector PCB If the high pressure switch is activated but the pressure is not very high Supposed Causes Compressor or the complete product has defective insulation High pressure switch connection failure Faulty leakage de...

Page 88: ... on the power Leakage detector PCB is energized High pressure switch is energized at both ends YES NO YES YES NO YES NO YES NO YES NO YES NO YES NO Reset the power with the operation switch set to OFF Earth leakage breaker ON OFF E2 Replace the defective parts Earth leakage leakage detector PCB E2 Replace the defective parts Earth leakage leakage detector PCB E2 Correct connection Replace the leak...

Page 89: ... continuity in the high pressure switch Malfunction Decision Conditions Error is generated when the HPS activation count reaches the number specific to the operation mode Reference Operating pressure of high pressure switch Operating pressure 3 8MPa Reset pressure 2 85MPa Supposed Causes Actuation of outdoor unit high pressure switch Defect of high pressure switch Defect of outdoor unit main PCB A...

Page 90: ...ce checker to compare the high pressure value and the actual measurement value by pressure sensor Refer to 1 by using the service checker Check if the high pressure value and the actual measurement valueby pressuresensor are the same The high pressure sensor is normal and the pressure detected with the PCB is also normal The high pressure has really become high Referring to information on P134 rem...

Page 91: ...etection Abnormality is detected by the pressure value with the low pressure sensor Malfunction Decision Conditions Error is generated when the low pressure is dropped under compressor operation Low pressure 0 00MPa Detected within 3 hours after power on Supposed Causes Abnormal drop of low pressure Defect of low pressure sensor Defect of outdoor unit PCB Stop valve is not opened Shortage of gas M...

Page 92: ...he low pressure sensor is normal and the pressure detected with the PCB is also normal The low pressure has really become low Referring to information on P135 remove the causes by which the low pressure has become low CHECK 6 1 Make a comparison between the voltage of the pressure sensor and that read by the pressure gauge 2 Make measurement of voltage of the pressure sensor NO YES NO YES NO YES O...

Page 93: ...erved in the phase current waveform Malfunction Decision Conditions This malfunction will be output when the inverter compressor motor does not start up even in forced startup mode Supposed Causes Inverter compressor lock High differential pressure 0 5MPa or more Incorrect UVW wiring Faulty inverter PCB Stop valve is left in closed Slugging state of refrigerant Abrasion of sliding parts caused by ...

Page 94: ... OFF Power ON Restartandcheckthe operation Checkifthecondition occursagain Checkif thestart modeisinthe highdifferentialpressure notless than0 5MPa YES NO YES NO YES NO YES NO Check if the wiring has any error in mistake for inverter compressor NO YES NO YES YES NO NO YES Local factor Open the stop valve Replace the connecting wires and ensure right connection of the connector Ensure correct conne...

Page 95: ...lfunction Decision Conditions The fan revolutions are kept at less than a certain value for a period of not less than 6 seconds when the fan motor meets rotating conditions The revolutions detection connector is disconnected When the malfunction occurs 4 times an alarm will be output When it occurs 5 times the system will go down Supposed Causes Failure of fan motor Defect or connection error of t...

Page 96: ... X1A and X2A Check if any connector is disconnected YES NO Check the relay connectors for their color For fan motor 1 White for all power supply and signal cables For fan motor 2 Red on the PCB side and white on the motor side for all power supply and signal cables Relay connectors have any connection error YES NO A Remove the foreign substances Insert the connector Correct the connection of the r...

Page 97: ...asesoffanmotorisoutof balance or shortcircuit between UVWphases YES NO Check fan motor connector signal wire The signal wire short circuits between Vcc and GND and between UVW and GND YES NO Put the power supply ON to check the following LED lamps 1 HAP lamp on the compressor PCB A3P 2 HAP lamp on the fan inverter PCB A4P HAP lamp for the A4P does not blink on the condition that HAP lamp for A3P i...

Page 98: ...RLEQ5 20AY1 Method of Malfunction Detection To be detected based on continuity existence of coil of electronic expansion valve Y1E Malfunction Decision Conditions No current is detected in the common COM when power supply is ON Supposed Causes Disconnection of connectors for electronic expansion valve Y1E Y2E Y3E Defect of electronic expansion valve coil Defect of outdoor unit main PCB A1P ...

Page 99: ...P for electronicexpansionvalve is connected NO YES The coil resistance of electronic expansion valve is normal Refer to 1 NO YES External factor other than malfunction for example noise etc Ensure correct connection Replace the electronic expansion valve coil Replace outdoor unit PCB A1P Make measurement of resistance between the connector pins and then make sure the resistance falls in the range ...

Page 100: ... Supposed Causes Faulty discharge pipe temperature sensor Faulty discharge pipe temperature thermistor Faulty outdoor unit PCB Insufficient injection at intermediate heat exchanger outlet caused by flash gas due to gas leakage or insufficient volume of refrigerant Clogging of electronic expansion valve for injection Failure to open the maintenance valve Insufficient insulation of onsite suction pi...

Page 101: ...cker with actual measurement value of discharge pipe thermistor Refer to 1 Check if temperature of discharge pipe by using service checker is the same with actual measurementvalueofdischarge pipe thermistor YES NO Discharge pipe thermistor is normal and the temperature detection of the main PCB is also normal Actually the temperature of discharge pipe is high Check 3 Remove the factor of overheat ...

Page 102: ...RLEQ5 20AY1 Method of Malfunction Detection Malfunction is detected from the values detected by pressure sensors and temperature sensors thermistors Malfunction Decision Conditions Three or more out of the pressure sensors and the temperature sensors thermistors causes a Sensor malfunction respectively Supposed Causes Faulty connection of sensor Faulty outdoor unit PCB ...

Page 103: ...t thermistor R5T R5T R5T J9 Heat exchanger inlet thermistor R6T R6T R6T JA High pressure sensor S1NPH X32A S1NPH X32A S1NPH X32A JC Low pressure sensor S1NPL X31A S1NPL X31A S1NPL X31A Caution Be sure to turn off power switch before connect or disconnect connector or parts damage may be occurred Three or more sensors malfunction Check for the malfunction history malfunction code on the remote cont...

Page 104: ...ubleshooting 1 The table below shows the connector numbers of the high pressure switch Model Relevant PCB Electric symbol Connector No LRMEQ5 6AY1 LRLEQ5 6AY1 A1P S1PH X2A LRMEQ8 10 12AY1 LRLEQ8 10 12AY1 A1P S1PH S2PH X2A X3A LRMEQ15 20AY1 LRLEQ15 20AY1 A1P S1PH S2PH S3PH X2A X3A X4A Caution Be sure to turn off power switch before connect or disconnect connector or parts damage may be occurred Is ...

Page 105: ...LRMEQ5 20AY1 LRLEQ5 20AY1 Method of Malfunction Detection Detection of abnormal signal from fan motor Malfunction Decision Conditions In case of detection of abnormal signal at starting fan motor Supposed Causes Abnormal fan motor signal circuit malfunction Broken short or disconnection connector of fan motor connection cable Fan Inverter PCB malfunction A4P or A8P ...

Page 106: ...d wire between Vcc and UVW and between GND and UVW are balanced YES NO Ensure correct connection Replace the fan motor Replace the inverter PCB z For fan motor 1 replace the inverter PCB A4P z For fan motor 2 replace the inverter PCB A8P 1 Check procedure for fan motor connector 1 Power OFF the fan motor 2 Remove the connector X2A on the PCB to measure the following resistance value Judgement crit...

Page 107: ...ature and resistance characteristics of thermistor refer to the table shown below Temp C Resistance kΩ Temp C Resistance kΩ 0 2 4 6 8 65 8 59 4 53 7 48 6 44 0 30 32 34 36 38 16 1 14 8 13 6 12 5 11 5 10 12 14 16 18 40 0 36 3 33 0 30 1 27 4 40 42 44 46 48 10 6 9 8 9 1 8 4 7 7 20 22 24 26 28 25 0 22 9 20 9 19 1 17 5 50 52 54 56 58 7 2 6 7 6 2 5 7 5 3 Caution Be sure to turn off power switch before co...

Page 108: ... PCB Defective compressor Troubleshooting Caution Be sure to turn off power switch before connect or disconnect connector or parts damage may be occurred Is the connector for current sensor connected to X25A X26A on outdoor unit PCB A1P YES NO Are the current sensors inversely connected to two STD compressors NO YES NO YES Applicable compressor coil wire is broken Is the current sensor mounted on ...

Page 109: ...plicable Models LRMEQ5 20AY1 LRLEQ5 20AY1 Method of Malfunction Detection Malfunction is detected from the temperatures detected by thermistors Malfunction Decision Conditions While in operation any of the thermistors causes a broken wire or a short circuit in it Supposed Causes Faulty connection of thermistor Faulty thermistor Faulty outdoor unit PCB ...

Page 110: ...M3C thermistor R33T J5 Suction pipe thermistor R2T X30A R2T X30A R2T X30A J8 Heat exchanger outlet thermistor R5T R5T R5T J9 Heat exchanger inlet thermistor R6T R6T R6T JA High pressure sensor S1NPH X32A S1NPH X32A S1NPH X32A JC Low pressure sensor S1NPL X31A S1NPL X31A S1NPL X31A Caution Be sure to turn off power switch before connect or disconnect connector or parts damage may be occurred Is the...

Page 111: ...unction Detection Malfunction is detected from the pressure detected by the high pressure sensor Malfunction Decision Conditions When the high pressure sensor is short circuit or open circuit Not less than 4 3MPa or 0 01MPa and below Supposed Causes Defect of high pressure sensor Connection of low pressure sensor with wrong connection Defect of outdoor unit PCB Defective connection of high pressur...

Page 112: ...normal Make a comparison between the voltage characteristics 1 and the gauge pressure YES NO If the PCB pressure detection normal Make a comparison between the checker pressure data and the voltage characteristics 1 YES NO Reset the operation and then restart the outdoor unit Are the characteristics of the high pressure sensor normal 2 YES NO Replace the high pressure sensor Replace the main PCB R...

Page 113: ...from pressure detected by low pressure sensor Malfunction Decision Conditions When the low pressure sensor is short circuit or open circuit Not less than 1 8MPa or 0 1MPa and below Supposed Causes Defect of low pressure sensor Connection of high pressure sensor with wrong connection Defect of outdoor unit PCB Defective connection of low pressure sensor Piping with wrong connection Reduction of low...

Page 114: ...isticsofthelow pressuresensor normal Make acomparisonbetweenthe voltagecharacteristics 1 and thegaugepressure NO YES If thePCBpressuredetection normal Makeacomparison betweenthechecker pressure dataandthevoltage characteristics 1 NO YES Reset the operation and then restart the outdoor unit Are the characteristics of the low pressure sensor normal 2 NO YES Correct the piping Replace the low pressur...

Page 115: ... operation at startup Malfunction Decision Conditions An overcurrent OCP flows while waveform is outputted The current sensor malfunctions while in synchronized operation IGBT malfunctions Supposed Causes Faulty inverter PCB A3P Faulty IPM Faulty current sensor Faulty IGBT or drive circuit Troubleshooting Caution Be sure to turn off power switch before connect or disconnect connector or parts dama...

Page 116: ... C YES NO Turn OFF the power supply and then make measurement of resistance of the radiation fin thermistor Is the resistance of the thermistor normal NO YES Connect and disconnect the radiation fin thermistor connector X111A to properly connect it Turn ON the power supplytostartoperation and then check whether the malfunction recurs YES NO Faulty radiation of power unit Blocked air inlet Dirty ra...

Page 117: ...n the power transistor Malfunction Decision Conditions An overcurrent 59 1A flows even instantaneously Supposed Causes Faulty compressor coil e g broken wire or insulation failure Compressor startup failure mechanical lock Faulty inverter PCB Slugging of refrigerant Abrasion of sliding parts caused by wet operation due to faulty secondary equipment expansion valve Failure of oil return due to faul...

Page 118: ...eofthe compressor is not more than 100kΩ NO YES There is a broken wire in the compressor coil NO YES Check4 P 133 Is the power transistor normal YES NO Whenrestarting the fault recurs YES NO Power OFF Replace the inverter PCB A3P Whenrestarting the fault recurs YES NO Open the stop valve Replace the compressor lead wire Correct the wirings and wire connections Replace the INV compressor Replace th...

Page 119: ...condary side of the inverter come to the following values 1 Not less than 19A for a period of consecutive 5 seconds 2 Not less than 16 1A for a period of consecutive 260 seconds Supposed Causes Compressor overload Broken wire in compressor coil Disconnection of compressor wiring Faulty inverter PCB Slugging of refrigerant Abrasion of sliding parts caused by wet operation due to faulty secondary eq...

Page 120: ... more than 100kΩ NO YES There is a broken wire in the compressor coil NO YES Check4 P 133 Is the power transistor normal YES NO Open the stop valve Replace the compressor lead wire Correct the wirings and wire connections Replace the INV compressor Replace the INV compressor Replace the inverter PCB A3P Connect the compressor lead wire and then restart operation The malfunction L8 recurs YES NO Is...

Page 121: ... compressor startup sequence is not complete Supposed Causes Failure to open the stop valve Faulty compressor Erroneous wire connections to compressor Large differential pressure prior to compressor startup Faulty inverter PCB Slugging of refrigerant Abrasion of sliding parts caused by wet operation due to faulty secondary equipment expansion valve Failure of oil return due to faulty onsite piping...

Page 122: ...ot less than 100kΩ NO YES Is the compressor lead wire disconnected YES NO Refrigerant is slugging No power is applied for a period of not less than 6 hours NO YES Is the insulation resistance of compressor maintained at not less than 100kΩ NO YES There is a broken wire in the compressor YES NO Charge a proper amount of refrigerant Open the stop valve Eliminate the slugging of refrigerant Eliminate...

Page 123: ... Malfunction Detection Check the communication state between the inverter PCB and the control PCB by micro computer Malfunction Decision Conditions When the correct communication is not conducted in certain period Supposed Causes Faulty connection between the inverter PCB and the main PCB Faulty main PCB transmission part Faulty inverter PCB Faulty noise filter External factors e g noises Faulty I...

Page 124: ...the inverter PCB correct See 2 YES NO The insulation resistance of the INV compressor is not more than 100kΩ NO YES The insulation resistance of the fan motor is not more than 1MΩ NO YES The micro controller normal monitor LED green on the main PCB A3P is blinking YES NO The micro controller normal monitor LED green on the inverter PCB is blinking YES NO The LC malfunction recurs NO YES Properly c...

Page 125: ...ce capable of constant recording of power supply voltage record power supply voltage between 3 phases L1 L2 L2 L3 L3 L1 for about one continuous week No abnormalities are observed in the power supply but the imbalance in voltage recurs Power supply voltage imbalance measure Explanation for users In accordance with notification of inspection results accompanying spare parts Give the user a copy of ...

Page 126: ...er PCB Faulty INV compressor Faulty fan motor Troubleshooting Caution Be sure to turn off power switch before connect or disconnect connector or parts damage may be occurred Make measurement of resistance of the radiation fin thermistor Is the resistance of the thermistor normal See 1 The insulation resistance of the INV compressor is not more than 100kΩ NO YES YES NO The insulation resistance of ...

Page 127: ...phase T is open Supposed Causes Reverse phase of power supply Open phase T of power supply Faulty outdoor unit PCB Troubleshooting Caution Be sure to turn off power switch before connect or disconnect connector or parts damage may be occurred The phase T is open at the power supply terminal block X1M of the outdoor unit YES NO YES NO Changing power supply cable connections between phases enables n...

Page 128: ...of the main circuit capacitor in the inverter Malfunction Decision Conditions When the voltage aforementioned is not less than 780V or not more than 320V or when the current limiting voltage does not reach 200V or more or exceeds 740V Supposed Causes Power supply voltage drop Instantaneous power failure Open phase Faulty inverter PCB Faulty control box PCB Faulty compressor Faulty wiring in the ma...

Page 129: ... insulation resistance is low i e not more than 1MΩ Check the inverter power transistor Has the power transistor got faulty Check the fan driver power transistor Has the power transistor got faulty A NO YES YES YES NO YES NO YES NO YES NO Onsite causes Correct the unbalanced loads to eliminate the unbalanced state Unbalanced voltage will cause extremely unbalanced current thus impairing the servic...

Page 130: ...urs NO NO NO NO YES YES YES YES YES A3P Replace the inverter PCB If the PCB replaced is badly damaged the compressor is likely to get faulty To make sure recheck the compressor A4P A8P Replace the fan driver PCB If the PCB replaced is badly damaged the fan motor is likely to get faulty To make sure recheck the compressor Recheck for the power supply If there is no problem with the power supply rep...

Page 131: ...aulty outdoor unit main PCB Faulty valve coil Faulty valve body Faulty high pressure sensor Faulty indoor unit liquid pipe thermistor Faulty outdoor unit main PCB Short circuit High ambient temp Faulty fan motor Faulty outdoor unit main PCB including capacity setting Dirty filter Obstacles Check to be sure that the stop valve is open Visual check Check for any temp difference before and after filt...

Page 132: ...istance Faulty fan motor Dirty filter Faulty outdoor unit main PCB including capacity setting Obstacles Is the pressure value on the Service Checker matched to the measurement of sensor Are the voltage characteristics normal Is the pressure value on the Service Checker matched to the measurement of sensor Is the coil resistance and the insulation normal Check for thermistor resistance and connecto...

Page 133: ...l Is the coil resistance and the insulation normal Faulty valve coil Faulty valve body Faulty indoor unit gas pipe thermistor Faulty indoor unit liquid pipe thermistor Faulty outdoor unit main PCB Faulty valve coil Faulty valve body Faulty low pressure sensor Faulty suction pipe thermistor Faulty outdoor unit main PCB Is the connector properly connected Are the thermistor resistance characteristic...

Page 134: ... supply Then after a lapse of 10 minutes or more make measurement of resistance Preparation z To make measurement disconnect all connectors and terminals Inverter PCB Electronic circuit According to the checking aforementioned it is probed that the malfunction results from the faulty inverter The following section describes supposed causes of the faulty inverter z Faulty compressor ground leakage ...

Page 135: ...it electronic expansion valve Faulty control Wet operation In defrosting If the outdoor unit electronic expansion valve excessively opens See 2 Dirty evaporator Drop in air volume Degradation in evaporating capacity Faulty valve coil Faulty valve body Faulty indoor unit gas pipe thermistor Faulty indoor unit liquid pipe thermistor Faulty outdoor unit main PCB Faulty valve coil Faulty valve body Fa...

Page 136: ... High pressure Low pressure Operating frequency High pressure gradually rises with increasing operating frequency Low pressure is maintained at a certain level To maintain low pressure operating frequency increases on the capacity control Degree of overcharge Proper amount Further overcharge High pressure drooping control Operating frequency comes to the lowest level Subcooled degree becomes highe...

Page 137: ...tate at a level below 100 7kPa for a period of one or more hours and then check to be sure that the vacuum gauge reading does not rise If the reading rises moisture remains in the system or vacuum leaks from the piping 3 Additional refrigerant charge Purge air from the hose connected to the manifold gauge and then charge a necessary amount of refrigerant Special vacuum drying In case moisture can ...

Page 138: ... in liquid or faulty compressor Excessive oil or refrigerant Faulty inverter PCB E5 Inverter Compressor Lock The compressor is in locked state does not rotate Faulty compressor L4 Rise in Radiation Fin Temperature The radiation fin temperature exceeds the reference value while in operation Malfunction of fan Long term overload operation Faulty inverter PCB U2 Abnormal Power Supply Voltage The inve...

Page 139: ...1 4 5 85 5 8 6 1059 5 84 1 0 65 8 6 9 806 5 64 1 5 51 1 5 5 618 9 49 4 10 40 0 4 4 487 8 38 4 15 31 6 3 6 373 1 30 1 20 25 1 2 9 292 9 23 8 25 20 1 2 4 231 4 18 9 30 16 2 2 0 184 1 15 2 35 13 1 1 6 141 1 12 3 40 10 7 1 4 118 7 10 0 45 8 8 1 1 96 1 8 2 50 7 2 1 0 78 3 6 8 55 6 0 0 82 64 1 5 6 60 5 0 0 70 52 8 4 7 65 4 2 0 60 43 6 3 9 70 3 5 0 51 36 3 3 3 75 3 0 0 44 30 3 2 8 80 2 5 0 38 25 4 2 4 85...

Page 140: ... 28 PH High pressure MPa PL Low pressure MPa VH Output voltage High pressure side VDC VL Output voltage Low pressure side VDC Pressure detected PH PL kg cm2 MPa 51 0 5 0 45 9 4 5 40 8 4 0 35 7 3 5 30 6 3 0 25 5 2 5 20 4 2 0 15 3 1 5 10 2 1 0 5 1 0 5 5 1 0 5 0 High pressure PH 1 7MPa Low pressure PL 0 5 0 0 5 1 1 5 2 2 5 3 3 5 4 VDC Output voltage VH VL ...

Page 141: ...9 m 3 k g 0 0 0 0 9 5 m 3 k g 0 0 0 1 m 3 k g 0 0 0 1 1 0 0 0 1 2 0 0 0 1 3 0 0 0 1 4 0 0 0 1 5 0 0 0 2 m 3 k g 0 0 0 5 m 3 k g 0 0 1 m 3 k g 0 0 2 m 3 kg 0 0 5 m 3 kg 0 1 m 3 k g 0 2 m 3 k g 0 5 m 3 k g 1 m 3 kg 2 m 3 k g 5 m 3 k g 10 m 3 kg 2 9 2 8 2 7 2 6 2 5 2 4 2 3 2 2 2 1 1 0 2 0 k J k g k 1 9 1 8 1 7 1 6 1 5 1 4 1 3 1 2 1 1 1 0k J kg k 0 9 0 8 0 7 0 6 0 5kJ kg k 100 C x 0 0 90 0 9 0 8 0 7 0...

Page 142: ...Example If the volume of the refrigerant recovered is 24kg 24 x 0 05 1 2 liter of oil that should be added Fill port Liquid stop valve service port For details about adding oil see the section that describes the refrigeration oil procedure Location of malfunction Procedure for maintenance 1 Outdoor unit compressors M1C M2C and M3C Solenoid valves for STD1 and STD2 INV electronic expansion valve Fo...

Page 143: ... WET replace the dryer 5 Conduct air tight checks 6 Conduct vacuuming through the service port b and the maintenance valve A and B If the oil needs to be added charge it through the service port a 7 Turn on the power supply for the outdoor unit Then turn on the operation switch for the outdoor unit If a remote controller switch is used enable the remote setting 8 Charge the refrigerant by the same...

Page 144: ...hecks 6 Conduct vacuuming through the service port b and the maintenance valve a and B If the oil needs to be added charge it through the service port A 7 Turn on the power supply for the outdoor unit Then turn on the operation switch for the outdoor unit If a remote controller switch is used enable the remote setting 8 Charge the refrigerant by the same quantity as that recovered Applicable parts...

Page 145: ...onduct vacuuming through the service port b and the maintenance valve a and B If the oil needs to be added charge it through the service port A 7 Turn on the power supply for the outdoor unit Then turn on the operation switch for the outdoor unit If a remote controller switch is used enable the remote setting 8 Charge the refrigerant by the same quantity as that recovered Applicable parts Compress...

Page 146: ...lace the dryer 5 Conduct air tight checks 6 Conduct vacuuming through the service port c and b Then charge the refrigerant according to the quantity as that recovered And then continue vacuuming 7 Turn on the power supply for the outdoor unit Then turn on the operation switch for the outdoor unit If a remote controller switch is used enable the remote setting 8 Charge the refrigerant by the same q...

Page 147: ...checks 6 Conduct vacuuming through the service port c and b Then charge the refrigerant according to the quantity as that recovered And then continue vacuuming 7 Turn on the power supply for the outdoor unit Then turn on the operation switch for the outdoor unit If a remote controller switch is used enable the remote setting 8 Charge the refrigerant by the same quantity as that recovered Applicabl...

Page 148: ...onduct vacuuming through the service port c and b Then charge the refrigerant according to the quantity as that recovered And then continue vacuuming 7 Turn on the power supply for the outdoor unit Then turn on the operation switch for the outdoor unit If a remote controller switch is used enable the remote setting 8 Charge the refrigerant by the same quantity as that recovered Applicable parts Ma...

Page 149: ... the compressor through the liquid stop valve C and gas stop valve D shaped region 6 Conduct air tight checks 7 Conduct vacuuming through the liquid stop valve C and gas stop valve D 8 Turn on the power supply for the outdoor unit Then turn on the operation switch for the outdoor unit If a remote controller switch is used enable the remote setting 9 Charge the refrigerant by the same quantity as t...

Page 150: ...sh count based on the size specified by the solenoid valve and mechanical thermostatic expansion valve being used Route the path to the indoor unit heat exchanger so that the flow or refrigerant is from top to bottom Wlhen installing a number of indoor units be sure to install them at the same level Difference in height between indoor units to be 5m or less Use either off cycle defrosting or elect...

Page 151: ...out at all times A B Manufacture s label value A B Total additional charging amount kg Charging amount Factory set kg Total amount of refrigerant kg Total length of φ15 9 liquid pipes Total length of φ12 7 liquid pipes Total length of φ9 5 liquid pipes Charging amount by piping length m 0 19 m 0 12 m 0 06 1 kg Capacity of showcase Note Amount of refrigerant Showcase Blower coil MT LT less than 5kW...

Page 152: ...rect Additional charge in the field Calculated value depending on piping length 1 3 Wrong Charge at factory Additional charge in the field Calculated value depending on piping length 1 3 Example Additional charge Calculated value 15kg The upper limit of additional charge 19 5kg 15 1 3 19 5 Precaution for charging refrigerant For additional charge please do not charge the upper limit of refrigerant...

Page 153: ...nner Driver Tool Expect the flat type Only small size type Only short shank type Gas injection pipe Suction pipe Discharge pipe Arrow view Method removed piping fixture for gas injection pipe 1 Insert the tool from behind the compressor remove the hexagon head screw A and tube fixture C On the other screw B slacken it 2 Turn the piping fixture on a point of tube holder D fold it toward 3 Cut the p...

Page 154: ...Any secondary damage such as deterioration and corrosion of the goods in the unit is not covered by the manufacturer s warranty Temperature control is the responsibility of the customer Please consider installing the alarming systems and spare units to minimize the damage According to the circumstances we recommend to arrange the damage insurance or after the sales service The unit is provided wit...

Page 155: ...RLEQ6AY1 LRMEQ5AY1 LRMEQ6AY1 LRLEQ5AY1E LRLEQ6AY1E LRMEQ5AY1E LRMEQ6AY1E LRLEQ8AY1 LRLEQ10AY1 LRLEQ12AY1 LRMEQ8AY1 LRMEQ10AY1 LRMEQ12AY1 LRLEQ8AY1E LRLEQ10AY1E LRLEQ12AY1E LRMEQ8AY1E LRMEQ10AY1E LRMEQ12AY1E LRLEQ15AY1 LRLEQ20AY1 LRMEQ15AY1 LRMEQ20AY1 LRLEQ15AY1E LRLEQ20AY1E LRMEQ15AY1E LRMEQ20AY1E Option name Central drain pan kit KWC26C160 HKWC26C160E KWC26C280 HKWC26C280E KWC26C450 HKWC26C450E ...

Page 156: ...compiled the content of this publication to the best of its knowledge No express or implied warranty is given for the completeness accuracy reliability or fitness for particular purpose of its content and the products and services presented therein Specifications are subject to change without prior notice Daikin Europe N V explicitly rejects any liability for any direct or indirect damage in the b...

Reviews: