Installation and Application Considerations
www.DaikinApplied.com
7
IOM 1242-8 • PATHFINDER
®
MODEL AWV CHILLERS
Installation and Application Considerations
Nameplates
Identification nameplates on the chiller:
• The unit nameplate is located on the exterior of the Unit
Power Panel. Both the Model No. and Serial No. are
located on the unit nameplate; the Serial No. is unique to
the unit. These numbers should be used to identify the
unit for service, parts, or warranty questions. This plate
also has the unit refrigerant charge and electrical ratings.
• Vessel nameplate is located on the evaporator. They
have a National Board Number (NB) and a serial number,
either of which identify the vessel (but not the entire unit).
• Compressor nameplate is located on each compressor
and gives pertinent electrical information.
Receiving and Handling
The unit should be inspected immediately after receipt for
possible damage. All Daikin Applied screw air-cooled chillers
are shipped FOB factory and all claims for handling and
shipping damage are the responsibility of the consignee.
Startup by a Daikin Applied service representative is included
on all Pathfinder
®
units sold for installation within the U.S.
and Canada and must be performed by them to initiate the
standard Limited Product Warranty. Startup by any party other
than a Daikin Applied service representative will void the
Limited Product Warranty. Two-week prior notification of startup
is required. The contractor should obtain a copy of the Startup
Scheduled Request Form from the sales representative or from
the nearest Daikin Applied service office. Completed Request
Form and check list on page 3 are required before startup can
be scheduled.
Installation and maintenance are to be performed only by
qualified personnel who are familiar with local codes and
regulations, and experienced with this type of equipment.
CAUTION
Extreme care must be used when rigging the unit to prevent
damage to the control panels and unit frame. Refer to the as-
built submittal drawings provided by a Daikin Applied sales
representative for configuration-specific details including
dimensions, weights, and center of gravity of the unit.
WARNING
When around sharp edges, wear appropriate Personal
Protective Equipment (PPE), such as gloves, protective
clothing, foot wear, eye protection etc. to prevent personal
injury.
WARNING
Escaping refrigerant can displace air and cause suffocation.
Immediately evacuate and ventilate the equipment area.
If the unit is damaged, follow Environmental Protection
Agency (EPA) requirements. Do not expose sparks, arcing
equipment, open flame or other ignition source to the
refrigerant.
DANGER
Improper rigging, lifting, or moving of a unit can result in
property damage, severe personal injury or death. Follow
rigging and moving instructions carefully.
Avoid rough handling shock due to impact or dropping the unit.
Do not push or pull the unit. Never allow any part of the unit
to fall during unloading or moving as this can result in serious
damage.
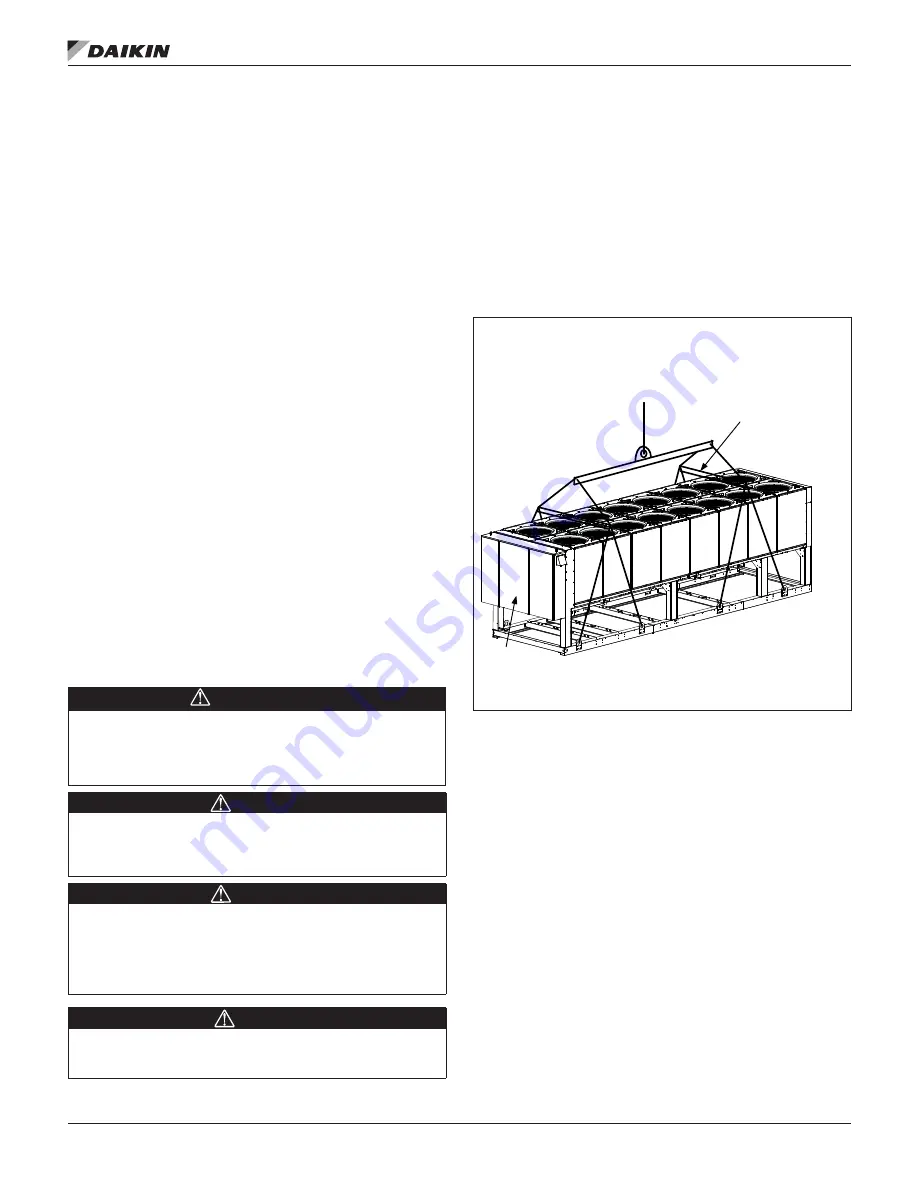
To lift a standard AWV unit, lifting tabs with 3” (76 mm)
diameter holes are provided on the base of the unit. All lifting
holes must be used when lifting the unit. Spreader bars and
cables should be arranged to prevent damage to the unit. (see
).
Figure 1: Rigging for Standard AWV Unit
NOTE:
1. Crosswise and lengthwise spreader bars must be
used to avoid damage to unit. The spreader bars in
are a representation only and may not reflect
the appearance of the actual spreader bars needed.
2. Unit with 8 lifting points illustrated above; the actual
unit configuration may vary from this diagram. See
“Dimensional Drawings” on page 38
for general
lifting locations. Drawings, dimensional values,
weights, and other information may change depending
on options or configurations selected. Refer to the as-
built submittal drawings provided by a Daikin Applied
sales representative for configuration-specific details.
To lift an AWV unit with the Integrated Waterside Economizer
(IWSE) option, tabs with(1) or (2) 3” (76 mm) diameter holes
are provided on the lifting bars extending from the base of the
unit. For double hole lifting lugs, the left lifting holes must be
used when lifting the unit. Spreader bars and cables should
be arranged according to the rigging label provided on the
control panel to prevent damage to the unit. (see
for an example). Lifting bar extensions from the base may be
removed once the unit is in place.
NUMBER OF FANS MAY
VARY FROM THIS DIAGRAM
BUT LIFTING METHOD
REMAINS THE SAME.
ALL PROVIDED RIGGING HOLES
MUST BE USED. LIFT ONLY FROM
CONTROL
PANEL
SPREADER BARS MUST BE
USED TO PREVENT CABINET
DAMAGE. LOCATE BARS
ABOVE UNIT TO CLEAR FAN
GRILLES. MINIMUM DISTANCE
ACROSS UNIT BETWEEN
CABLE OR CHAINS IS
90 INCHES.
BASE POINTS AS SHOWN.
L1
L2
OPPOSITE
SIDE
L3
L4
OPPOSITE
SIDE
L5
L6
OPPOSITE
SIDE
L7
L8
OPPOSITE
SIDE - (NOT ON
NOT SHOWN FOR DRAWING SIMPLICITY.
COMPRESSORS, EVAPORATOR, AND PIPING
REPRESENTATIVE LIFTING SCHEMATIC -
ALL MODELS)


