SiK401004_A
121
MAINTENANCE
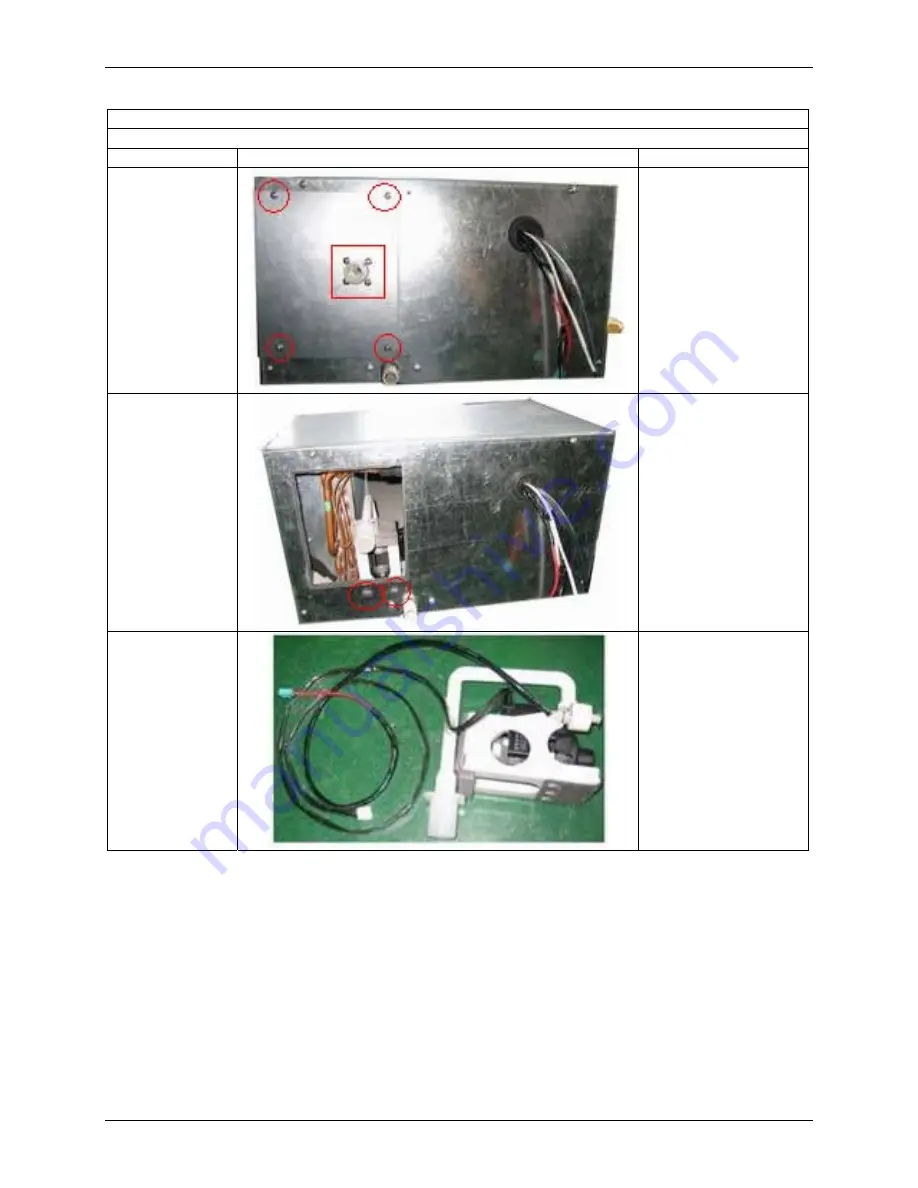
Disassembly of drainage pump
Remark: Make sure that the power supply is cut off before disassembling and protect all the parts during disassembly.
Step Illustration
Handling
Instruction
1. Disassembly of the
screws on
seal-plates of indoor
panels and the
drainage pipe
●
Disassemble the screws on
seal-plates of indoor panels
and the pump drainage pipe.
Remove the seal-plates.(As
is shown in the illustration,
the circle represents screws
on seal-plates and box the
screws on drainage pipe. All
the 8 screws shall be
disassembled. )
2. Disassembly of the
screws on the
drainage pump
●
Disassemble the screws on
the drainage pump. (As is
shown in the graph, the
circle represents the position
of screws.)
3. Removal of
condensed water
drainage pump
●
Removed condensed water
drainage pump is shown in
the illustration.
Summary of Contents for RY24PEV1K
Page 12: ...SiK401004_A SPECIFICATIONS 4 2 NOMENCLATURE 24 E K M V1...
Page 36: ...SiK401004_A SPECIFICATIONS 28 5 PIPING DIAGRAM...
Page 80: ...SiK401004_A INSTALLATION 72 2 5 Installation Clearance Data Figure 2 5 1...
Page 110: ...SiK401004_A MAINTENANCE 102 3 1 2 R24PEV1K 6 3 6 2 5 6 4 3...
Page 111: ...SiK401004_A 103 MAINTENANCE 3 1 3 RY30PEV1K 6 3 6 2 5 3 6 6...
Page 112: ...SiK401004_A MAINTENANCE 104 3 1 4 R30PEV1K 6 3 6 2 5 6 5 0...
Page 113: ...SiK401004_A 105 MAINTENANCE 3 1 5 RY36PEY1K...
Page 114: ...SiK401004_A MAINTENANCE 106 3 1 6 R36PEY1K L L...
Page 115: ...SiK401004_A 107 MAINTENANCE 3 1 7 RY42PEY1K RY48PEY1K L L...
Page 116: ...SiK401004_A MAINTENANCE 108 3 1 8 R42PEY1K R48PEY1K L L...


