SiK401004_A
INSTALLATION
62
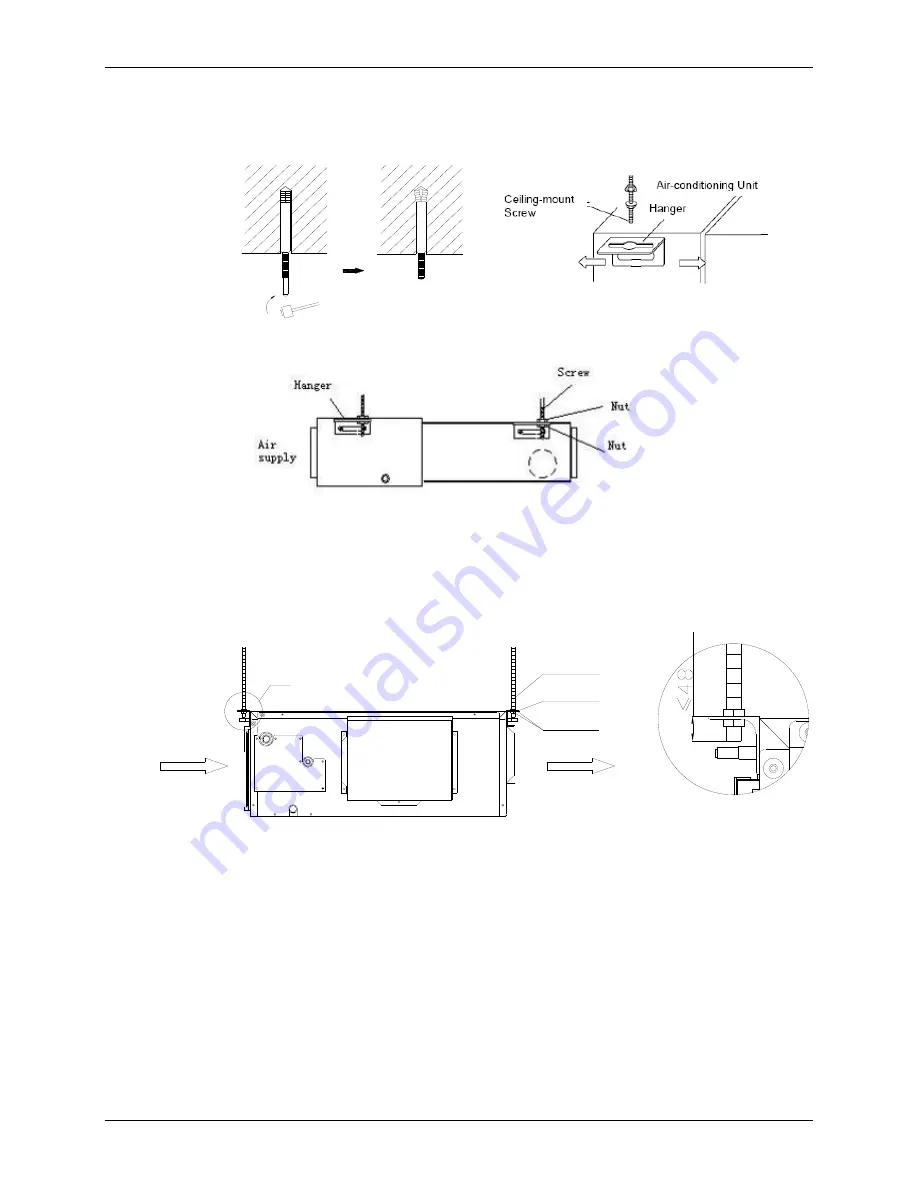
3) Insert a M10 expansion bolt into the hole. Drive a nail into the bolt. Refer to the profile
dimensions drawing of the indoor unit for the distance between the holes. Refer to
Figure 1 for the installation of the expansion bolt, as shown in Figure 1-1-1.
Figure 1-1-1
Figure 1-1-2
Figure
1-1-3
4) Install the hanger onto the indoor unit as shown in Fig.1-1-2.
5) Install the indoor unit at the ceiling as shown in Fig 1-1-5.
Air Supply
Air Intake
Nut
Hanger
Screw
mm
I
Enlargement
I
Figure
1-1-5
6) Precautions for unfavorable installation:
The preparation of all pipes (connecting pipes and drainage pipes) and cables
(connecting lines of wired controller, indoor unit and outdoor unit) must be ready
before the installation, so as to install easily.
Drill an opening on the ceiling. Maybe it is required to support the ceiling to ensure
the evenness of it and avoid the vibration of it. Consult with the user or a
construction company for details.
In case the strength of ceiling is not enough, use angle iron sections to set up a
beam support. Place the unit at the beam and fix it.
Detail
Summary of Contents for RY24PEV1K
Page 12: ...SiK401004_A SPECIFICATIONS 4 2 NOMENCLATURE 24 E K M V1...
Page 36: ...SiK401004_A SPECIFICATIONS 28 5 PIPING DIAGRAM...
Page 80: ...SiK401004_A INSTALLATION 72 2 5 Installation Clearance Data Figure 2 5 1...
Page 110: ...SiK401004_A MAINTENANCE 102 3 1 2 R24PEV1K 6 3 6 2 5 6 4 3...
Page 111: ...SiK401004_A 103 MAINTENANCE 3 1 3 RY30PEV1K 6 3 6 2 5 3 6 6...
Page 112: ...SiK401004_A MAINTENANCE 104 3 1 4 R30PEV1K 6 3 6 2 5 6 5 0...
Page 113: ...SiK401004_A 105 MAINTENANCE 3 1 5 RY36PEY1K...
Page 114: ...SiK401004_A MAINTENANCE 106 3 1 6 R36PEY1K L L...
Page 115: ...SiK401004_A 107 MAINTENANCE 3 1 7 RY42PEY1K RY48PEY1K L L...
Page 116: ...SiK401004_A MAINTENANCE 108 3 1 8 R42PEY1K R48PEY1K L L...


