background image

ESIE12-06

Outlook Outdoor Units

General Information

3

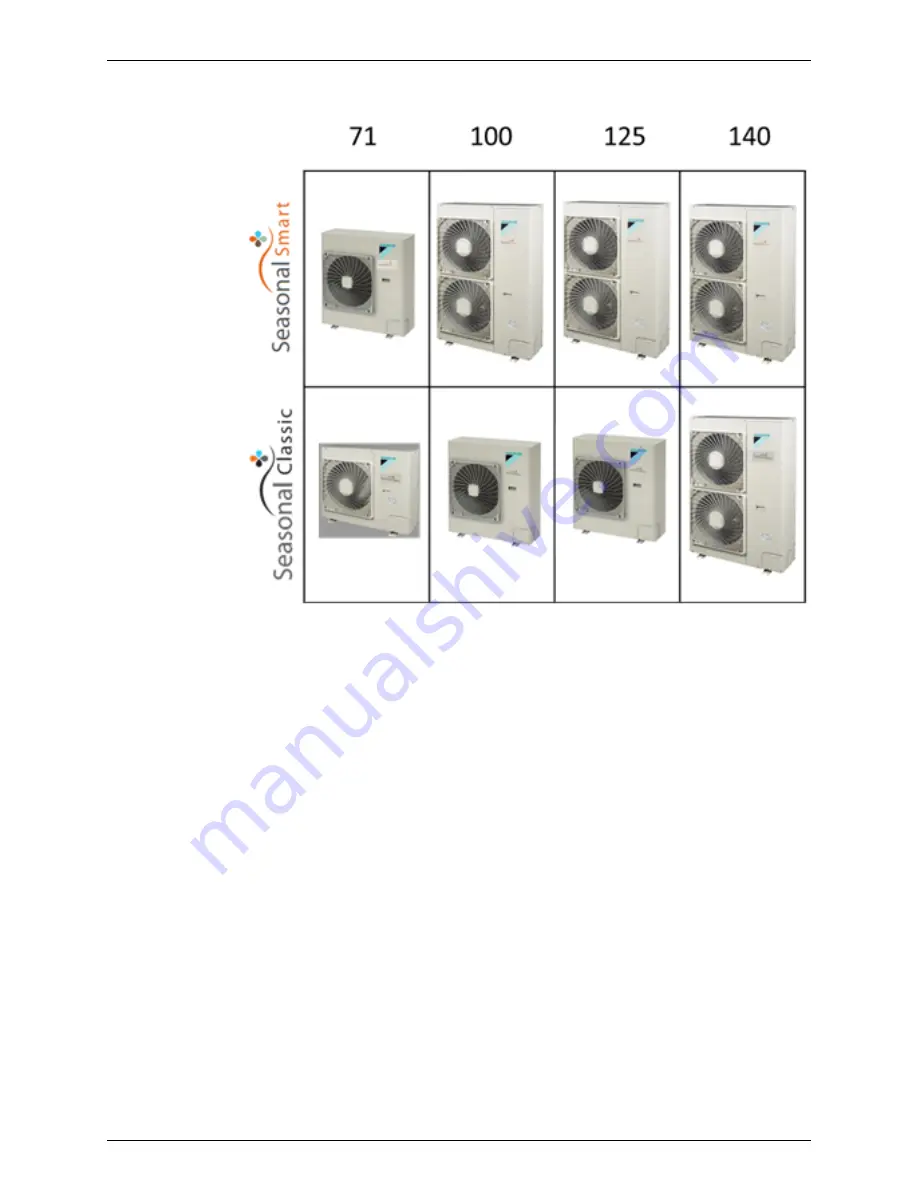
2. Outlook Outdoor Units

Summary of Contents for RZQG71~140L7V1B

Page 1: ...Service Manual GQI Eco Series Heat Pump R 410A 50Hz Smart RZQG71 140L7V1B RZQG71 140L7Y1B Classic RZQSG71 140L7V1B RZQSG71 140L7Y1B ESIE12 06...

Page 2: ......

Page 3: ...Part 4 Remote Controller 79 1 Wired Remote Controller 80 1 1 Applicable Models 80 1 2 Names and Functions 80 1 3 MAIN SUB Setting when Using 2 Remote Controllers 84 1 4 Centralized Control Group No S...

Page 4: ...ice Diagnosis 155 1 Maintenance Inspection 157 1 1 Overview 157 2 Symptom based Troubleshooting 159 2 1 Overview 159 2 2 Equipment does not Operate 160 2 3 Indoor Unit Fan Operates but Compressor does...

Page 5: ...Prevention Time Lag 219 4 26 Transmission System Abnormality between Control and Inverter PCB 221 4 27 Open Phase or Power Supply Voltage Imbalance 222 4 28 Defective Capacity Setting 223 4 29 Refrige...

Page 6: ...er cable plug from the plug socket before disassembling the equipment for repair Working on the equipment that is connected to the power supply may cause an electrical shock If it is necessary to supp...

Page 7: ...ctrical shock Do not clean the air conditioner by splashing water Washing the unit with water may cause an electrical shock Be sure to provide the grounding when repairing the equipment in a humid or...

Page 8: ...t generation or fire When wiring between the indoor and outdoor units make sure that the terminal cover does not lift off or dismount because of the cable If the cover is not mounted properly the term...

Page 9: ...ent children from swallowing it If a child swallows the coin battery see a doctor immediately Warning Caution Installation of a leakage breaker is necessary in some cases depending on the conditions o...

Page 10: ...to install the packing and seal on the installation frame properly If the packing and seal are not installed properly water may enter the room and wet the furniture and floor For unitary type only Ca...

Page 11: ...eries Heat Pump System Daikin offers a wide range of models to respond to building and office air conditioning needs We are confident that customers will be able to find the models that best suit thei...

Page 12: ...ESIE12 06 General Information 1 Part 1 General Information 1 Model Names of Indoor Outdoor Units 2 2 Outlook Outdoor Units 3...

Page 13: ...iven because the combinations are for simultaneous operation indoor units installed in the same room 2 When different indoor models are used in combination designate the remote controller that is equi...

Page 14: ...ESIE12 06 Outlook Outdoor Units General Information 3 2 Outlook Outdoor Units...

Page 15: ...Outlook Outdoor Units ESIE12 06 4 General Information...

Page 16: ...ESIE12 06 Functions 5 Part 2 Functions 1 Functions 5 1 1 Indoor Unit 5 1 2 Outdoor Unit 5...

Page 17: ...ld resistant treatment for filter Mould proofing drain pan Work servicing Drain water lift up mechanism Pre charged for up to 30 m Long life filter Filter sign Ceiling soiling prevention Emergency ope...

Page 18: ...ESIE12 06 Specifications 7 Part 3 Specifications 1 Specifications 8 2 Operation range 75...

Page 19: ...Specifications ESIE12 06 8 Specifications 1 Specifications RZQG71V FVQ71CVEB RZQG71L7V1B...

Page 20: ...ESIE12 06 Specifications Specifications 9 FUQ71BWV1B RZQG71L7V1B FUQ71BVV1B RZQG71L7V1B...

Page 21: ...Specifications ESIE12 06 10 Specifications FHQG71CVEB RZQG71L7V1B FCQHG71FVEB RZQG71L7V1B...

Page 22: ...ESIE12 06 Specifications Specifications 11 FCQG71FVEB RZQG71L7V1B FBQ71C8VEB RZQG71L7V1B...

Page 23: ...Specifications ESIE12 06 12 Specifications FAQ71CVEB RZQG71L7V1B...

Page 24: ...ESIE12 06 Specifications Specifications 13 RZQG71L7V1B...

Page 25: ...Specifications ESIE12 06 14 Specifications RZQG71Y FVQ71CVEB RZQG71L7Y1B...

Page 26: ...ESIE12 06 Specifications Specifications 15 FUQ71BWV1B RZQG71L7Y1B FHQG71CVEB RZQG71L7Y1B...

Page 27: ...Specifications ESIE12 06 16 Specifications FCQHG71FVEB RZQG71L7Y1B FCQG71FVEB RZQG71L7Y1B...

Page 28: ...ESIE12 06 Specifications Specifications 17 FBQ71C8VEB RZQG71L7Y1B FAQ71CVEB RZQG71L7Y1B...

Page 29: ...Specifications ESIE12 06 18 Specifications RZQG71L7Y1B...

Page 30: ...ESIE12 06 Specifications Specifications 19 RZQG100V FVQ100CVEB RZQG100L7V1B FUQ100BWV1B RZQG100L7V1B...

Page 31: ...Specifications ESIE12 06 20 Specifications FUQ100BVV1B RZQG100L7V1B FHQG100CVEB RZQG100L7V1B...

Page 32: ...ESIE12 06 Specifications Specifications 21 FCQHG100FVEB RZQG100L7V1B FCQG100FVEB RZQG100L7V1B...

Page 33: ...Specifications ESIE12 06 22 Specifications FBQ100C8VEB RZQG100L7V1B FAQ100CVEB RZQG100L7V1B...

Page 34: ...ESIE12 06 Specifications Specifications 23 RZQG100L7V1B...

Page 35: ...Specifications ESIE12 06 24 Specifications RZQG100Y FVQ100CVEB RZQG100L7Y1B FUQ100BWV1B RZQG100L7Y1B...

Page 36: ...ESIE12 06 Specifications Specifications 25 FHQG100CVEB RZQG100L7Y1B FCQHG100FVEB RZQG100L7Y1B...

Page 37: ...Specifications ESIE12 06 26 Specifications FCQG100FVEB RZQG100L7Y1B FBQ100C8VEB RZQG100L7Y1B...

Page 38: ...ESIE12 06 Specifications Specifications 27 FAQ100CVEB RZQG100L7Y1B...

Page 39: ...Specifications ESIE12 06 28 Specifications RZQG100L7Y1B...

Page 40: ...ESIE12 06 Specifications Specifications 29 RZQG125V FVQ125CVEB RZQG125L7V1B FUQ125BWV1B RZQG125L7V1B...

Page 41: ...Specifications ESIE12 06 30 Specifications FUQ125BVV1B RZQG125L7V1B FHQG125CVEB RZQG125L7V1B...

Page 42: ...ESIE12 06 Specifications Specifications 31 FDQ125C7VEB RZQG125L7V1B FCQHG125FVEB RZQG125L7V1B...

Page 43: ...Specifications ESIE12 06 32 Specifications FCQG125FVEB RZQG125L7V1B FBQ125C8VEB RZQG125L7V1B...

Page 44: ...ESIE12 06 Specifications Specifications 33 RZQG125L7V1B...

Page 45: ...Specifications ESIE12 06 34 Specifications RZQG125Y FVQ125CVEB RZQG125L7Y1B FUQ125BWV1B RZQG125L7Y1B...

Page 46: ...ESIE12 06 Specifications Specifications 35 FHQG125CVEB RZQG125L7Y1B FDQ125C7VEB RZQG125L7Y1B...

Page 47: ...Specifications ESIE12 06 36 Specifications FCQHG125FVEB RZQG125L7Y1B FCQG125FVEB RZQG125L7Y1B...

Page 48: ...ESIE12 06 Specifications Specifications 37 FBQ125C8VEB RZQG125L7Y1B...

Page 49: ...Specifications ESIE12 06 38 Specifications RZQG125L7Y1B...

Page 50: ...ESIE12 06 Specifications Specifications 39 RZQG140V FVQ140CVEB RZQG140L7V1B FHQG140CVEB RZQG140L7V1B...

Page 51: ...Specifications ESIE12 06 40 Specifications FCQHG140FVEB RZQG140L7V1B FCQG140FVEB RZQG140L7V1B...

Page 52: ...ESIE12 06 Specifications Specifications 41 FBQ140C8VEB RZQG140L7V1B...

Page 53: ...Specifications ESIE12 06 42 Specifications RZQG140L7V1B...

Page 54: ...ESIE12 06 Specifications Specifications 43 RZQG140Y FVQ140CVEB RZQG140L7Y1B FHQG140CVEB RZQG140L7Y1B...

Page 55: ...Specifications ESIE12 06 44 Specifications FCQHG140FVEB RZQG140L7Y1B FCQG140FVEB RZQG140L7Y1B...

Page 56: ...ESIE12 06 Specifications Specifications 45 FBQ140C8VEB RZQG140L7Y1B...

Page 57: ...Specifications ESIE12 06 46 Specifications RZQG140L7Y1B...

Page 58: ...ESIE12 06 Specifications Specifications 47 RZQSG71V FVQ71CVEB RZQSG71L2V1B FHQG71CVEB RZQSG71L2V1B...

Page 59: ...Specifications ESIE12 06 48 Specifications FCQHG71FVEB RZQSG71L2V1B FCQG71FVEB RZQSG71L2V1B...

Page 60: ...ESIE12 06 Specifications Specifications 49 FBQ71C8VEB RZQSG71L2V1B FAQ71CVEB RZQSG71L2V1B...

Page 61: ...Specifications ESIE12 06 50 Specifications RZQSG71L2V1B...

Page 62: ...ESIE12 06 Specifications Specifications 51 RZQSG71V FVQ100CVEB RZQSG100L7V1B FHQG100CVEB RZQSG100L7V1B...

Page 63: ...Specifications ESIE12 06 52 Specifications FCQHG100FVEB RZQSG100L7V1B FCQG100FVEB RZQSG100L7V1B...

Page 64: ...ESIE12 06 Specifications Specifications 53 FBQ100C8VEB RZQSG100L7V1B FAQ100CVEB RZQSG100L7V1B...

Page 65: ...Specifications ESIE12 06 54 Specifications RZQSG100L7V1B...

Page 66: ...ESIE12 06 Specifications Specifications 55 RZQSG100Y FVQ100CVEB RZQSG100L7Y1B FHQG100CVEB RZQSG100L7Y1B...

Page 67: ...Specifications ESIE12 06 56 Specifications FCQHG100FVEB RZQSG100L7Y1B FCQG100FVEB RZQSG100L7Y1B...

Page 68: ...ESIE12 06 Specifications Specifications 57 FBQ100C8VEB RZQSG100L7Y1B FAQ100CVEB RZQSG100L7Y1B...

Page 69: ...Specifications ESIE12 06 58 Specifications RZQSG100L7Y1B...

Page 70: ...ESIE12 06 Specifications Specifications 59 RZQSG125V FVQ125CVEB RZQSG125L7V1B FHQG125CVEB RZQSG125L7V1B...

Page 71: ...Specifications ESIE12 06 60 Specifications FDQ125C7VEB RZQSG125L7V1B FCQHG125FVEB RZQSG125L7V1B...

Page 72: ...ESIE12 06 Specifications Specifications 61 FCQG125FVEB RZQSG125L7V1B FBQ125C8VEB RZQSG125L7V1B...

Page 73: ...Specifications ESIE12 06 62 Specifications RZQSG125L7V1B...

Page 74: ...ESIE12 06 Specifications Specifications 63 RZQSG125Y FVQ125CVEB RZQSG125L7Y1B FHQG125CVEB RZQSG125L7Y1B...

Page 75: ...Specifications ESIE12 06 64 Specifications FDQ125C7VEB RZQSG125L7Y1B FCQHG125FVEB RZQSG125L7Y1B...

Page 76: ...ESIE12 06 Specifications Specifications 65 FCQG125FVEB RZQSG125L7Y1B FBQ125C8VEB RZQSG125L7Y1B...

Page 77: ...Specifications ESIE12 06 66 Specifications RZQSG125L7Y1B...

Page 78: ...ESIE12 06 Specifications Specifications 67 RZQSG140V FVQ140CVEB RZQSG140L7V1B FHQG140CVEB RZQSG140L7V1B...

Page 79: ...Specifications ESIE12 06 68 Specifications FCQHG140FVEB RZQSG140L7V1B FCQG140FVEB RZQSG140L7V1B...

Page 80: ...ESIE12 06 Specifications Specifications 69 FBQ140C8VEB RZQSG140L7V1B...

Page 81: ...Specifications ESIE12 06 70 Specifications RZQSG140L7V1B...

Page 82: ...ESIE12 06 Specifications Specifications 71 RZQSG140Y FVQ140CVEB RZQSG140L7Y1B FHQG140CVEB RZQSG140L7Y1B...

Page 83: ...Specifications ESIE12 06 72 Specifications FCQHG140FVEB RZQSG140L7Y1B FCQG140FVEB RZQSG140L7Y1B...

Page 84: ...ESIE12 06 Specifications Specifications 73 FBQ140C8VEB RZQSG140L7Y1B...

Page 85: ...Specifications ESIE12 06 74 Specifications RZQSG140L7Y1B...

Page 86: ...ESIE12 06 Operation range Specifications 75 2 Operation range Smart...

Page 87: ...Operation range ESIE12 06 76 Specifications EDP...

Page 88: ...ESIE12 06 Operation range Specifications 77 Classic...

Page 89: ...Operation range ESIE12 06 78 Specifications...

Page 90: ...0 1 2 Names and Functions 80 1 3 MAIN SUB Setting when Using 2 Remote Controllers 84 1 4 Centralized Control Group No Setting 85 2 Wireless Remote Controller 87 2 1 Applicable Models 87 2 2 Names and...

Page 91: ...d by the fan speed icon 6 AIR CLEANING ICON This icon indicates that the air cleaning unit option is operational 7 LEAVE HOME ICON The leave home icon shows the status of the leave home function 8 EXT...

Page 92: ...N This icon indicates that the defrost hotstart mode is active 24 AIR FILTER CLEANING TIME ICON This icon indicates the air filter must be cleaned Refer to the manual of the indoor unit 25 ELEMENT CLE...

Page 93: ...cting model 3 Menu Enter button Used to indicate the main menu Used to enter the setting item selected 4 Up button Be sure to press the part with the symbol Used to raise the set temperature The next...

Page 94: ...e leave settings are enabled with this button kept pressed for at least four seconds 8 On Off button Press this button and system will start Press this button again and system will stop 9 Operation la...

Page 95: ...e power off and then on again Step Action 1 Insert a flat head screwdriver into the recess between the upper and lower part of the remote controller as shown in the illustration below Gently pry off t...

Page 96: ...er 1 During normal mode press and hold the button for 4 seconds or more to enter the Field Setting Mode 2 Select the Mode No 00 with the button 3 Select the Group No for each group with the button Gro...

Page 97: ...allation place of the indoor unit into the attached installation table Be sure to keep the installation table with the operation manual for maintenance 1 Basic screen Press and hold Cancel button for...

Page 98: ...Models 2 2 Names and Functions Receiver Model Series FCQHG F FCQG F FHQG C Remote Controller BRC7G63 8 10 13 11 12 15 14 16 17 9 1 3 4 6 2 5 7 DOWN FAN UP ON OFF H C hr hr TEST MODE TIMER RESERVE CANC...

Page 99: ...ress the button and the system will start Press the button again and the system will stop Press this button to select the fan speed Low or Middle or High of your choice Use this button for temperature...

Page 100: ...ddress for The receiver of the wireless remote controller The wireless remote controller Setting the Address for the Receiver When using both a wired and a wireless remote controller for 1 indoor unit...

Page 101: ...sor data No with or button 6 Each data displays Refer to the table below display 7 Return to the normal operation mode Press the inspection test operation button once Mode No Function Content and Oper...

Page 102: ...tion adjusting button then press timer ON OFF button to decide In case of Mode 45 Select the changed unit No with or button then press timer ON OFF button to decide 6 Return to the normal operation mo...

Page 103: ...ection test button once 1 Inspection mode Press the Inspection test button once 2 Indoor unit model code display Press the Inspection test button once 3 Outdoor unit model code display Press the Inspe...

Page 104: ...trol 93 Part 5 Function and Control 1 Function of Main Components and Thermistors 94 2 Operation Flow Chart 96 2 1 Cooling Dry Operation 96 2 2 Heating Operation 97 3 Function Details 98 3 1 Indoor Un...

Page 105: ...valve with service port 5 16 flare Outdoor heat exchanger B Electronic expansion valve Compressor Accumulator Pressure switch high Service port 5 16 flare Check valve C 3D069535 R2T R3T R1T This ther...

Page 106: ...ing cooling operation Used for judgement of the defrost IN and OUT condition Intermediate Heat Exchanger Thermistor R5T Used for calculation of high pressure during cooling operation Calculate Pc by d...

Page 107: ...ic expansion valve PI control Low pressure protection control High pressure protection control Discharge pipe temperature protection control Inverter current protection control Low outdoor temperature...

Page 108: ...ntrol High pressure protection control Heating overload control Suction pipe superheat protection control Discharge pipe temperature protection control Inverter current protection control Overall curr...

Page 109: ...actually detected room temperature 1 the thermostat is turned ON or OFF T Detected room temperature Temperature set by remote controller Tro Room temperature detected when dry operation is started Tr...

Page 110: ...table below 3 1 5 Drain Pump Control Only for FCQG FCQHG Cooling Dry Operation Normally drain pump ON Thermostat ON OFF Tro 24 C 16 C Tro 24 C Tro 16 C T 2 5 C 1 C Thermostat OFF Dry operation T 2 C...

Page 111: ...e blows air downward Starting condition 5 min 5 sec Drain pump Float switch ON OFF OFF ON 7 6 5 4 3 2 1 0 1 2 3 4 5 6 7 6 5 4 3 2 1 0 1 2 3 4 5 6 Thermo ON Thermo OFF Thermo ON Thermo OFF Suction air...

Page 112: ...ature by operating the fan at certain intervals when the fan is turned off while the thermo is off 3 1 10 Defrost Control When the heating operation continues at a low outdoor air temperature the fros...

Page 113: ...ressure 0 12 MPa or less continues for 5 minutes 10 times in 200 minutes High pressure HPS activated or over 3 92 MPa continues for 1 minute 15 times in 300 minutes Discharge pipe temperature RZQG71L...

Page 114: ...cy is fixed for specified period of time at low frequency to prevent returning of refrigerant Compressor stopping or 6 hours or less after turning ON the power 1 hour or more after turning OFF the com...

Page 115: ...d off T Indoor suction air temperature temperature set by remote controller Cooling T Temperature set by remote controller indoor suction air temperature Heating Thermostat ON Condition T 0 5 C Thermo...

Page 116: ...ng t cool Remote controller set temperature Indoor return air temperature Depending on t cool and the cooling load the target evaporating temperature will be a value between 2 C and 20 C Heating t hea...

Page 117: ...ted the indoor fan will be controlled in order to prevent cold air draft and secure the starting performance quick pressure build up Indoor unit fan OFF Heating operation is turned ON with remote cont...

Page 118: ...apacity priority setting when the low noise setting remains the low noise setting is prioritized and even if air conditioning load becomes high the noise operation continues 3 2 11 Low Pressure Protec...

Page 119: ...a Compressor operation frequency 1 step 10 sec Compressor operation frequency 1 step 1 min Normal operation Compressor operation frequency B Hz Compressor stop Abnormal stop E3 indication Compressor o...

Page 120: ...he upper limit frequency will be controlled SH Superheat degree EV Electronic expansion valve Normal operation Suction SH 12 C Suction SH 8 C Suction SH 10 C EV opening degree 450 pls Suction SH 10 C...

Page 121: ...0 V At this time operation sound may be heard from the outdoor unit RZQG71L RZQG100 140L A C 105 C 105 C B C 120 C 115 C C minutes 5 minutes 10 minutes Normal operation OR OR OR Td 105 C Compressor up...

Page 122: ...from tripping due to inverter overcurrent Normal operation The condition of Inverter current Stepping down current continues for 2 minutes Inverter current Stepping down current Inverter upper limit f...

Page 123: ...or operation frequency restriction refer to the followings Hp Lp 0 93MPa Hp Lp 0 78MPa Hp Lp 0 78MPa Compression ratio 1 8 Compression ratio 1 8 Hp 1 86MPa Tfin 66 C OR OR OR Compression ratio 2 4 Hp...

Page 124: ...the connecting pipe and the transmission connecting line are connected each to a differing outdoor unit the abnormal stop is activated with the error code UF being displayed on the remote controller 3...

Page 125: ...oor unit remote controller frost upper limit time A becomes as shown in the table below Integrated compressor running time is 25 minutes or more since the completion of the previous defrost operation...

Page 126: ...asing the number of revolutions of fan is lowered 3 2 28 Emergency Operation No transmission is performed between indoor and outdoor unit During cooling the cycle of operation for 20 minutes and stop...

Page 127: ...nger thermistor in heating Liquid pipe thermistor Indoor suction air thermistor Indoor heat exchanger thermistor B Operation continues even the error is detected The remote controller displays error c...

Page 128: ...tructions 1 When the error code E3 E4 or L8 is displayed on the remote controller there is possibility that either the stop valve is closed or the airflow outlet is obstructed 2 When the error code U2...

Page 129: ...nd 33 will overrule Do not change the value of setting 33 when EDP setting is set For WHC See Weather Depending Control on page 118 3 2 32 Improved COP in Heating by Tc Control The COP could be increa...

Page 130: ...nutes neglecting the selected Te Tc After 20 minutes the selected Te Tc setting will receive priority again Example The customer has to make a choice Fix the Te Lower limit and or the Tc upper limit o...

Page 131: ...Function Details ESIE12 06 120 Function and Control limit and or Tc Upper limit...

Page 132: ...2 1 Wired Remote Controller 125 2 2 Wireless Remote Controller 128 2 3 Settings Contents and Code No for Indoor Units 129 2 4 Overview of the Field Setting on the Outdoor Units 134 2 5 Quiet Low Noise...

Page 133: ...tings of the remote controller for the BRC1D series should be made in accordance with the following procedure The settings of the remote controller for the BRC1E series should be made in accordance wi...

Page 134: ...00 refer to Failure diagnosis at the moment of first installation on page 124 9 If the inspection test operation button is pressed 4 times during a test run the unit returns to normal operation 10 Ch...

Page 135: ...he outdoor unit PCB may have run out If the malfunction code E3 E4 L8 or U0 is displayed on the remote controller there is a possibility that the stop valves are closed If the malfunction code E3 E4 L...

Page 136: ...tton for 4 seconds or more and the Field Set Mode is entered 2 Select the desired Mode No with the button 2 3 During group control when setting by each indoor unit mode No 20 22 and 23 have been selec...

Page 137: ...uring group control When Mode No such as 20 21 22 23 25 are selected highlight the unit No and select Indoor unit No to be set by using Up Down button In the case of group total setting this operation...

Page 138: ...tdoor unit see installation manual attached to the outdoor unit 6 7 6 Press Menu Enter button Setting confirmation screen is displayed 7 Select Yes and press Menu Enter button Setting details are dete...

Page 139: ...o Field setting mode UP button DOWN button First code No Second code No MODE button Step Action 1 Hold down the INSPECTION TEST button for at least 4 s during normal mode to enter the Field setting mo...

Page 140: ...air thermistor When the Second Code No is set to 01 room temperature is controlled by the indoor unit suction air thermistor and the room temperature thermistor in remote controller as following figu...

Page 141: ...re thermistor Suction air thermistor Suction air thermistor Suction air thermistor Suction air thermistor Room temperature thermistor Suction air thermistor Suction air thermistor Suction air thermist...

Page 142: ...G Only For the purpose of securing airflow range during heating the number of revolutions of fan during heating can be changed Make the setting according to installation environment Mode No First Code...

Page 143: ...be paid for the occurrence of the following situation Setting of Normal Airflow Make the following setting according to the ceiling height The setting position No is set to 01 at the factory FCQG71 F...

Page 144: ...This is set to perform individual operation of heat reclaim ventilation using the remote controller central unit when heat reclaim ventilation is built in Switch only when heat reclaim ventilation is...

Page 145: ...me low noise operation Disabled Factory setting Automatic low noise activation Capacity preceding setting when using KRP58 option Automatic low noise capacity preceding Refer to P135 1 Automatic low n...

Page 146: ...ll be conducted for 10 hours The maximum outdoor temperature is supposed to occur at 14 00h As the time judgement is made in accordance with the outdoor temperature the above mentioned timing is an es...

Page 147: ...ntrol priority for capacity can be set Prioirity for capacity will be activated by changing field setting 26 0 03 in combination with the closed contact on KRP58M Exceptions The Quiet low noise operat...

Page 148: ...emand 2 Close contact between COM and contact 2 Demand 3 Close contact between COM and contact 3 Demand 1 Power consumption limitation in function of setting on DS1 Demand 2 Power consumption limitati...

Page 149: ...sor frequency is controlled in function of the target evaporating temperature The target evaporating temperature is controlled in function of the cooling load Minimum target Te 2 C Minimum target Te 0...

Page 150: ...mote controller setting temp Te target limited 20 C to protect the comp Te target limited Indoor temp 11 not to rising wetbulb Te see note target acceptable area Indoor temp setting Te target down Ind...

Page 151: ...is selected Field setting 16 26 2 03 Te target C Te target acceptable area Remote controller setting temp Te target limited 20 C to protect the comp Te see note target acceptable area Indoor temp set...

Page 152: ...rature after thermostat OFF the thermostat control will be changed when using field settings 16 26 2 03 16 26 2 04 Thermostat ON Trs 0 5 C No change from standard setting Thermostat OFF Trs 2 0 C for...

Page 153: ...91 1 01 1 06 1 16 1 21 1 26 5 0 62 0 81 0 91 1 01 1 06 1 16 1 21 1 26 10 0 62 0 81 0 91 1 01 1 06 1 16 1 21 1 26 15 0 62 0 81 0 91 1 01 1 12 1 14 1 19 1 24 20 0 62 0 81 0 91 1 07 1 10 1 12 1 16 1 21...

Page 154: ...S1 BS3 BS4 Dip Switch A2P MODE MODE SET RETURN PUMPDOWN TEST HWL L N O P DEMAND Display Lamp BS Button Display Function or Operating Procedure Symbol Name Display Lamp H1P MODE During Setting mode 1 t...

Page 155: ...Demand operating condition normal 30 demand 40 demand 50 demand These conditions above can be checked by performing the following steps Setting mode 1 Monitor mode H1P Blinking Off H1P Setting mode 2...

Page 156: ...to Setting mode 2 Press the SET BS2 button and set the LED display to a setting item 1 Press the RETURN BS3 button and decide the item Selection of setting items Selection of setting conditions Press...

Page 157: ...r more and set to Setting mode 2 k h h h h h h Push the SET BS2 button three times to set the LED display as shown in the table on the right k h h h h k k Push the RETURN BS3 button once Present setti...

Page 158: ...ode 1 for 5 seconds or more and set to Setting mode 2 k h h h h h h Press the SET BS2 button 28 times to set the LED display as shown in the table on the right 1 k h k k k h h Press the RETURN BS3 but...

Page 159: ...lfunction 1 cycle before Contents of malfunction 2 cycle before Indication of causes of stepping down operation Normal not in stepping down operation Low pressure stepping down High pressure stepping...

Page 160: ...on to set the LED display to retry or error item When the RETURN BS3 button is pressed the LED display for RETURN 1 turns ON Selection of retry or error item When SET BS2 button is pressed the LED dis...

Page 161: ...Field Setting from Outdoor Unit PCB ESIE12 06 150 Field Setting Outdoor unit...

Page 162: ...ESIE12 06 Field Setting from Outdoor Unit PCB Field Setting 151 3 2 7 Troubleshooting...

Page 163: ...on the unit stops the operation once and restarts three minutes later 4 When there is an error on PCB the emergency operation cannot be used Name Application Setting method Operation Thermistor detect...

Page 164: ...ing the test run mode the test run starts Test Operation by Outdoor Unit PCB 1 Press the Test Operation BS4 button on outdoor unit PCB for 5 seconds After a while the test operation starts Reference F...

Page 165: ...Emergency Operation ESIE12 06 154 Field Setting...

Page 166: ...8 4 1 Procedure of Self diagnosis by Remote Controller 178 4 2 Error Codes and Description 182 4 3 Safety Devices 183 4 4 Indoor Unit PCB Abnormality 184 4 5 Drain Water Level System Abnormality 185 4...

Page 167: ...32 Transmission Error between Indoor and Outdoor Unit 229 4 33 Transmission Error Between Remote Controller and Indoor Unit 232 4 34 Transmission Error between MAIN Remote Controller and SUB Remote C...

Page 168: ...lease exercise the proper caution High Pressure Low Pressure Discharge Pipe Temperature Suction Temperature Indoor Unit Temperature Differential between Suction Air and Discharge Air Outdoor Unit Temp...

Page 169: ...hort Circuit of Indoor Unit Inlet Outlet Air Lower Lower Lower Outdoor Unit Fin Fouling Higher Higher Higher Short Circuit of Outdoor Unit Inlet Outlet Air Higher Higher Higher Air Mixed in Refrigeran...

Page 170: ...n if remote controller is set to L tap It is normal It is caused by the activation of the overload control airflow shift control 16 Flap automatically moves during cooling It is normal It is caused by...

Page 171: ...oint Defective high pressure switch Defective magnetic switch for fan motor Activation or fault of overcurrent relay for fan motor Defective overcurrent relay for compressor Defective compressor prote...

Page 172: ...tion 3 minutes later 3 min standby YES NO Diagnose based on error code on remote controller YES NO Diagnose based on error code on remote controller YES NO Check the electric system Defective electric...

Page 173: ...erates but Compressor does not Operate Applicable Model All models of SkyAir series Supposed Causes Fuse blown or disorder of contact in operation circuit Defective thermistor Defective indoor outdoor...

Page 174: ...ating operation When suction air thermistor temperature is lower than set temperature Check the thermistor YES NO Caution Be sure to turn off power switch before connect or disconnect connector or par...

Page 175: ...on the error code on remote controller wired YES Caution Be sure to turn off power switch before connect or disconnect connector or parts damage may be occurred Wireless NO NO YES YES Defective fan mo...

Page 176: ...reasons Lower voltage of power supply Excess level of high pressure Insufficient size of power cable Defective compressor Compressor protection thermostat Compressor protection thermostat may act due...

Page 177: ...Contact the power company NO YES Replace the power cable NO YES After vacuum drying charge correct amount of refrigerant Then start operation again Defective electronic expansion valve NO YES Defecti...

Page 178: ...y Excess level of high pressure Insufficient size of power cable Defective compressor Compressor protection thermostat Compressor protection thermostat may act due to the following reasons Internal le...

Page 179: ...oiled heat exchanger Defective fan motor Refer to troubleshooting A6 Check the each item Check the each item Possible causes as follows Refrigerant overcharge Air in refrigerant system Soiled heat exc...

Page 180: ...efrigerant system Defective pressure switch Defective magnetic switch for outdoor unit fan motor Defective aux relay for outdoor unit fan motor Soiled heat exchanger of outdoor unit There is an interf...

Page 181: ...of sunlight Affection of excessive fresh air into room NO Refrigerant shortage possibly generates trouble YES Insufficient compression of compressor Insufficient circulation of refrigerant Faulty ele...

Page 182: ...e the source of humid condition It may be necessary to remove the source of humid condition YES YES Cleaning of heat exchanger is necessary NO NO YES Did the trouble generate on switching to heating m...

Page 183: ...d is flushing noise of gas refrigerant inside air conditioning unit YES Normal The noise is a sound generated at the time of gas refrigerant flow change or stop YES Normal Operation sound of draining...

Page 184: ...r unit are blown out Cleaning for inside of indoor unit is necessary YES Dust collected inside the indoor unit are blown out Cleaning for inside of indoor unit is necessary Install the air filter Is t...

Page 185: ...emote controller is normal Indication appears for short time YES Caution Be sure to turn off power switch before connect or disconnect connector or parts damage may be occurred Check the unit based on...

Page 186: ...functions can force the swing flap into a fixed position although swing mode is selected on the remote controller This is not a unit error but a control function to prevent draft to the customer Befo...

Page 187: ...connected Is the limit switch s transfer connector correctly connected Does the flap swing 220 240 VAC Is continuity no continuity reversed Turn the power supply off once and back on and check whethe...

Page 188: ...on PCB A1P of the outdoor unit k LED on h LED off l LED blinks Note 1 Turn OFF the power supply and turn it ON again after 5 seconds or more Check the error condition and diagnose the problem 2 Turn O...

Page 189: ...ed operation to stop Refer to P 182 for error code and error contents Note 1 Pressing the INSPECTION TEST button will blink the check indication 2 While in service mode holding down the ON OFF button...

Page 190: ...Taking corrective action Operation Status Display Abnormal shutdown The system stops operating The operation lamp green starts to blink The message Error Press Menu button will appear and blink at the...

Page 191: ...ntinue the operation in step 4 until a buzzer remains ON The continuous buzzer indicates that the error code is confirmed Continuous beep No abnormality 3 Press the MODE selector button The left 0 upp...

Page 192: ...n is pressed 1 Press INSPECTION TEST button If no button is pressed for 1 minute equipment returns to normal status When MODE selector button is pressed or no button is pressed for 1 minute equipment...

Page 193: ...H9 Outdoor air thermistor system abnormality 210 J3 Discharge pipe thermistor system abnormality 210 J5 Suction pipe thermistor system abnormality 210 J6 Heat exchanger thermistor system abnormality...

Page 194: ...4 3 1 Outdoor Unit 4 3 2 Indoor Unit Model High pressure switch Fuse Open Close RZQG71L 4 0 MPa 0 0 15 3 0 MPa 0 15 6 3A 250V F1U 3 15A 250V F6U RZQG100L 6 3A 250V F1U F2U F3U 5A 250V F6U RZQG125L RZQ...

Page 195: ...be erased either within the computer or externally and usually requires more voltage for erasure than the common 5 volts used in logic circuits It functions like non volatile RAM but writing to E2PRO...

Page 196: ...or unit Method of Error Detection By float switch OFF detection Error Decision Conditions The error is generated when the water level reaches its upper limit and when the float switch turns OFF Suppos...

Page 197: ...O YES YES Connect the float switch NO Replace the float switch YES Replace the indoor unit PCB Replace the drain pump NO NO YES Remove the float switch from X15A short circuit X15A and restart operati...

Page 198: ...act Defective indoor unit PCB Troubleshooting Note Connector and indoor unit PCB Refer to P 248 Model Connector for fan motor PCB FCQG X20A A1P FHQG X20A A1P YES Turn OFF the power supply Wait for 10m...

Page 199: ...alled at the factory is for some reason changed at the installation site the capacity will not be contained in the replacement PCB To set the correct capacity for the PCB you have to connect a capacit...

Page 200: ...on of transmission between indoor unit PCB A1P and adaptor PCB A2P using micro computer Error Decision Conditions When normal transmission is not conducted for certain duration 15 seconds or more Afte...

Page 201: ...YES Replace the harness YES Eliminate the external factor NO Normal operation Check the panel PCB and indoor unit PCB Turn OFF the power supply and turn the power ON Press the power switch on the rem...

Page 202: ...onnector connection Defective thermistor Defective indoor unit PCB Broken or disconnected wire Troubleshooting Refer to P 241 Error Code Defective Thermistor Symbol C4 Heat exchanger thermistor R2T C5...

Page 203: ...OFF button of the remote controller must be pushed and held for 5 seconds in the check mode 2 To display the code the Inspection Test Operation button of the remote controller must be pushed and held...

Page 204: ...remote controller thermistor becomes disconnected or shorted when the unit is running Even if the remote controller thermistor is error the system can operate with the system thermistor Supposed Caus...

Page 205: ...N Supposed Causes Defective outdoor unit PCB A1P Defective fan motor External factor Noise etc Troubleshooting External factor Noise etc YES NO Caution Be sure to turn off power switch before connect...

Page 206: ...thermistor R3T detects the pressure shown below 3 92 MPa or more continuously for one minute Reference equivalent saturation temperature 62 C Supposed Causes Dirt and blockage of the outdoor unit hea...

Page 207: ...A1P YES NO Are the operation of electronic expansion valve normal Troubleshooting E9 NO YES High pressure is too high CHECK 2 CHECK 9 Replace the outdoor unit PCB A2P If error is displayed again repla...

Page 208: ...ivated 4 0 MPa When the outdoor unit intermediate thermistor R5T detects the pressure shown below 3 92 MPa or more continuously for one minute Reference equivalent saturation temperature 62 C When the...

Page 209: ...re continuity in the high pressure switch Replace the connecting line Replace the outdoor unit intermediate heat exchanger thermistor NO NO YES NO In cooling In heating Is there continuity in the high...

Page 210: ...or by the intermediate heat exchanger thermistor R5T Error Decision Conditions In cooling When the detection pressure is the following value 0 12MPa or less continues for 5 minutes When the saturated...

Page 211: ...ate thermistor Replace the outdoor unit PCB A1P Correct the refrigerant system defect Is the stop valve open Is it in cooling operation YES In cooling operation In heating operation Remove the thermis...

Page 212: ...essor lock High differential pressure 2 6 MPa or more starting Stop valve is not opened Troubleshooting Is the stop valve open NO YES Open the stop valve NO YES NO Connect correctly YES Remedy the cau...

Page 213: ...isconnected When the error is generated 4 times the system shuts down Supposed Causes Defective fan motor The harness connector between fan motor and PCB is left in disconnected or faulty connector Fa...

Page 214: ...an motor connector and then turn the power ON again YES Replace the fan motor NO YES Replace the fuse Error is displayed YES Replace the outdoor unit inverter PCB External factor Noise etc NO A Is the...

Page 215: ...e and electronic expansion valve opening degree Error Decision Conditions No common power supply when the power is ON When the following conditions are met Suction pipe superheat degree 4 C Minimum el...

Page 216: ...roperly YES YES NO NO YES Mount properly NO Replace the coil of the electronic expansion valve NO YES A Error is displayed again Is the temperature sensor of each thermistor suction pipe discharge pip...

Page 217: ...Replace the outdoor unit PCB A1P YES A External factor Noise etc NO CHECK 1 CHECK 5 Refer to to eliminate the causes of wet operation Error is displayed again CHECK 8 YES YES Replace the pressure sen...

Page 218: ...rge pipe temperature sensor Error Decision Conditions When the discharge pipe temperature rises to an abnormally high level When the discharge pipe temperature rises suddenly When the discharge pipe t...

Page 219: ...lace the discharge pipe thermistor Replace the outdoor unit PCB A1P NO YES Caution Be sure to turn off power switch before connect or disconnect connector or parts damage may be occurred NO Connect co...

Page 220: ...outdoor unit PCB Disconnected lead wire Troubleshooting Note 1 Connector and indoor unit PCB Model Connector for high pressure switch PCB RZQG X32A A1P Connect correctly Replace the outdoor unit PCB...

Page 221: ...ctive outdoor unit PCB A1P Troubleshooting Refer to P 241 Error Code Defective Thermistor Symbol H9 Outdoor air thermistor R1T J3 Discharge pipe thermistor R2T J5 Suction pipe thermistor R3T J6 Heat e...

Page 222: ...g an MP PAM series capacitor overvoltage sensor Error Decision Conditions When over current is detected at the time of waveform output during operating the compressor When the current sensor error dur...

Page 223: ...efore connect or disconnect connector or parts damage may be occurred Turn OFF the power supply and remove the connector for fan motor and then operate again Replace the outdoor unit PCB A2P L1 is dis...

Page 224: ...tion fin thermistor Error Decision Conditions When the temperature of the inverter radiation fin rises abnormally due to faulty heat dissipation Supposed Causes Actuation of fin thermal switch Insuffi...

Page 225: ...n off power switch before connect or disconnect connector or parts damage may be occurred Turn the power ON and then press the remote controller check button once NO NO Connect correctly NO YES Troubl...

Page 226: ...transistor Actuated even by instantaneous overcurrent Supposed Causes Defective compressor mechanical lock poor insulation Defective inverter PCB Instantaneous fluctuation of power supply voltage Defe...

Page 227: ...mpressor Check the power supply voltage Turn the power ON and then operate the test operation Go to the other troubleshooting Normal operation NO NO YES YES YES Replace the outdoor unit PCB NO Correct...

Page 228: ...ection The error is detected from the current flowing to power transistor into voltage with CT1 DC current sensor Error Decision Conditions When compressor overload except for when startup is detected...

Page 229: ...according to the diagnosis procedure for abnormal noises vibration operating status etc of the compressor NO Remedy the cause Check for excessive refrigerant charging YES YES Caution Be sure to turn...

Page 230: ...is detected by converting the current flowing to power transistor into voltage with CT1 DC current sensor Inverter PCB detects the disorder of position signal Error Decision Conditions When compressor...

Page 231: ...frigerant system Compressor inspection Inspect according to the diagnosis procedure for abnormal noises vibration operating status etc of the compressor Replace the outdoor unit PCB A1P NO NO Replace...

Page 232: ...fied period of time or longer Supposed Causes Defective outdoor fan motor Defective of fan motor connector contact Defective control and inverter PCB External factor Noise etc Troubleshooting Connect...

Page 233: ...the power supply open phase Supposed Causes Open phase Voltage imbalance between phases Defective outdoor unit PCB Defective main circuit capacitor Power unit Disconnection in diode module Defective m...

Page 234: ...is made only when turning the power supply ON Supposed Causes Improper set value of E2PROM Improper capacity setting adaptor Mismatching of type of PCB Troubleshooting Note Capacity setting adaptor i...

Page 235: ...the electronic expansion valve opens fully and the suction superheat is large more than 20 C continuously for 60 seconds Even if error occurs operation will continue Supposed Causes Stop valve is not...

Page 236: ...ree during the control of suction air superheating high pressure indoor heat exchanger temperature and indoor suction air temperature Error Decision Conditions In cooling When compressor frequency doe...

Page 237: ...be occurred NO YES YES Collect refrigerant and recharge a proper amount of refrigerant after vacuum drying Check the inter unit wiring and piping between the indoor and outdoor units NO Match wiring a...

Page 238: ...ge of main circuit capacitor built in the inverter and power supply voltage Error Decision Conditions When the voltage of main circuit capacitor built in the inverter and power supply voltage drop or...

Page 239: ...or C C Remove the connector for fan motor on the PCB and operate NO NO YES YES YES YES YES NO Field factors NO Replace the fan motor NO NO YES Replace the fan motor Correct the wiring Replace the outd...

Page 240: ...t the transmission between the indoor and the outdoor unit is not normal over a certain amount of time Error Decision Conditions When the transmission is not carried out normally over a certain amount...

Page 241: ...r unit do not fit each other YES Wire correctly NO YES Replace the outdoor fan motor YES NO Wire correctly and securely fasten the terminal screws NO Is the power supply voltage between 180 and 220 VA...

Page 242: ...t PCB There is no problem with the unit An external factor noise etc other than unit failure may be the cause YES Make the fuse normal In case of a fuse can be replaced replace the fuse In case of a f...

Page 243: ...indoor unit PCB External factor Noise etc Troubleshooting Caution Be sure to turn off power switch before connect or disconnect connector or parts damage may be occurred Replace the indoor unit PCB a...

Page 244: ...f time Supposed Causes Setting failure with remote controller Connection among SUB remote controllers Defective remote controller PCB Disconnection of remote controller wiring Troubleshooting Turn the...

Page 245: ...on indoor unit and outdoor unit Improper field setting Supposed Causes Defective indoor unit PCB and wrong wiring Defective power supply PCB connection Indoor outdoor indoor indoor unit transmission w...

Page 246: ...correct Set correctly NO Connect correctly Do the micro computer normal monitors HAP on all indoor unit PCB blink Are the wires between indoor outdoor correctly connected YES YES NO NO NO Connect corr...

Page 247: ...cts the same address as that of its own on any other indoor unit Error Decision Conditions The error decision is made as soon as the abnormality aforementioned is detected Supposed Causes Address dupl...

Page 248: ...d of Error Detection Micro computer checks if transmission between indoor unit and centralized controller is normal Error Decision Conditions When transmission is not carried out normally for a certai...

Page 249: ...connect connector or parts damage may be occurred YES Is the once connected indoor unit equipment disconnected or the address changed Reset the all remote controllers power supply at the same time YES...

Page 250: ...anger thermistor R2T and the indoor suction air thermistor R1T B Difference in evaporation temperature Te or condensation temperature Tc during heating operation detected by the indoor heat exchanger...

Page 251: ...ing NO YES CHECK 11 Check the refrigerant piping system for clogging CHECK 10 Is the refrigerant level proper Correctly connect inter unit wiring between the indoor and outdoor units YES Caution Be su...

Page 252: ...r Checking To check the thermistors proceed as follows CHECK 1 FCQG FHQG Thermistor R1T Suction air thermistor R2T Heat exchanger thermistor R3T Intermediate heat exchanger thermistor RZQG Thermistor...

Page 253: ...8 61 4 79 61 5 4 70 12 36 30 12 5 35 45 62 4 62 62 5 4 54 13 34 62 13 5 33 81 63 4 46 63 5 4 38 14 33 02 14 5 32 25 64 4 30 64 5 4 23 15 31 50 15 5 30 77 65 4 16 65 5 4 08 16 30 06 16 5 29 37 66 4 01...

Page 254: ...9 73 5 31 15 123 6 87 123 5 6 78 24 208 90 24 5 204 39 74 30 63 74 5 30 12 124 6 69 124 5 6 59 25 200 00 25 5 195 71 75 29 61 75 5 29 12 125 6 51 125 5 6 42 26 191 53 26 5 187 44 76 28 64 76 5 28 16 1...

Page 255: ...or less Visual inspection Does air enter the refrigerant system Conduct refrigerant collection and vacuum drying and then add proper amount refrigerant Is the refrigerant overcharged Conduct refriger...

Page 256: ...eck valve If YES the check valve is caught Is the indoor unit installed under such conditions that short circuit easily occurs Visual inspection Is the refrigerant gas short Conduct refrigerant collec...

Page 257: ...ric shock may result Therefore disconnect the connector from the outdoor unit fan motor after confirming that the outdoor unit fan has stopped 4 Before measuring the continuity disconnect the connecti...

Page 258: ...d Red Black White 5V Measure DC voltage here Pressure sensor Detected Pressure Output voltage VH PH Kg cm MPa 5 0 4 5 4 0 3 5 3 0 2 5 2 0 1 5 1 0 0 5 0 5 1 5 2 5 0 5 0 5 0 1 2 3 5 3 4 VDC 51 0 45 9 40...

Page 259: ...he resistance is more than the value mentioned in the following table Electronic expansion valve connector and coil resistance criteria Measurement point Judgement 1 4 1M or more 2 4 100k or more 3 4...

Page 260: ...fan motor Referring to the Fault Tree Analysis FTA shown below identify the faulty points Refer to Is the heat exchanger clogged Refrigerant dwelling Excessive refrigerant charging Faulty superheat de...

Page 261: ...hanger thermistor 3 Cooling Adequate level Compressor frequency increases in order to maintain low pressure Compressor frequency decreases in order to maintain high pressure Maximum frequency Suction...

Page 262: ...he electronic expansion valve 2 Accumulator Frosting Choked moisture Blow a nitrogen gas and then replace the refrigerant 3 Distributor Temperature difference Dust Choked moisture Reduced effective pi...

Page 263: ...of the lowest frequency 52 Hz and the refrigerant flow rate decrease low pressure cannot be maintained 3 This measured temperature is used to calculate the equivalent saturation pressure of the refrig...

Page 264: ...used to calculate the equivalent saturation pressure of the refrigerant Refer to P 260 Heating 1 High Pressure Pressure sensor 2 Low Pressure Intermediate heat exchanger thermistor 3 Heating Maintain...

Page 265: ...ESIE12 06 254 Service Diagnosis...

Page 266: ...x 1 Piping Diagrams 256 1 1 RZQG71L 256 1 2 RZQG100 140L 256 2 Wiring Diagrams 257 2 1 Indoor Unit 257 2 2 Outdoor Unit 258 3 Precautions for New Refrigerant R 410A 259 3 1 Outline 259 3 2 Refrigerant...

Page 267: ...nger Electronic expansion valve Compressor Accumulator Pressure switch high Service port 5 16 flare Stop valve with service port 5 16 flare 3D069535 Filter Filter 4 way valve Indoor heat exchanger HPS...

Page 268: ...MINAL CONNECTOR 3D069625 INDOOR UNIT YLW A1P PRINTED CIRCUIT BOARD F2 ORG F1 C105 H4P H3P R3T R2T R1T BLU P2 P2 F1U R1T GRN INDOOR UNIT P1 BLK P1 t t t H5P HAP Z1C A1P X1M X2M N 4 X16A V1R NE X27A GRN...

Page 269: ...Y GRN GREEN 3D068608 A1P PRINTED CIRCUIT BOARD A2P PRINTED CIRCUIT BOARD TO INDOOR POWER SUPPLY A3P PRINTED CIRCUIT BOARD UNIT 220 240V 50Hz L N A4P PRINTED CIRCUIT BOARD X1M 1 3 2 X1M GRN BS1 BS4 PUS...

Page 270: ...frigerant mixture of 2 or more refrigerants having similar boiling points 3 The design pressure is different at each product Please refer to the installation manual for each product Reference 1 MPa 10...

Page 271: ...dix Thermodynamic characteristic of R 410A Steam pressure kPa Liquid Vapor Density kg m3 Liquid Vapor Specific heat at constant pressure kJ kgK Liquid Vapor Specific enthalpy kJ kg Liquid Vapor Specif...

Page 272: ...sure vessels Although those vessels are durable and strong careless handling can cause damage that can lead to unexpected accidents Do not drop vessels let them fall apply impact or roll them on the g...

Page 273: ...Do not use the same tools for R 22 and R 410A Thread specification differs for R 410A and R 407C Charging cylinder Weighting instrument used for HFCs Gas detector The same tool can be used for HFCs V...

Page 274: ...rgin of 0 to 0 5 mm was provided for flaring For R 410A air conditioners perform pipe flaring with a pipe extension margin of 1 0 to 1 5 mm For clutch type only Conventional tool with pipe extension m...

Page 275: ...of vacuum 50 l min 50 Hz Select a vacuum pump which is able to keep 60 l min 60 Hz the vacuum degree of the system in excess of Suction port UNF7 16 20 1 4 Flare 100 7 kPa 5 torr 755 mmHg UNF1 2 20 5...

Page 276: ...rigerant oil Air compal Specifications Contains synthetic oil therefore it can be used for piping work of every refrigerant cycle Offers high rust resistance and stability over long period of time Dif...

Page 277: ...t hand operate valve that prevents refrigerant from outflow Differences Pressure proof hose Change in service port diameter Use of nylon coated material for HFC resistance 8 Charging cylinder Specific...

Page 278: ...igerant charging A manifold with separate ports for HFCs and previous refrigerants is equipped as standard accessories Differences Measurement is based on weight to prevent change of mixing ratio duri...

Page 279: ...Precautions for New Refrigerant R 410A ESIE12 06 268 Appendix...

Reviews: