background image

2 About the documentation

Installer reference guide

5

RZQG71~Y1 + RZQSG100~Y1
Split system air conditioners
4P385522-1A – 2016.10

1.2.6

Electrical

DANGER: RISK OF ELECTROCUTION

▪ Turn  OFF  all  power  supply  before  removing  the

switch  box  cover,  connecting  electrical  wiring  or
touching electrical parts.

▪ Disconnect  the  power  supply  for  more  than  1  minute,

and measure the voltage at the terminals of main circuit
capacitors  or  electrical  components  before  servicing.
The  voltage  MUST  be  less  than  50  V  DC  before  you
can touch electrical components. For the location of the
terminals, see the wiring diagram.

▪ Do NOT touch electrical components with wet hands.

▪ Do  NOT  leave  the  unit  unattended  when  the  service

cover is removed.

WARNING

If  NOT  factory  installed,  a  main  switch  or  other  means  for
disconnection,  having  a  contact  separation  in  all  poles
providing  full  disconnection  under  overvoltage  category  III
condition, shall be installed in the fixed wiring.

WARNING

▪ ONLY use copper wires.

▪ Make sure the field wiring complies with the applicable

legislation.

▪ All  field  wiring  must  be  performed  in  accordance  with

the wiring diagram supplied with the product.

▪ NEVER  squeeze  bundled  cables  and  make  sure  they

do  not  come  in  contact  with  the  piping  and  sharp
edges. Make sure no external pressure is applied to the
terminal connections.

▪ Make sure to install earth wiring. Do NOT earth the unit

to  a  utility  pipe,  surge  absorber,  or  telephone  earth.
Incomplete earth may cause electrical shock.

▪ Make  sure  to  use  a  dedicated  power  circuit.  NEVER

use a power supply shared by another appliance.

▪ Make  sure  to  install  the  required  fuses  or  circuit

breakers.

▪ Make sure to install an earth leakage protector. Failure

to do so may cause electric shock or fire.

▪ When installing the earth leakage protector, make sure

it  is  compatible  with  the  inverter  (resistant  to  high
frequency electric noise) to avoid unnecessary opening
of the earth leakage protector.

NOTICE

Precautions when laying power wiring:

▪ Do  not  connect  wiring  of  different  thicknesses  to  the

power  terminal  block  (slack  in  the  power  wiring  may
cause abnormal heat).

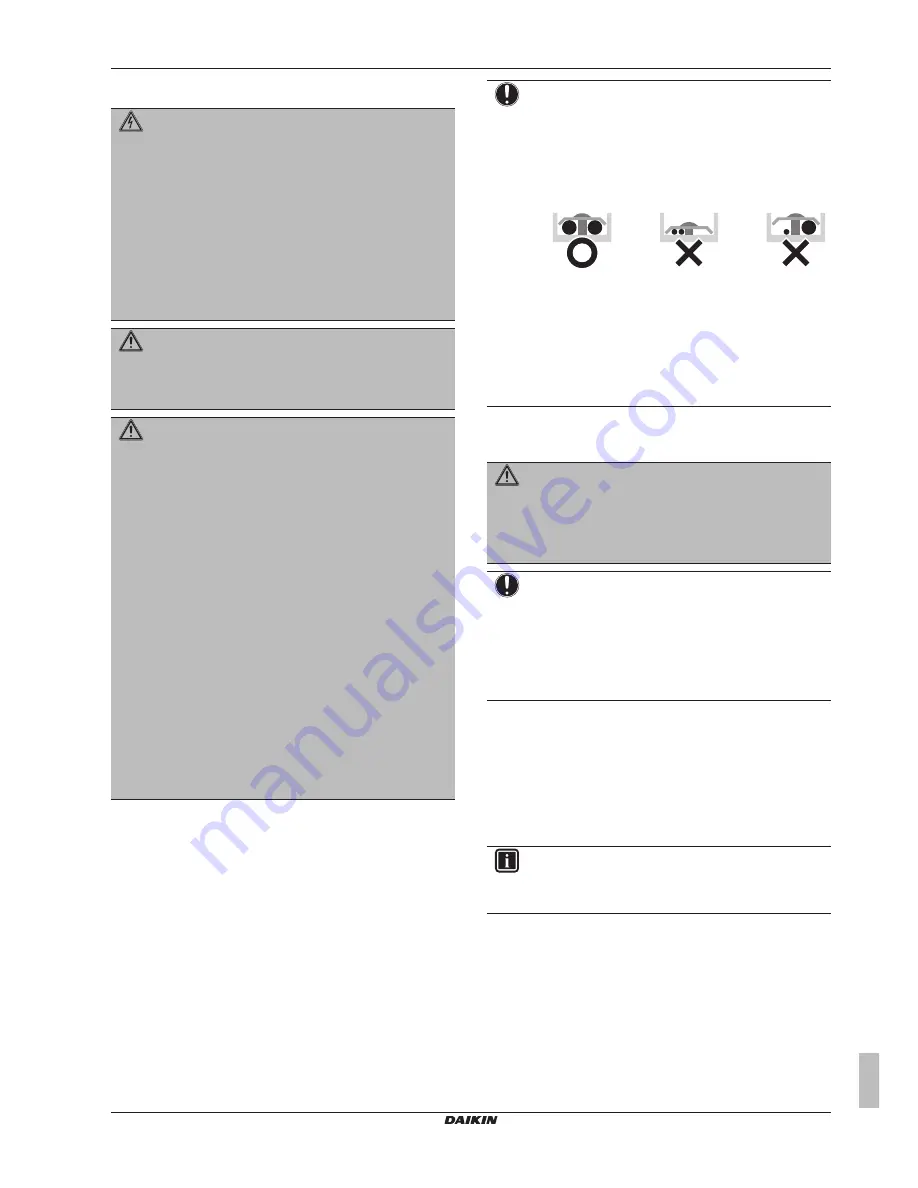
▪ When  connecting  wiring  which  is  the  same  thickness,

do as shown in the figure below.

▪ For wiring, use the designated power wire and connect

firmly,  then  secure  to  prevent  outside  pressure  being
exerted on the terminal board.

▪ Use  an  appropriate  screwdriver  for  tightening  the

terminal  screws.  A  screwdriver  with  a  small  head  will
damage  the  head  and  make  proper  tightening
impossible.

▪ Over-tightening the terminal screws may break them.

Install power cables at least 1 metre away from televisions or radios
to prevent interference. Depending on the radio waves, a distance of
1 metre may not be sufficient.

WARNING

▪ After  finishing  the  electrical  work,  confirm  that  each

electrical  component  and  terminal  inside  the  electrical
components box is connected securely.

▪ Make sure all covers are closed before starting up the

unit.

NOTICE

Only applicable if the power supply is three‑phase, and the
compressor has an ON/OFF starting method.

If  there  exists  the  possibility  of  reversed  phase  after  a
momentary black out and the power goes on and off while
the  product  is  operating,  attach  a  reversed  phase
protection  circuit  locally.  Running  the  product  in  reversed
phase can break the compressor and other parts.

2

About the documentation

2.1

About this document

Target audience

Authorised installers

INFORMATION

This appliance is intended to be used by expert or trained
users  in  shops,  in  light  industry  and  on  farms,  or  for
commercial use by lay persons.

Documentation set

This  document  is  part  of  a  documentation  set.  The  complete  set
consists of:

General safety precautions:

▪ Safety instructions that you must read before installing

▪ Format: Paper (in the box of the outdoor unit)

Outdoor unit installation manual:

▪ Installation instructions

▪ Format: Paper (in the box of the outdoor unit)

Summary of Contents for RZQG71L9V1B

Page 1: ...rs English Installer reference guide Split system air conditioners RZQG71L9V1B RZQG100L9V1B RZQG125L9V1B RZQG140L9V1B RZQG71L8Y1B RZQG100L8Y1B RZQG125L8Y1B RZQG140L7Y1B RZQSG100L9V1B RZQSG125L9V1B RZQ...

Page 2: ...ng to the outdoor unit 16 6 4 9 To determine if oil traps are required 17 6 5 Checking the refrigerant piping 17 6 5 1 About checking the refrigerant piping 17 6 5 2 Precautions when checking the refr...

Page 3: ...F BURNING Do NOT touch the refrigerant piping water piping or internal parts during and immediately after operation It could be too hot or too cold Give it time to return to normal temperature If you...

Page 4: ...ion WARNING Make sure there is no oxygen in the system Refrigerant may only be charged after performing the leak test and the vacuum drying In case re charge is required refer to the nameplate of the...

Page 5: ...esistant to high frequency electric noise to avoid unnecessary opening of the earth leakage protector NOTICE Precautions when laying power wiring Do not connect wiring of different thicknesses to the...

Page 6: ...allation What to do and know to install the system Commissioning What to do and know to commission the system after it is installed Hand over to the user What to give and explain to the user Maintenan...

Page 7: ...L7 in combination with RZQG_V1 you also have to install the demand adaptor kit For installation instructions see the installation manual of the bottom plate heater Demand adaptor kit Can be used for t...

Page 8: ...eaker 1 5 height of outdoor unit Mind the service space requirements when installing the windbreaker a b c d c d a Sea wind b Building c Outdoor unit d Windbreaker Strong winds 18 km h blowing against...

Page 9: ...oil checking reference card This is available from your dealer 1 Put some residual oil from the piping on a piece of white paper 2 Compare the colours If the oil colour is Then Identical to or darker...

Page 10: ...iquid piping 9 5 mm Gas piping 15 9 mm L1 pair twin triple double twin Model New a Existing b L1 liquid piping L1 gas piping RZQG71 Size down 6 4 mm 12 7 mm Standard 9 5 mm 15 9 mm Size up 12 7 mm RZQ...

Page 11: ...m b 25 m 35 m b 3 Maximum allowable piping length Pair N A Twin L1 L2 L3 Limit 60 m 75 m 50 m Triple L1 L2 L3 L4 Limit 75 m 50 m Double twin L1 L2 L3 L4 L5 L6 L7 Limit 75 m 50 m 4 Maximum branch pipi...

Page 12: ...because this unit is equipped with an inverter A phase advancing capacitor will reduce performance and may cause accidents WARNING All wiring must be performed by an authorized electrician and must co...

Page 13: ...0 350 3 4 5 3 5 5 4 M12 a a Make sure not to cover the drain holes INFORMATION The recommended height of the upper protruding part of the bolts is 20 mm 20 NOTICE Fix the outdoor unit to the foundatio...

Page 14: ...ting the refrigerant piping to the indoor unit Installing oil traps Insulating the refrigerant piping Keeping in mind the guidelines for Pipe bending Flaring pipe ends Brazing Using the stop valves 6...

Page 15: ...stration A Flare tool for R410A clutch type Conventional flare tool Clutch type Ridgid type Wing nut type Imperial type A 0 0 5 mm 1 0 1 5 mm 1 5 2 0 mm 5 Check that the flaring is properly made a b c...

Page 16: ...tem cap is sealed where indicated with the arrow Do NOT damage it After handling the stop valve tighten the stem cap and check for refrigerant leaks Item Tightening torque N m Stem cap liquid side 13...

Page 17: ...is might cause liquid compression or deterioration of oil return Oil traps in the rising gas piping can prevent this If Then The indoor unit is installed higher than the outdoor unit Install an oil tr...

Page 18: ...be caused by e g the closed state of the expansion valve in the outdoor unit circuit but does NOT present any problem for correct operation of the unit 6 5 5 To perform vacuum drying 1 Vacuum the sys...

Page 19: ...nents with specific functions e g valves The refrigerant circuit therefore features additional service ports for vacuuming pressure relief or pressurizing the circuit In case it is required to perform...

Page 20: ...ize up G2 m Total length of 6 4 mm liquid piping 2 Determine R1 and R2 If Then G1 30 m a Use the table below to determine R1 length G1 30 m a and R2 length G2 If Then G1 30 m a and G1 G2 30 m a R1 0 0...

Page 21: ...see unit name plate c Additional refrigerant amount charged d Total refrigerant charge e Greenhouse gas emissions of the total refrigerant charge expressed as tonnes CO2 equivalent f GWP Global warmin...

Page 22: ...d conductor wire with round crimp style terminal c b b a c a B B a Terminal b Screw c Flat washer Tightening torques Item Tightening torque N m M4 X1M 1 2 1 8 M4 earth 1 2 1 4 M5 X1M 2 0 3 0 M5 earth...

Page 23: ...ies a b a b a b 2 3 1 a Power supply cable b Interconnection cable Connecting to the frame When cables are routed from the unit a protection sleeve for the conduits PG insertions can be inserted at th...

Page 24: ...rate the unit without thermistors and or pressure sensors switches Burning of the compressor might result NOTICE Do NOT operate the unit until the refrigerant piping is complete when operated this way...

Page 25: ...the unit to cooling operation mode 2 Start the test run Action Result 1 Go to the home menu Cool Set to 28 C 2 Press at least 4 seconds The Service Settings menu is displayed 3 Select Test Operation...

Page 26: ...he user what to do in relation to maintaining the unit 9 Maintenance and service NOTICE Maintenance must be done by an authorised installer or service agent We recommend to do maintenance at least onc...

Page 27: ...ANGER RISK OF EXPLOSION Pump down Refrigerant leakage If you want to pump down the system and there is a leakage in the refrigerant circuit Do NOT use the unit s automatic pump down function with whic...

Page 28: ...A B C D E HB HU HD B 100 A B C 100 100 100 B E 100 1000 500 A B C E 150 150 150 1000 500 D 500 D E 1000 500 500 500 500 B D 100 100 B D E HB HD HB HD HB HU 250 750 1000 500 HU HB HU 250 1000 1000 500...

Page 29: ...red to install a roof but seal the gap between the upper and lower units to prevent discharged air from flowing back to the suction side through the bottom of the unit 12 2 Piping diagram Outdoor unit...

Page 30: ...1U F2U Fuse F6U Fuse T 3 15 A 250 V F7U F8U Fuse F 1 0 A 250 V F1U F8U RZQG100 140_V1 RZQSG125 140_V1 F1U F4U Fuse F6U Fuse T 5 0 A 250 V F7U F8U Fuse F 1 0 A 250 V F1U F8U RZQ S G_Y1 F1U F2U Fuse 31...

Page 31: ...ed company which can perform or coordinate the required service to the product Installation manual Instruction manual specified for a certain product or application explaining how to install configure...

Page 32: ...4P385522 1A 2016 10 Copyright 2014 Daikin...

Reviews: