6 Installation
Installer and user reference guide
21
SERHQ020~0 SEHVX20~64BAW
Split packaged air-cooled water chiller
4P508020-1A – 2018.01
6.5.4
To connect the refrigerant piping to the
outdoor unit
NOTICE
All field piping must be installed by a licensed refrigeration
technician and must comply with the relevant local and
national regulations.
Seal the piping and wiring intake holes using sealing material (field
supply), otherwise the capacity of the unit will drop and small
animals may enter the machine.
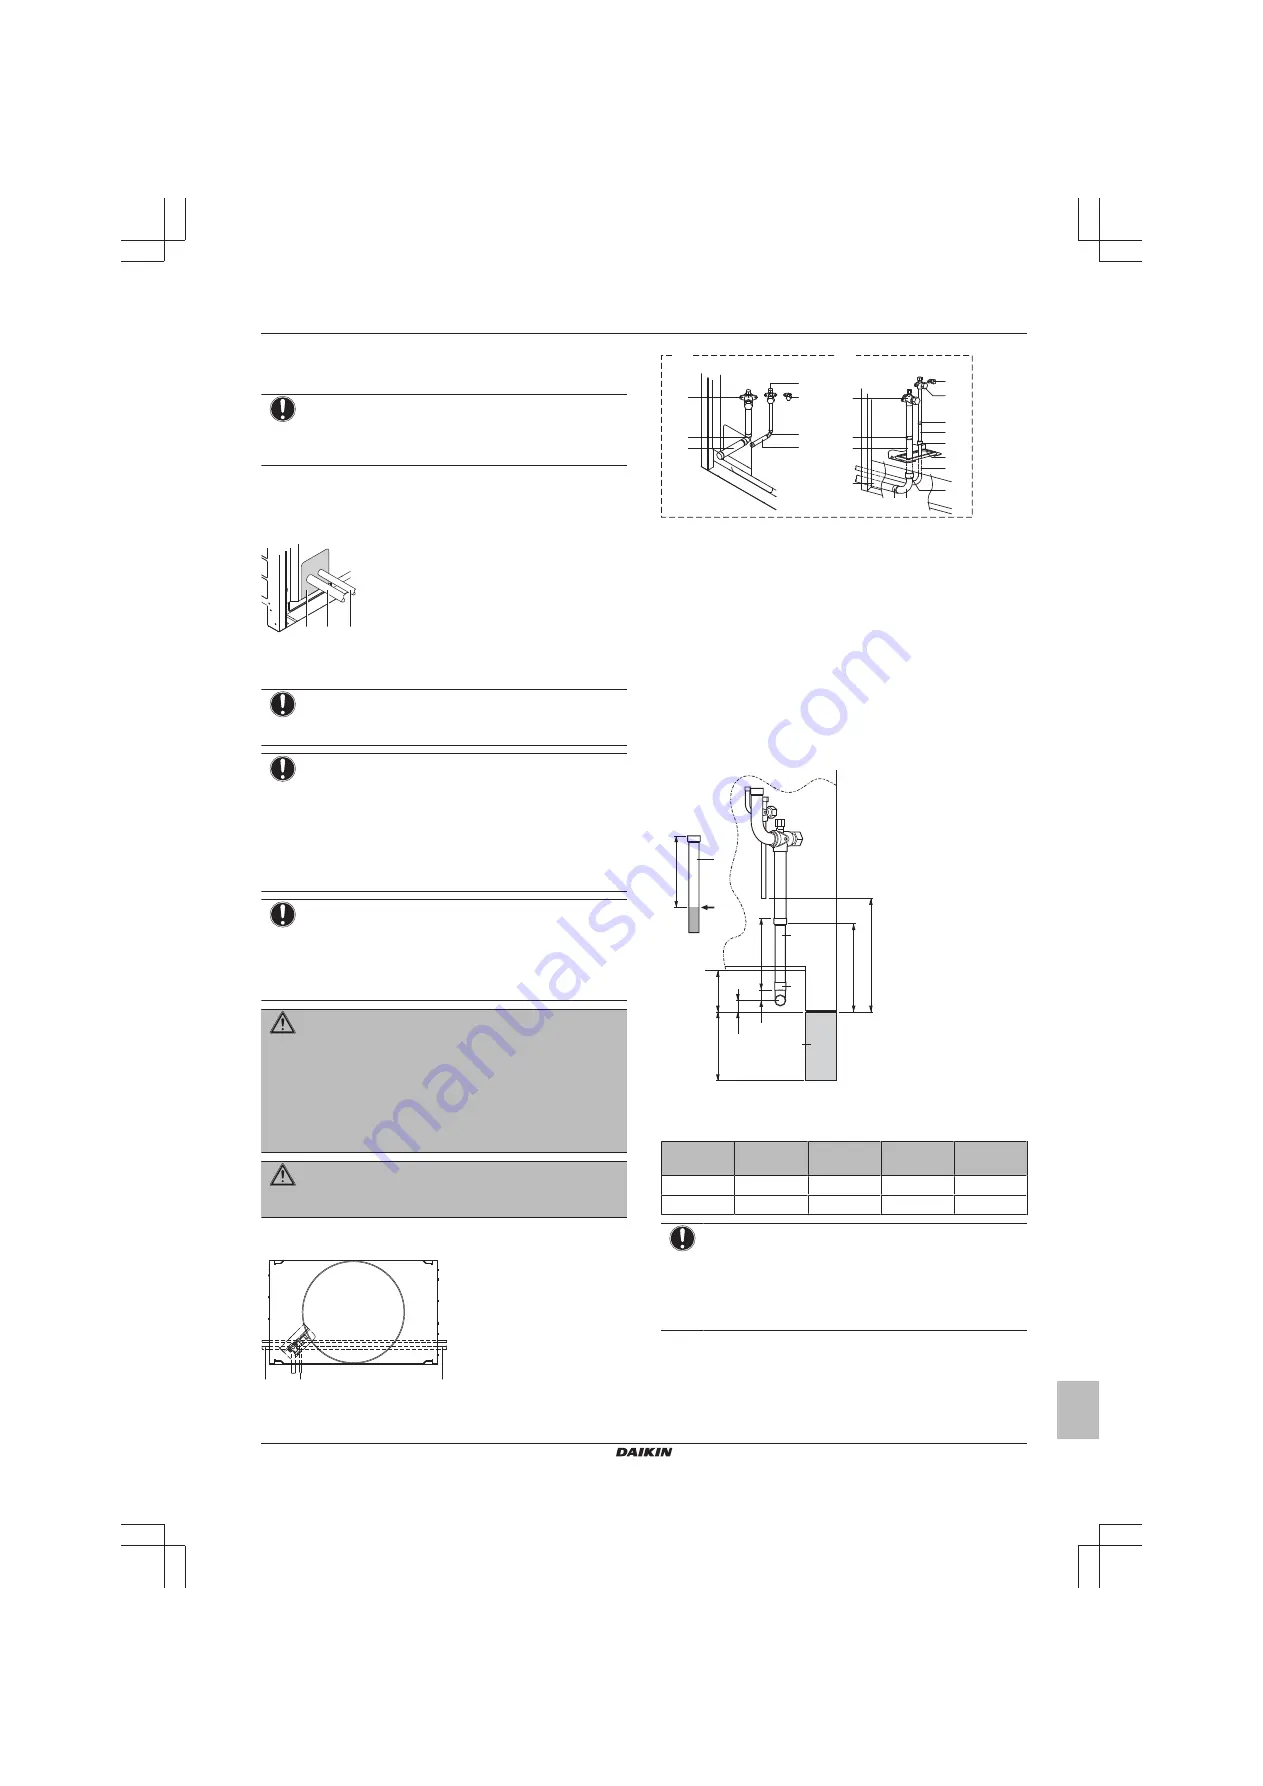
Example: passing piping out through the front
a b c
a
Plug the grey areas (piping routed through the front panel)
b
Gas side piping
c
Liquid side piping
NOTICE
After all the piping has been connected, make sure there is
no gas leak. Use nitrogen to perform a gas leak detection.
NOTICE
▪ Be sure to use the supplied accessory pipes when
carrying out piping work in the field.
▪ Be sure that the field installed piping does not touch
other pipes, the bottom panel or side panel. Especially
for the bottom and side connection, be sure to protect
the piping with suitable insulation, to prevent it from
coming into contact with the casing.
NOTICE
Use a 2-stage vacuum pump with a non-return valve that
can evacuate to a gauge pressure of −100.7 kPa
(−1.007 bar)(5 Torr absolute). Make sure the pump oil
does not flow oppositely into the system while the pump is
not working.
WARNING
Take sufficient precautions in case of refrigerant leakage. If
refrigerant gas leaks, ventilate the area immediately.
Possible risks:
▪ Excessive refrigerant concentrations in a closed room
can lead to oxygen deficiency.
▪ Toxic gas may be produced if refrigerant gas comes
into contact with fire.
WARNING
NEVER directly touch any accidental leaking refrigerant.
This could result in severe wounds caused by frostbite.
The refrigerant piping can be installed from the front or from the side
of the unit (when taken out from the bottom) as shown in the figure.
a
b
c
a
Left-side connection
b
Front connection
c
Right-side connection
c
b
h
f
d
h
a
c
b
g
h
i
h
j
k
h
h
h
e
i
a
A
B
A
For front connection, remove the stop valve cover to
connect the refrigerant piping.
B
For side connection, remove the knockouts in the bottom
frame and route the piping under the bottom frame.
a
Gas pipe stop valve
b
Liquid pipe stop valve
c
Service port for adding refrigerant
d
Gas side accessory pipe (1)
e
Gas side accessory pipe (2)
f
Liquid side accessory pipe (1)
g
Liquid side accessory pipe (2)
h
Brazing
i
Gas side piping (field supply)
j
Liquid side piping (field supply)
k
Open the knockout holes with a hammer
Cutting the gas side accessory pipe
When connecting the refrigerant piping from the side, cut the gas
side accessory pipe as shown in the figure.
A
A
B
C
D
a
b
a
c
d
25
150
90
a
Gas side accessory pipe
b
Cut here
c
Gas side piping (field supply)
d
Unit base
Outdoor
unit
A
B
C
D
SERHQ020
156
23
192
247
SERHQ032
150
29
192
251
NOTICE
▪ When connecting the piping on site, be sure to use the
accessory piping.
▪ Make sure the onsite piping does not come into contact
with other piping, the bottom frame or side panels of
the unit.


