background image

Supplementary Explanation

Si-93

56

Supplementary Explanation

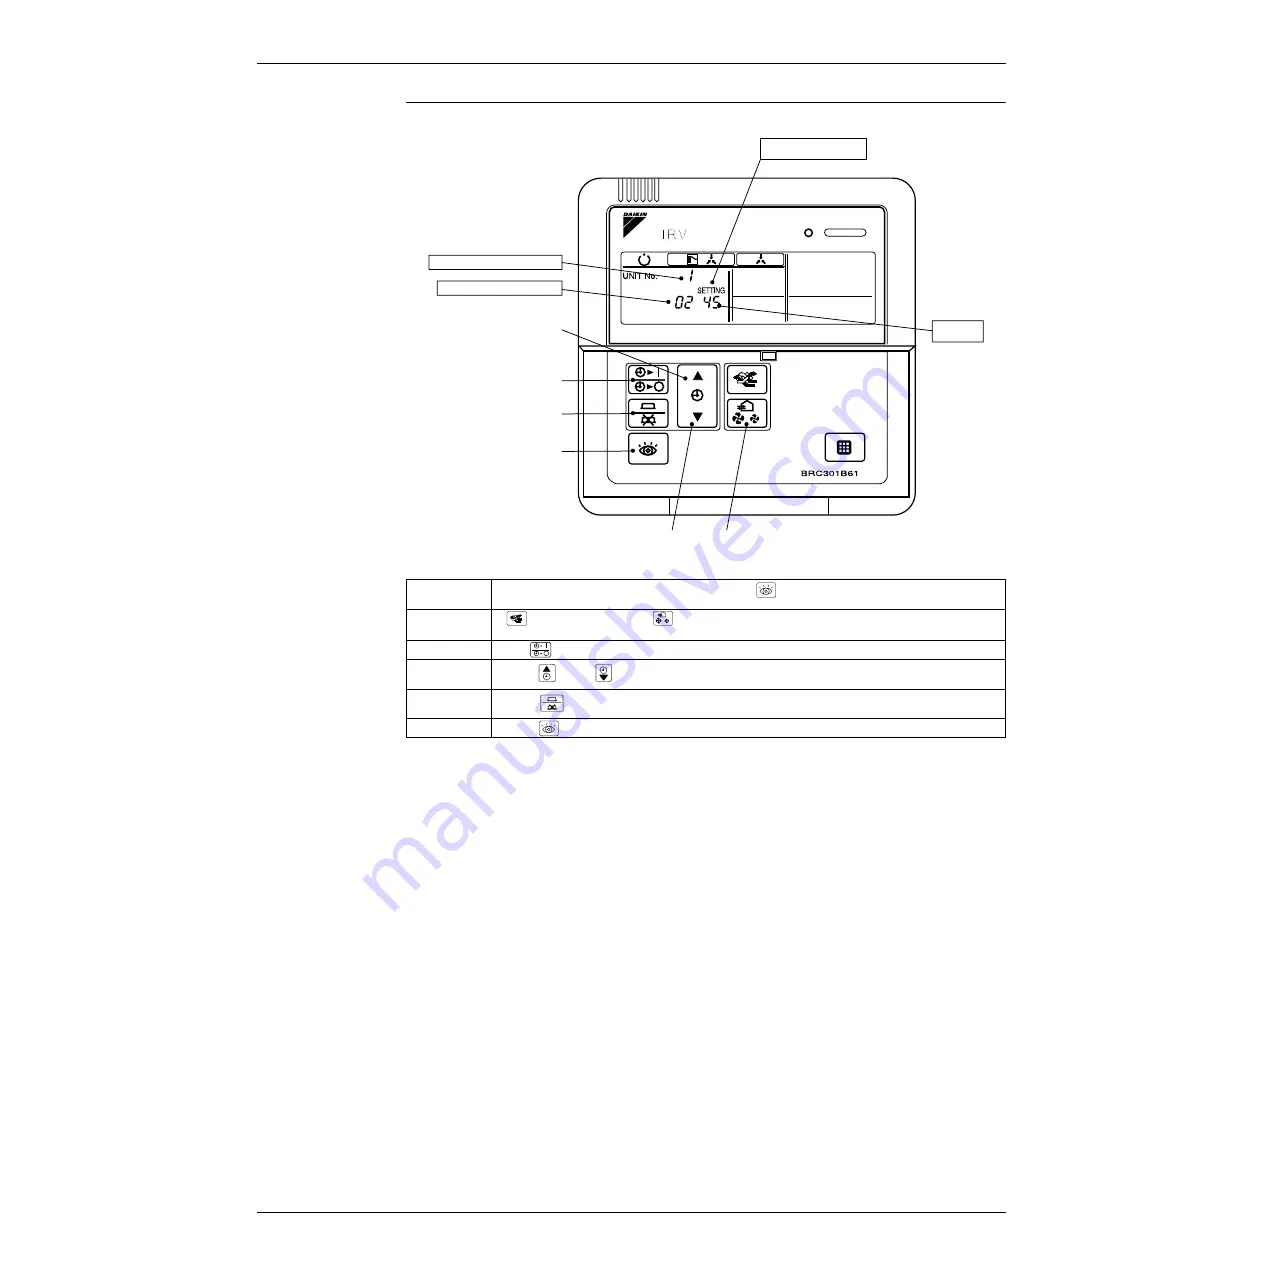
Unit No. 
reallocation (Mode 
No.45) 

Unit No. before reallocation

Unit No. after reallocation

3

4

1, 6

5

4

2

(HL042)

Field setting mode

Mode No.

Step 1

With equipment in field setting mode, press the 

 button for more than 4 seconds to enter 

service mode. 

Step 2

 Mode No.: UP 


 Mode No.: DOWN

Use [MODE] and [AIR VOLUME] to select  mode No.45.

Step 3

Use 

 to select setting Unit No. 

Step 4

Press 

 or 

 button to select Unit No. after reallocation.

Step 5

Press 

 button once to enter settings.

Step 6

Press 

 button to return to normal mode.

Summary of Contents for VAM 500EJ

Page 1: ...Heat Recovery Ventilation Applied Models VAM 500EJ VAM 800EJ VAM1000EJ VAM2000EJ SiE 93 Service Manual...

Page 2: ...Si 93 Table of Contents i Heat Recovery Ventilation VAM 500EJ VAM 800EJ VAM1000EJ VAM2000EJ VAM500 1000EJ VAM2000EJ...

Page 3: ...s 25 1 Circuit Operations 27 1 1 Circuit Configuration 27 1 2 Circuit Functions 28 Part 6 Troubleshooting 29 1 Troubleshooting 31 1 1 Error Code Indication 31 1 2 Overall Alarm 32 1 3 Overall Malfunct...

Page 4: ...7 1 18 Power Transformer 48 1 19 Damper Motor 49 Part 7 Supplementary Explanation 51 1 Supplementary Explanation 53 1 1 Field Setting Service Mode Operation 53 Part 8 Appendix 63 1 Appendix 65 1 1 Wir...

Page 5: ...Si 93 iv Table of Contents...

Page 6: ...Therefore be sure to observe all the safety caution items described below About the pictograms This symbol indicates an item for which caution must be exercised The pictogram shows the item to which...

Page 7: ...Introduction Si 93 vi 1 1 1 Cautions in Repair Warning...

Page 8: ...Si 93 Introduction vii...

Page 9: ...e but may nevertheless be valuable to the reader such as tips and tricks Caution Caution A caution is used when there is danger that the reader through incorrect manipulation may damage equipment loos...

Page 10: ...Si 93 General Constructions 1 Part 1 General Constructions 1 General Constructions 3 1 1 Explanation 3...

Page 11: ...Si 93 2 General Constructions...

Page 12: ...er Long Life Filter 5 Damper 6 Switch Box 7 Maintenance Cover 8 Heat Exchange Elements 9 Name Plate 10 Air Supply Fan 11 Remote Controller Option Parts 12 Damper Motor 13 EA Exhaust Air Exhaust Air to...

Page 13: ...Switch Box 7 Maintenance Cover 8 Heat Exchange Elements 9 Name Plate 10 Air Supply Fan 11 Remote Controller Option Parts 12 Damper Motor 13 EA Exhaust Air Exhaust Air to Outdoor 14 OA Outdoor Air Fres...

Page 14: ...Si 93 Operations 5 Part 2 Operation 1 Operation 7 1 1 Explanation for Systems 7 1 2 Operation with The Remote Control for Air Conditioning Operation HRV Units BRC301B61 8...

Page 15: ...Si 93 6 Operation...

Page 16: ...VENTILATION mode The ON OFF and timer operation can not be performed using the HRV remote controllers The indication of centralized control appears on the display Other operations can be performed usi...

Page 17: ...gh mode FRESH UP Low FRESH UP mode FRESH UP High FRESH UP mode Remote Controller for HRV BRC301B61 For Freshup operation When this indication does not show The volume of outdoor air supplied into the...

Page 18: ...he office hours During this period the cooling or heating load is reduced to bring the room temperature to the set temperature in a short time 7 Indication of centralized control When a remote control...

Page 19: ...ctor Remote Controller for VRV BRC1A61 62 Every time the operation mode selector is pressed the operation mode display changes as shown below example When the FILTER indication appears on the display...

Page 20: ...Si 93 Maintenance 11 Part 3 Maintenance 1 Maintenance 13 1 1 Maintenance for The Air Filter 13 1 2 Maintenance for The Heat Exchange Element 16...

Page 21: ...Si 93 12 Maintenance...

Page 22: ...art Be sure to turn off the OPERATION switch and disconnect the power CLEANING FREQUENCY AT LEAST ONCE EVERY TWO YEARS FOR GENERAL OFFICE USE CLEAN THE ELEMENT MORE FREQUENTLY IF NECESSARY 1 Go into c...

Page 23: ...a vacuum cleaner If excessively dirty wash it in water 5 If the air filter is washed remove water completely and allow to dry Air filter for 20 to 30 minutes in the shade When dried completely install...

Page 24: ...not dry the air filter over a fire 3 Do not subject the air filter to direct sunlight 4 Do not use organic solvent such as gasoline and thinner on the air filter 5 Be sure to install the air filter af...

Page 25: ...f the heat exchange element Use the vacuum cleaner equipped with a brush on the tip of the suction nozzle Lightly contact the brush on the surface of the heat exchanging element when cleaning Do not c...

Page 26: ...Si 93 Control Functions 17 Part 4 Control Functions 1 Control Functions 19 1 1 List of Control Functions 19 1 2 Explanation of Individual Functions 20...

Page 27: ...Si 93 18 Control Functions...

Page 28: ...output based on temperature controller judgment Note 1 2 5 Pre cool pre heat function Prevents equipment operation for a preset time set time after air conditioner is turned on 2 6 Freshup function S...

Page 29: ...Filter sign reset Stop Heat reclaim ventilation unit Ventilation fan motor Damper motor ventilation mode Normal ventilation Total heat exchange ventilation Remote controller indication Operation lamp...

Page 30: ...150 min 3 Others a Heat reclaim ventilation unit must be in non operating condition for two consecutive hours or more prior to pre cool pre heat operation b Temperature control mode of the air condit...

Page 31: ...oller for air conditioner Allows independent operation of heat reclaim ventilation unit from VRV system remote controller during interim periods not possible when direct duct connection is used ON OFF...

Page 32: ...controller for air conditioner Details of setting Mode Setting mode Setting switch No Setting position Operation method 01 02 03 04 05 06 Group No setting for centralized controller individual Field s...

Page 33: ...supply air exhaust air 7 Supply Air Exhaust Air External input terminal function selection 8 Fresh up Overall alarm Overall malfunction Forced Off Fanforced Off Air flow increase KRP50 output changeov...

Page 34: ...Si 93 Circuit Operations 25 Part 5 Circuit Operations 1 Circuit Operations 27 1 1 Circuit Configuration 27 1 2 Circuit Functions 28...

Page 35: ...Si 93 26 Circuit Operations...

Page 36: ...motor relay Central data transmission interface circuit Remote control signal transmission interface circuit Relay drive circuit Microcomputer oscillation circuit Microcomputer reset circuit Control m...

Page 37: ...ay coils Fan motor damper motor relay Power supply relay for fan motor and damper motor Input Thermistor interface Uses thermistor temperature sensor to detect inside and outside temperatures Airflow...

Page 38: ...dicated LCD Remote Controller 38 1 9 Data Transmission Error Between LCD Remote Controller and Main Unit 39 1 10 Data Transmission Error LCD Remote Controller 40 1 11 Data Transmission Error Between L...

Page 39: ...Si 93 30 Troubleshooting...

Page 40: ...shing Overall alarm P32 Flashing Flashing Overall malfunction P33 6 6 6 64 4 4 4 ON OFF Flashing Inside air thermistor error P34 6 6 6 65 5 5 5 ON OFF Flashing Outside air thermistor error P35 6 6 6 6...

Page 41: ...ting Conditions When external input terminal J1 JC is shorted during operation Overall Alarm must be set in field setting mode Possible Causes Faulty external device Broken wire Faulty control PCB Tro...

Page 42: ...ting Conditions When external input terminal J1 JC is shorted during operation Overall Alarm must be set in field setting mode Possible Causes Faulty external device Broken wire Faulty control PCB Tro...

Page 43: ...conversion table when measuring resistance Thermistor temperature resistance conversion table If measured value deviates significantly from above values thermistor is faulty Use tester to check resist...

Page 44: ...conversion table when measuring resistance Thermistor temperature resistance conversion table If measured value deviates significantly from above values thermistor is faulty Use tester to check resist...

Page 45: ...contact in connector including relay connector Faulty control PCB assembly Troubleshooting Note Note 1 Place tester probes on connectors of limit switch Move switch by hand and check continuity If tes...

Page 46: ...er motor or limit switch Faulty indoor air thermistor Faulty outdoor air thermistor Frosting Broken wire in cable Faulty contact in connector including relay connector Faulty control PCB assembly Trou...

Page 47: ...B assembly error Troubleshooting Dedicated Remote Controller Main Unit PCB Check to see if master slave remote controller is used Check microcomputer operation monitor on main unit PCB Is it flashing...

Page 48: ...erminal board Check with power turned on With remote controller cable disconnected voltage between P1 and P2 on terminal board should be approx 16 VDC If measured value is not approx 16 VDC PCB assemb...

Page 49: ...n is not performed correctly for a certain time period Possible Causes Erroneous connection Faulty remote controller setting Faulty remote controller Troubleshooting Is master slave selection switch p...

Page 50: ...nditions When data transmission is not performed correctly for a certain time period Possible Causes Faulty remote controller setting Faulty remote controller Troubleshooting NO NO Is master slave sel...

Page 51: ...ontroller cable Replace remote controller Is combination of remote controller and heat reclaim ventilation unit air conditioner correct NO HF011 Are 17 or more units connected to remote controller cab...

Page 52: ...Remote controller microcomputer checks for double setting of addresses Error Generating Conditions When same address is set to two or more units Possible Causes Overlapping of central control address...

Page 53: ...operly Is it flashing After checking other possible causes replace PCB assembly Is monitor indicator Off YES YES Monitor indicator remains On With remote controller disconnected check microcomputer op...

Page 54: ...er check continuity between two wires in cable Is measured value M infinity NO YES With remote controller cable disconnected from main unit PCB check voltage between P1 and P2 on main unit terminal bo...

Page 55: ...Option Check 2 Dedicated LCD remote controller Option Check 3 Dedicated LCD remote controller Option JC J2 J1 F2 F1 P2 P1 HL034 Main unit PCB JC J2 J1 F2 F1 P2 P1 HL035 Main unit PCB JC J2 J1 F2 F1 P2...

Page 56: ...hermistor is faulty Use tester to check resistance NO YES Is resistance as shown below Thermistor is normal Remove thermistor from main unit PCB X12A X13A and check resistance using tester If measured...

Page 57: ...sistance between secondary side of transformer and case 100 M or higher Insulation resistance between primary side and secondary side of transformer 100 M or higher Check resistance of primary side of...

Page 58: ...resistance and voltage DAMPER MOTOR NO YES YES Is measured value 0 when limit switch turns on and infinity when it turns off Damper motor is normal Place tester probes at connectors of limit switch an...

Page 59: ...Troubleshooting Si 93 50 Troubleshooting...

Page 60: ...Si 93 Supplementary Explanation 51 Part 7 Supplementary Explanation 1 Supplementary Explanation 53 1 1 Field Setting Service Mode Operation 53...

Page 61: ...Si 93 52 Supplementary Explanation...

Page 62: ...tep 1 With equipment in normal mode press the button for more than 4 seconds to enter field setting mode Step 2 Mode No UP Mode No DOWN Use MODE and AIR VOLUME to select desired mode No Step 3 To sett...

Page 63: ...ng mode Mode No Group No 3 4 1 5 HL040 2 Step 1 With equipment in normal mode press the button for more than 4 seconds to enter field setting mode Step 2 Mode No UP Mode No DOWN Use MODE and AIR VOLUM...

Page 64: ...on the forced fan Mode No 43 Step 1 With equipment in field setting mode press the button for more than 4 seconds to enter service mode Step 2 Mode No UP Mode No DOWN Use MODE and AIR VOLUME to selec...

Page 65: ...mode Mode No Step 1 With equipment in field setting mode press the button for more than 4 seconds to enter service mode Step 2 Mode No UP Mode No DOWN Use MODE and AIR VOLUME to select mode No 45 Ste...

Page 66: ...pe andcooling heating selection privilege Note Note 1 Only master remote controller can display flashing Operation changeover control when cooling heating selection privilege is not set New heat recla...

Page 67: ...y 40 Sensor data 41 Forced fan ON 43 Individual setting 44 Unit No reallocation 45 Step 1 To field setting mode Press for more than 4 sec Step 2 Mode No selection 1 Mode 00 30 Mode 40 49 Mode 50 59 Pr...

Page 68: ...LCD LCD is equipped with a new function that graphically displays currently selected ventilation mode as shown below HL045 Ventilation mode Auto Total heat exchange ventilation mode Normal ventilatio...

Page 69: ...Freshup setting changes as follows Inspection Inspection operation is shown below With Freshup Low Low High High Low Freshup High Freshup Without Freshup Function modes change in sequence every time...

Page 70: ...ame group control system However the setting of selected units can be fixed by the following method Example This setting method can be used when a group control system is connected with units having a...

Page 71: ...2 Supplementary Explanation Individual Settings Heat Reclaim Ventilation Unit Air Conditioner Ventilation Volume Ventilation Mode Airflow Volume Airflow Direction As indicated by LCD As indicated by L...

Page 72: ...Si 93 Appendix 63 Part 8 Appendix 1 Appendix 65 1 1 Wiring Diagram 65...

Page 73: ...Si 93 64 Appendix...

Page 74: ...Si 93 Appendix Appendix 65 1 Appendix 1 1 Wiring Diagram VAM500EJVE VAM800EJVE VAM1000EJVE...

Page 75: ...Appendix Si 93 66 Appendix VAM2000EJVE...

Page 76: ...LCD Master Remote Controller and Slave Remote Controller 41 Data Transmission Error Between LCD Remote Controller and Main Unit 39 Data Transmission Error LCD Remote Controller 40 Dedicated LCD Remote...

Page 77: ...eover Control 57 Operation chart 20 Operation for INDIVIDUAL SYSTEM 8 Operation mode selector 10 Operation with The Remote Control for Air Conditioning Operation HRV Units BRC301B61 8 Outdoor Air 3 4...

Page 78: ...de indication ON OFF 24 Ventilation mode setting 24 Ventilation mode otal heat exchange 59 Ventilation Operation Control 20 Ventilation operation control function 19 Ventilation volume Freshup setting...

Page 79: ...Si 93 iv Index...

Page 80: ...TO OPERATE WITH TIMER 9 I Initial setting mode Nos 17 27 18 28 53 Inspection operation 60 L LCD and Operation Panel 59 M Main Unit PCB 38 Main unit PCB 44 Maintenance Cover VAM2000EJVE 13 VAM500 1000E...

Page 81: ...Si 93 vi Drawings Flow Charts When no indication is displayed on remote controller 45 Wiring Diagram 65...

Reviews: