5-35
Chapter 5 User Menu
9.1 Test Exposures for Adjusting the Laser Power, Drum Rpm, Focus,
and Zoom
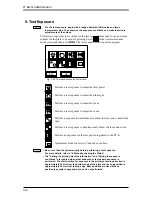
The procedure for performing test exposures for adjusting the laser power, drum rpm,
focus value, and zoom value is explained here. The test exposure setting screen for
laser power adjustment is used as an example.
NOTE
• In the above screen, the value in parentheses above the initial value shows the
laser power value (or rpm, focus value, or zoom value) in the media type selected
when the plate was loaded. Use it as a reference when performing the test
exposure.
• The initial value is the first laser power (or drum rpm, focus value, or zoom value)
used in the test exposure.
• The increment value indicates the amount of change from the initial value. For
example, if the laser power increment value is set to 10%, output will take place at
increments of 10% from the initial value.
• The count is the number of times the test exposure is to be carried out. For
example, if the initial value of laser power adjustment is 50%, the increment value
is 10%, and the count is 5, exposure will take place five times beginning at 50%
and incrementing by 10% to 60%, 70%, 80%, and 90%.
• The exposure start point is the distance from the plate edge to the point where the
test exposure begins. This value is updated (moved to the next possible exposure
position) each time a test exposure ends.
1.
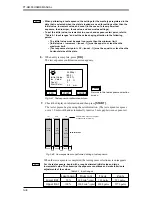
Press the resolution key and select the resolution value. With each press of the
key the setting changes as follows: 1200 dpi
→
2000 dpi
→
2400 dpi
→
4000
dpi
→
2438 dpi
→
2540 dpi
→
1200 dpi.
2.
Enter what you think is the best initial value and then press
[ENT]
. The highlight
will move to the increment value setting.
3.
Enter the desired increment value and then press
[ENT]
. The highlight will
move to the count setting.
50.0
Resolution key
Increment value
Count
Exposure start point
These keys can also move the
highlighted portion.
Currently set value
Initial value
Fig. 5-46 Test exposure setting screen
4.
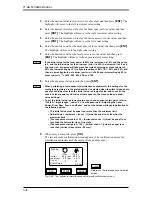
Enter the desired count and then press
[ENT]
. The highlight will move to the
exposure start point setting.
5.
Enter the exposure start point and then press
[ENT]
.
Summary of Contents for PLATE RITE 4300
Page 10: ...x...
Page 11: ...Chapter 1 Ensuring Safety 1 This chapter gives information necessary for safe use of the PT R...
Page 26: ...PT R4300 USERS MANUAL 1 16 End of Chapter 1...
Page 38: ...PT R4300 USERS MANUAL 3 8 End of Chapter 3...
Page 39: ...This chapter explains the basic procedures for operating the PT R Chapter 4 Basic Operation 4...
Page 60: ...PT R4300 USERS MANUAL 4 22 End of Chapter 4...
Page 61: ...This chapter explains the procedures for setting PT R parameters Chapter 5 User Menu 5...
Page 122: ...PT R4300 USERS MANUAL 5 62 End of Chapter 5...
Page 157: ...This chapter explains this typical PT R problem and the solutions Chapter 8 Jamming 8...
Page 163: ...This chapter gives technical information on the PT R Chapter 9 Technical Information 9...

