11
Line data input
(When line length is known)
This method is used when the line length is known before winding.
In the example below, PE4-250m is wound.
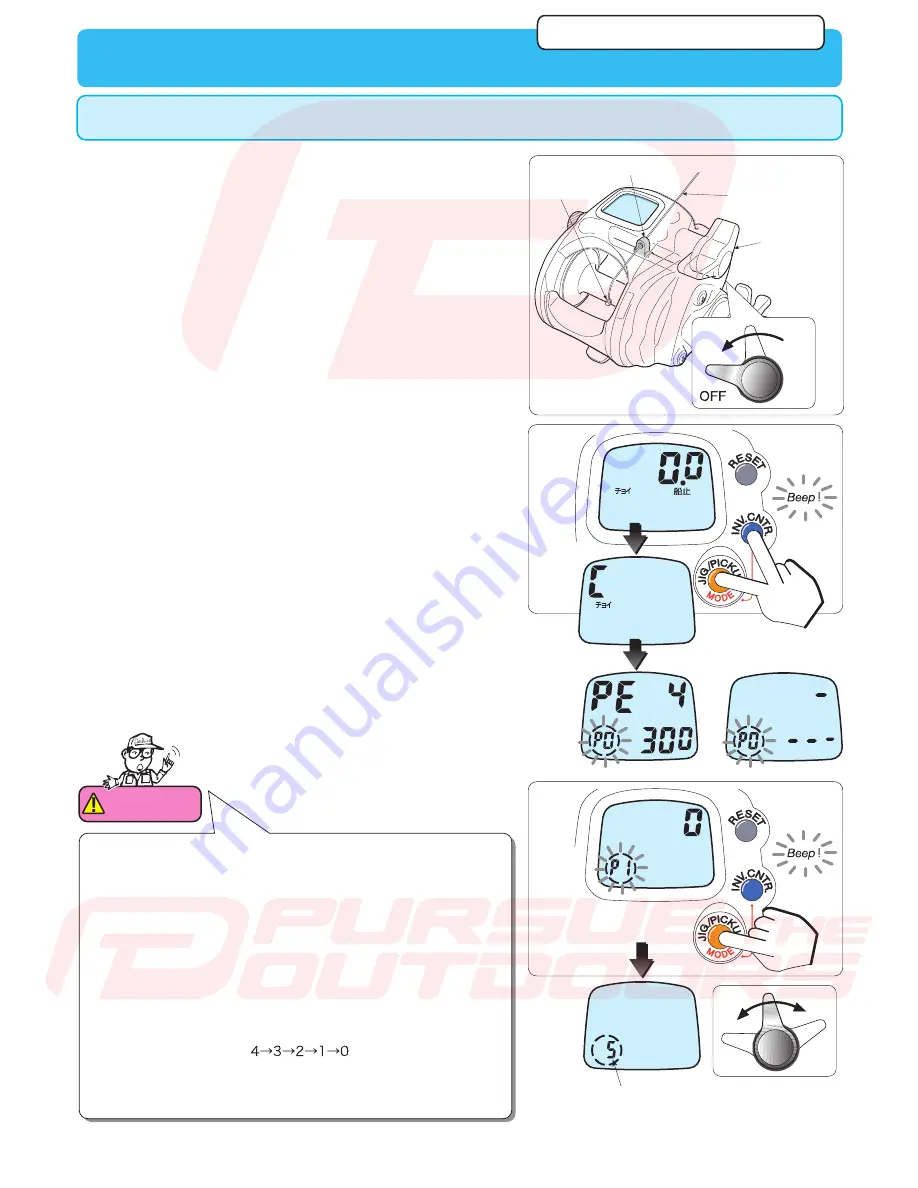
1.
Run line through the levelwind guide and tie it onto the spool.
The levelwind threader makes this process easier. Make sure
to tie the line onto the pin found on the spool to avoid the line
slipping.
2.
Move the power lever to the OFF position.
1
Tension indicatar
or
8.
Push the power lever forward to maximum and wind line to its
end. As the power lever is moved forward, the
P1
display
changes to a tension indicator, Keep line tension between level
4 and 5 while winding on line.
Do not allow line to rub against the finger guard while winding
as it will scratch the guard.
6.
The default setting display will appear.
7.
Press
JIG/PICKUP
BUTTON
once to move to the line length
input mode.
P1
will be blinking.
5.
Press
INVERSE COUNTER BUTTON
and
JIG/PICKUP
BUTTON
simultaneously and hold for 6 seconds, until the
display shows
P0
on left area of the display.
3.
Connect the clip to the power source (12V DC).
MAX
P0
will be blinking.
Levelwind Guide
Main line
Pin
Power lever
2
5
7
8
6
P1 Inputting the line length
Attention
If the line is wound indoors at a low speed and with a high
tension for a long period of time (*1), the motor will be
overheated, which may cause motor failure. Tilt the power
lever to the MAX position before inputting a value. This issue
does not need to be considered during fishing because the
motor will be cooled by sea water.
(*1) If the line is wound continuously for 10 minutes, the
motor overheat prevention function will start to work, which
will stop the motor. In this case, the display will start to blink
and any operation will become unavailable for 5 minutes.
When the countdown display on the chumming timer
indicator area reaches “
” (min.), a beep will
sound and data inputting will become available again from
the state immediately before the motor stoppage.
4.
Attach the cord connector to the reel.
See in page 2 for the connection method.
pursuetheoutdoors.com/schematics


