background image

MODEL:06A-618BR

LUBRICATION

OPERATION

USE ONLY THE AIR TOOL LUBRICANTS SUPPLIED WITH THE 
TOOL.

Do not use other lubricants as they may damage the 

tool.
If the tool is not used with an in-line lubrication system on 
the air supply it is necessary to periodically lubricate the tool 
with air tool lubrication.
Under  low  use,  lubricate  once  a  day.  Under  heavy  use, 
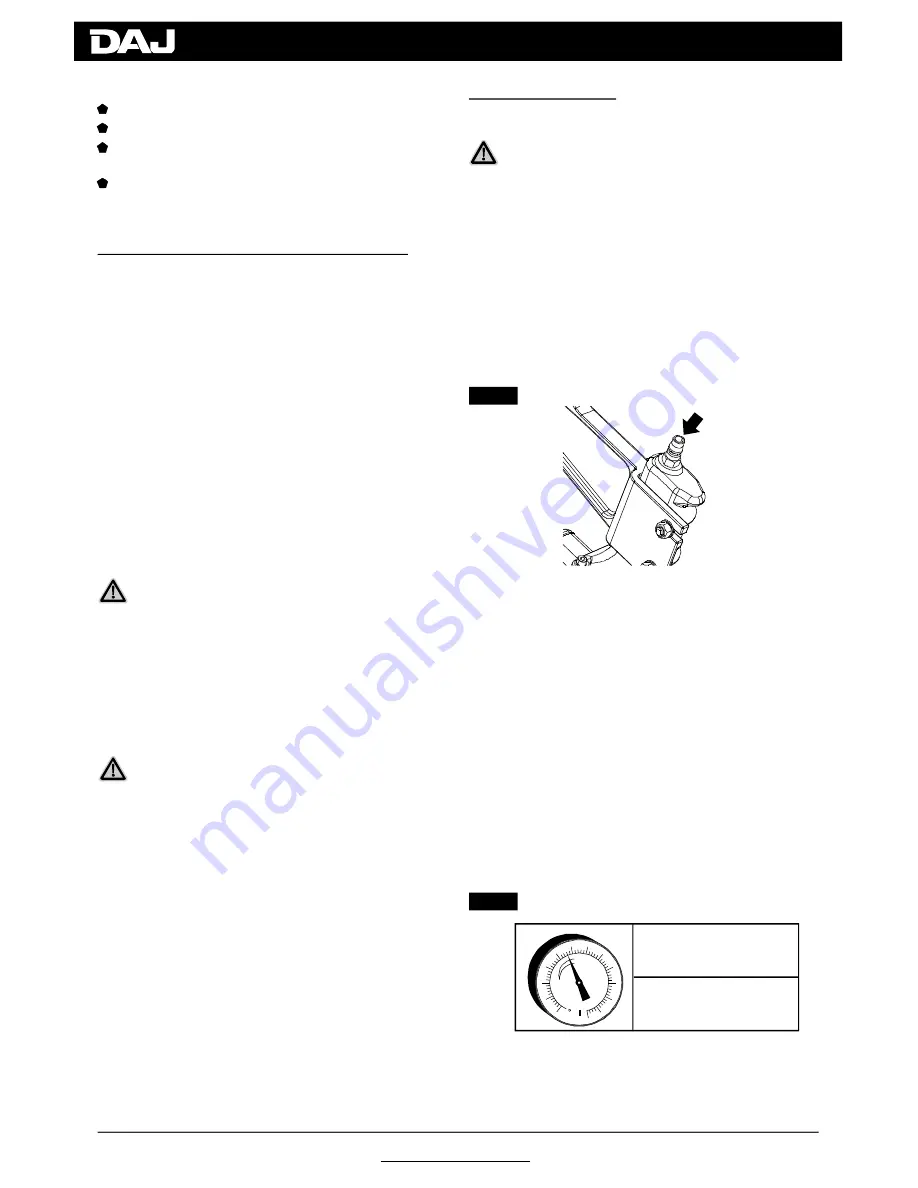
lubricate  twice  a  day.  To  lubricate,  insert  2-3  drops  of 
lubricant  into  the  air  supply  fitting  attached  to  the  tool 
handle (FIG 2). Using too much oil will cause it to collect in 

the tool and be noticeable in the exhaust.

Do not use detergent oil, WD-40, transmission fluid, motor 
oil, or other lubricants not specifically designated as air tool 
lubricants. These lubricants will cause accelerated wear to 
the  seals,  o-rings,  and  bumpers  in  the  tool,  resulting  in 
poor tool performance and frequent maintenance.

2-3 Drops of 

Air Tool Lubricant

ADJUSTING AIR PRESSURE

Adjust the air pressure at recommended operating pressure 
70-115PSI 

The correct air pressure is the lowest pressure which will do 
the job. Using the tool at a higher than required air pressure 
unnecessarily over stresses the tool. Don't exceed 115PSI.

according to the length of nails and the hardness 

of workpiece.

FEATURES

ASSEMBLY INSTALLATION

/

Follow  the  instructions  below  to  prepare  your  tool  for 
operation.

All tool operators and their immediate supervisors must 
become  familiar  with  the  operator  safety  instructions 
before operating the tool. 
Included  with  each  tool  are  one  copy  of  these 
Operating/Safety Instructions. Keep this publications for 
future reference.
Install a filter, regulator, lubricator unit and moisture trap 

on  your  air  delivery  system  per  the  manufacturer's 
instructions  for  these  devices.  Additionally,  install  a 
pressure  gauge  as  close  as  practical  to  the  tool, 
preferably within 10 feet.
Select  hoses  with  a  minimum  inner  diameter  of  1/4 
inches and a maximum length of 100 feet.

1.

2.

3.

4.

To  reduce  the  risk  of  injury  from  a  hose  bursting,  select 
hoses that are rated at least 200PSI.

Select  fittings  that  are  appropriately  sized  for  the 
selected hoses. The tool and air hose must have a hose 
coupling such that all pressure is removed from the tool 
when the coupling joint is disconnected.

Never  use  non  relieving  couplers  and/or  female  quick 
disconnect couplings on the tool.

 Non relieving couplings 

and female couplings will trap high pressure air in the tool 
when the air line is disconnected. This will leave the tool 
charged with enough air after it has been disconnected to 
drive  a  nail.  Only  MALE  pneumatic  type  air  connectors 
should be fitted to the tool, so that high pressure air in the 
tool  is  vented  to  atmosphere  as  soon  as  the  air  line  is 
disconnected.

Set the regulator at the air delivery system to a PSI that 
falls  within  the  tool's  operating  range  of  70-115PSI. 
The correct pressure is the lowest pressure that will do 
the job.

5.

6.

70PSI Minimum

115PSI Maximum

WARNING

WARNING

FIG. 2

FIG. 3

Well balanced hardened driver blade for a longer life.
Ergonomic design for less fatigue.
Composite base to eliminate scratch and damage to the 
surface of the wood.
Mallet included.

WARNING

www.chinaairtool.com

04

Summary of Contents for 06A-618BR

Page 1: ...jiang Prov 317500 P R China www chinaairtool com MODEL 06A 618BR USERS MANUAL WARNING SAVE THIS MANUAL FOR FUTURE REFERENCE 3 IN 1 FLOORING NAILER Failure to follow warnings could result in DEATH OR SERIOUS INJURY TAIZHOU DAJIANG IND CO LTD DAJ M0502 V2 ...

Page 2: ...RATING THE TOOL COLD WEATHER OPERATION SPECIFICATION FEATURES WORK AREA PERSONAL SAFETY TOOL USE AND CARE SERVICE AIR SOURCE JAM CLEARING CLEANING STORAGE HOOKUP INSTRUCTIONS FOR TOOL TO AIR SUPPLY IMPORTANT INFORMATION EXPLANATION OF THE NAILING ACTION GENERAL SAFETY RULES DESCRIPTION AND SPECIFICATION ASSEMBLY INSTALLATION OPERATION MAINTENANCE RECOMMENDED HOOKUP TROUBLE SOLVING www chinaairtool...

Page 3: ... horseplay with the tool Respect the tool as a working implement Doing so may cause malfunction and personal injuries Read manual carefully learn its applications and limitations as well as the specific potentialhazards related to this tool USE ONLY FASTENERS THAT ARE RECOMMENDED FOR YOUR MODELS CHECK FOR MISALIGNMENT OR BINDING OF MOVING PARTS BREAKAGE OF PARTS AND ANY OTHERS CONDITION THAT MAY A...

Page 4: ...ACTURER FOR THE SPECIFIC TOOL MODEL USE OF UNAUTHORIZED PARTS OR FAILURE TO FOLLOW MAINTENANCE INSTRUCTIONS MAY CREATE A RISK OF INJURY USE ONLY THE LUBRICANTS SUPPLIED WITH THE TOOL OR SPECIFIED BY THE MANUFACTUR TOOL SERVICE MUST BE PERFORMED ONLY BY QUALIFIED REPAIR PERSONNEL PLACE TOOL PROPERLY ON WORKPIECE DO NOT USE THE TOOL AS A HAMMER KEEP ALL SCREWS AND COVERS TIGHT IN PLACE KEEP FACE HAN...

Page 5: ...Pressure Magazine Capacity Fastener Size Range Length 20 1 510mm Height 22 8 580mm Width 3 54 90mm 11 2Ibs 5 1kg 70 115psi 5 8bar T cleat 100 pcs L cleat 100pcs Staple 120pcs T cleat 1 1 2 2 38 50mm L cleat 1 1 2 2 38 50mm Staple 1 1 2 2 38 50mm Air Cap Hand Grip Air Plug Magazine Pusher Body Hammer Cap Arm Shoe Foot Plate L cleats T cleats 38mm 45mm 50mm 1 1 2 1 3 4 2 16Ga 16Ga 38mm 45mm 50mm 1 1...

Page 6: ...h each tool are one copy of these Operating Safety Instructions Keep this publications for future reference Install a filter regulator lubricator unit and moisture trap on your air delivery system per the manufacturer s instructions for these devices Additionally install a pressure gauge as close as practical to the tool preferably within 10 feet Select hoses with a minimum inner diameter of 1 4 i...

Page 7: ...zine side shelter back Place full clip of desired fasteners into magazine from the side Up to 100 cleat nails can be loaded into magazine Be noted that when holding the L cleat nails the side with the L head should be in the left of the magazine side shelter Press the lock button then the pusher set back to make the magazine side shelter down back 1 2 3 FIG 6 FIG 7 LOADING CLEAT NAILS LOADING STAP...

Page 8: ...ped or if the hammer cap is accidentally struck then the tool will fire a fastener potentially causing SERIOUS PERSONAL INJURY Keep your feet off the tool Before using the tool on a floor test the tool on a scrap piece of wood Adjust the driving depth by providing more or less air pressure contacting the work surface Then using the mallet packet with the tool strike the hammer cap firmly to drive ...

Page 9: ... Bolt Make sure there is no fastener in magazine before clearing a jam Disconnect the tool from the air source whenever clearing a jam After disconnecting the tool from the air compressor there should still be enough air pressure to fire the tool After the air hose is disconnected always fire the tool into scrap wood repeatedly to make sure all of the compressed air is expended HOOKUP INSTRUCTIONS...

Page 10: ...e the air compressor is set between 70psi and 115psi Clean exhaust channel Not shooting fasteners Damaged pusher spring Wrong size of fasteners Replace spring Use 1 2 crown staples Fix the drive channel Replace the piston Remove the bent fasteners replace with the 1 2 crown staples Clean magazine Tighten screws Verify that fasteners are the correct size Drive channel is worn Piston is broken or wo...

Page 11: ...om normal wear neglect abuse accident or repair attempted Driver blades bumpers O rings piston and piston rings are considered normally wearing parts To take advantage of this warranty the product or part must be returned to us If our inspection verifies the defect we will either repair or replace the product With continuing product development changes may have occurred that the product you receiv...

Reviews: