background image

9

8

ENGLISH

Saturn Evo

 | Mounting instructions

Saturn Evo

 | Mounting instructions

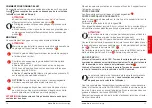
HOW IT WORKS

The lock is composed of an external shell turning on two fixed 

half-flanges.      


       Securing is at complete discretion of the user (see “How to use”).

CAUTION

•Before installing the device check that the doors are perfectly

aligned      ; 

• Prefer smooth surfaces to areas where the van body is

irregular;

• If necessary, use the plastic shims to level and/or align the

surfaces      ;  

WHERE YOU CAN INSTALL IT 

The device can be installed both on 

the rear and on the side door of the van.

CAUTION

 do not install the device on the forepart of 

the side door      . 

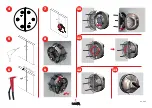
Use the adhesive drill template to mark the holes needed to 

install the device, using the central axis.  

Before drilling, check that the template is in the right position. 

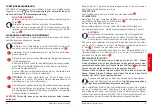
• Make 6 ø4.5 holes for mounting with long screws OR 6 ø6

holes for mounting with rivets on thin sheets (max 2.5 mm).

• Make 

1 ø3.5 hole 

(two holes are marked on the adhesive

drill template) only on the shutter/sliding door.

DISCRETIONARY

 In case of thin sheets (max 2.5 mm) once 

you have drilled the 6 ø6 holes (step 5), insert the rivets with a 

rivet plier (not included).

After drilling, clean the door surface and remove any burr. 

Better treat the door surface with rust preventive paint.

CAUTION


Check that the surface of the holes does not have burrs. 

1

4

5

6

7

2

3

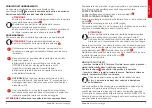
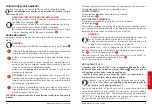
Place the rubber protections in correspondence of the holes and fix the 

two half-flanges in this way: 

REAR DOORS 

the two half-flanges are symmetrical and interchangeable      ;  

SLIDING DOORS

fix the beveled half-flange on the fixed van body and the other one on 

the sliding door      ;

Fix the 6 M4 long screws;

In case of thin sheets (max 2.5 mm) fix the 6 M4 short screws into the 

rivets that you have inserted (see step 

6

). 

CAUTION

if the surface is irregular, use the plastic shims included in the 

kit (see step 

2

). Since some doors can be subjected to defor-

mation, it is suggested not to exceed in tightening.


Open the shutter/sliding door. Place the external shell (key not inserted) 

onto the half flange in the only possible way (see      ). 

Turn the external shell of 180°      ;

From the inside of the door, fix the external shell in the hole with 3,5 mm 

diameter using the M3,5x14 screw and the star washer.

Close the shutter/sliding door. 

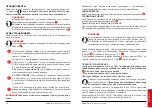
HOW TO USE

Insert the key and turn it of 180°. Turn the external shell until the lock 

symbols are on vertical axis. Turn the key and extract it: the lock is se-

cured. 

• Insert the key and turn it; turn the external shell. Turn the key and ex-

tract it: the lock is NOT secured. 

Opening/closing is guaranteed by the extraction of the key.


Securing is at complete discretion of the user.

Check the steadiness of the device: now you can open and close the 

device. Lubricate the lock at least every three months with a specific 

product. A silicone lubricant (VW G052 778 A2) is recommended. 

When washing the vehicle, avoid to point the water jet directly on the 

device.  

8

10

11

12

13

9

Summary of Contents for Saturn Evo

Page 1: ...X V V KIT SATURN EVO 1 2 3 ...

Page 2: ...4 5 6 MAX 2 5 mm 7 8 9 Ed 8 15 4 5 6 7 8 9 10 11 12 13 ...

Page 3: ...SCHEDA DI MONTAGGIO MOUNTING INSTRUCTIONS NOTICES DE MONTAGE ESQUEMA DE MONTAJE MONTAGEANLEITUNG ИНСТРУКЦИЯ ПО СБОРКЕ ...

Page 4: ...ICOLI COMMERCIALI 6 VAN LOCK 8 SERRURE DE SÉCURITÉ POUR VEHICULES UTILITAIRES 10 LADERAUMSICHERUNG FÜR NUTZFAHRZEUGE 12 CIERRE DE SEGURIDAD PARA EL ÁREA DE CARGA DE LAS FURGONETAS 14 МЕХАНИЧЕСКАЯ СИСТЕМА БЕЗОПАСНОСТИ ДЛЯ КОММЕРЧЕСКОГО ТРАНСПОРТА 16 ...

Page 5: ...inox AISI 304 satiné n 2 clefs n 1 kit visserie Der Lieferumfang von Saturn Evo beinhaltet n 1 Klebeschablone für die Bohrungen n 2 Weiche Gummieinlagen n 2 Harte Kunststoffeinlagen n 2 Halbflansche n 1 Schlossgehäuse aus gebürstetem Edelstahl AISI 304 n 2 Schlüssel n 1 Schraubensatz Cada cerrojo Saturn Evo incluye n 1 plantilla adhesiva para marcar los agujeros n 2 placas de plástico blandas n 2 ...

Page 6: ... le due protezioni in gomma morbida in corrispondenza dei fori e fissare le due semiflange secondo il seguente criterio PORTE POSTERIORI Le due semiflange sono simmetriche e intercambiabili PORTE LATERALI SCORREVOLI fissare la semiflangia smussata sulla lamiera fissa e l altra sulla porta mobile Completare il montaggio con le 6 viti M4 lunghe Per lamiere sottili max 2 5 mm utilizzare le 6 viti M4 ...

Page 7: ...r protections in correspondence of the holes and fix the two half flanges in this way REAR DOORS the two half flanges are symmetrical and interchangeable SLIDING DOORS fix the beveled half flange on the fixed van body and the other one on the sliding door Fix the 6 M4 long screws In case of thin sheets max 2 5 mm fix the 6 M4 short screws into the rivets that you have inserted see step 6 CAUTION i...

Page 8: ... et fixez les 2 supports selon l indication suivante PORTES ARRIÈRE Les 2 supports sont symétriques et interchangeables PORTES LATÉRALES COULISSANTES Fixez le seul support biseauté sur la tôle fixe et le support droit sur la porte mobile Terminez la pose avec les 6 vis longues M4 Pour tôles d épaisseur jusqu à 2 5 mm utilisez les 6 vis courtes M4 qui doivent être vissées dans les inserts fixés jus...

Page 9: ...Gummieinlagen an den Türen und befesti gen Sie die 2 Halbflansche wie folgt HINTERTÜRE Die 2 Halbflansche sind symmetrisch und austauschbar SCHIEBETÜRE Befestigen Sie den schrägen Halbflansch an der Fahrzeugseite und den anderen Halbflansch an der Schiebetür Ziehen Sie 6 lange M4 Schrauben an Bis einer Blechstärke von 2 5mm ziehen Sie 6 kurze M4 Schrauben in den Gewindeeinsätzen an die Sie bereits...

Page 10: ...acas de plástico blandas en los agujeros y fijar las dos lámi nas taladradas de acuerdo con el siguiente criterio PUERTA TRASERA Las dos láminas taladradas son simétricas y por lo tanto intercambiables LADO PUERTAS CORREDIZAS Fijar la lámina biselada en la parte fija y la otra en la puerta móvil corrediza Completar el montaje con 6 tornillos M4 largos para las chapas finas máxi mo 2 5 mm utilizar ...

Page 11: ...оверхности и отсутствии заз убрин 1 4 5 6 7 2 3 Разместите две мягкие резиновые прокладки в соответствии с отверстиями и расположите полу фланцы следующим образом ЗАДНИЕ ДВЕРЦЫ два полу фланца являются симметричными и взаимозаменяемыми РАЗДВИЖНЫЕ ДВЕРИ полу фланец со спиленными углами закрепите на неподвижную часть кузова другой на раздвижную дверь Завершить монтаж 6 длинными болтами M4 Для тонкос...

Page 12: ...Key code daken it ...

Page 13: ...Daken S r l Zona Ind le Jesce 75100 Matera ITALY daken it ...

Reviews: