page 5
MAN#650265
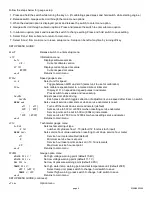
Places gauge into demo mode until the key is turned off (useful for display at shows)
Adjust dimming point on gauge
Dimming function is off
Gauge will dim when light on gauge face is very low (default)
…
7 selectable dimming levels
Gauge will dim early when more light is on gauge face
Enables/disables dim output for other gauges
Dim output will be high when gauge is dimming
Dim output will be disabled (default)
TEMP OIL
Enables/disables display of the temp / oil gauges in message center
Temp / oil display is enabled (used if temp and oil senders are not installed)
Temp / oil display is disabled (default)
FUEL
Enables/disables display of fuel gauge
Fuel gauge will be displayed (default)
Fuel gauge is not displayed. This if for use in applications without fuel senders.
Allows presetting of odometer value on initial install (not available after 10 miles (16 km)
Allows presetting of hour meter value on initial install (not available after 1.0 hrs)
Returns to main menu
Provides diagnostic modes
Displays the resistance in ohms of gear position sender
Displays 4x4 coil current in amps
Returns to main menu
Leaves setup menu if selected
ADDITIONAL SETUP NOTES
:
SPEED – AUTO
This setup option allows calibrating to a known mile or kilometer. By default, the speed is calibrated to use the stock RZR
speed signal. Calibration should only be needed if the calibration is no longer correct due to changes to tires or gearing.
1. Start with vehicle at the beginning of the marked mile or kilometer and turn the key off.
2. Start engine while holding the switch to enter setup.
3. Select speed option in setup and select appropriate unit (if you will be calibrating to a known kilometer choose km/h,
if calibrating to a known mile choose MPH).
4. Select the Auto option. The speed display will read
and the message center will read
.
5. Begin driving the mile or kilometer. The message center will read the number of pulses read from the speed signal.
This value cannot be used to determine if a mile or kilometer has been driven.
6. At the end of the mile or kilometer, stop the vehicle and press the switch to save the new speed calibration. The
gauge will leave setup and return to normal operation.
SPEED – ADJUST
This setup option allows adjustment to speed while driving. By default, the speed is calibrated to use the stock RZR speed
signal. Calibration should only be needed if the factory calibration is no longer correct due to changes to tires or gearing.
1. Start vehicle while holding the switch to enter setup.
2. Select speed option in setup and select appropriate unit (if you will be calibrating in kilometers per hour choose
km/h, if you will be calibrating in miles per hour choose MPH).
3. Select the
option. The speed reading will displayed and message center will read
4. Follow another vehicle traveling at a constant known speed or use a GPS unit to determine your speed. Hold the
switch to begin increasing the speed reading. To decrease the speed reading, release the switch and press and
hold the switch again.
5. The direction of adjustment will change each time the switch is released.
6. The calibration is saved when the switch has not been pressed for approximately 8 seconds. This is indicated by a
short flash of the message center.
7. Calibration can continue after a save has occurred but you must then wait another 8 seconds for the new setting to
be saved.
8. To leave speed adjust mode, stop the vehicle and turn off the key.
SERVICE METERS


