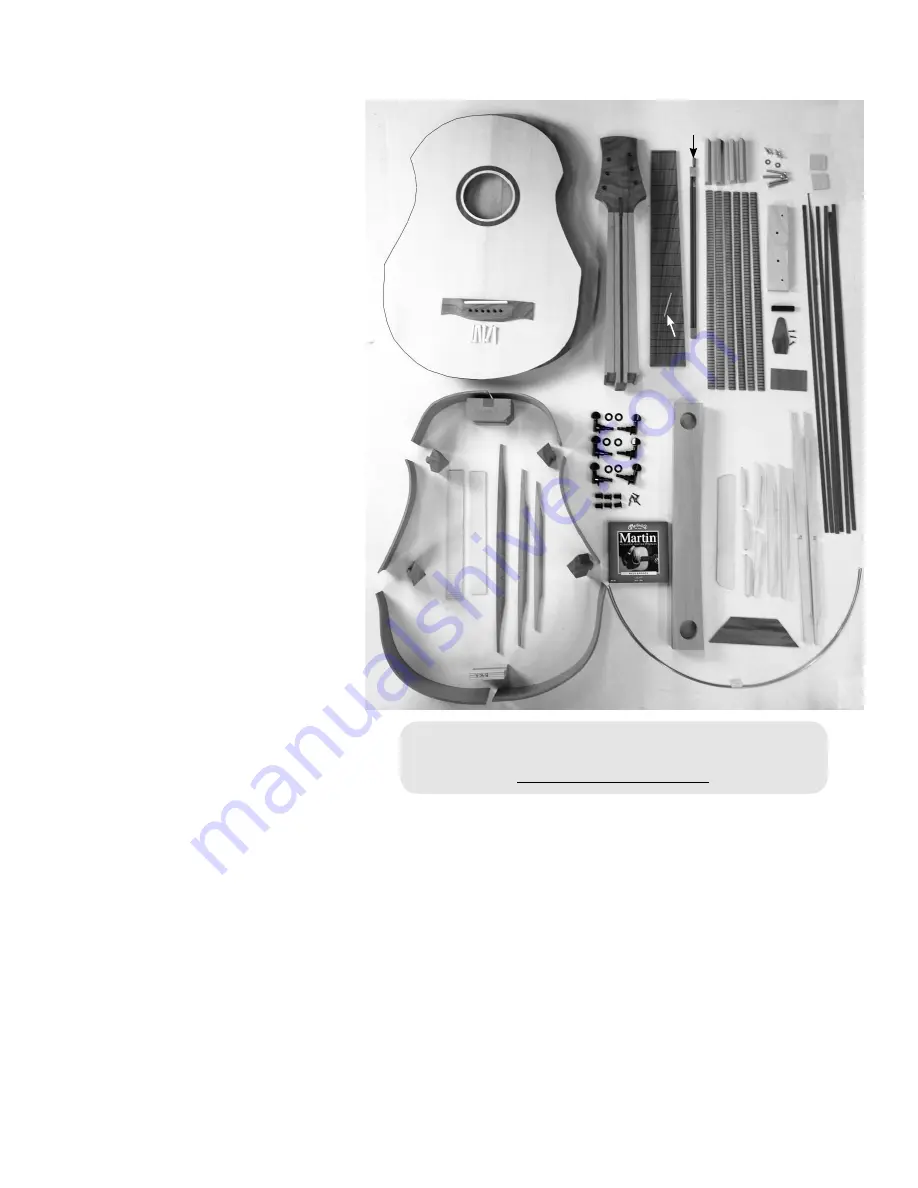
WOOD PARTS:
A - Neck
B - Fretboard
C - Heel Block
D - Tail Block
E - 2 Heel Ribs
F - 2 Side Ribs
G - 2 Tail Ribs
H - 4 Corner Blocks
I - Back Panel
J - 3 Cross-Braces for Back
K - 2 Flat Braces for Back
L - Front
(Soundboard)
M - 10 Braces for Front
(Soundboard)
N - 6 Inner Kerfing Strips
O - Bridge with Saddle
P - Bridge Clamp,
w/4 machine screws,
2 washers, 2 wing nuts
Q - Bridge Plate
R - 4 Clamping Wedges
S - Spacer Block
T - 6 Binding Strips, walnut
U - Heel Cap
V - Truss Rod Cover
HARDWARE:
W - 48 Inches Fretwire
X - 1 White Side Marker Rod
5/64”” X 2”
Y - 6 Black Geared Tuners
w/6 sleeves, 6 washers & 6 tiny screws
Z - Double Truss Rod
, with allen wrench
1 - Heavy Fretwire, 2” long,
for #0 fret
1 - Set of 6 Guitar Strings,
light
1 - Black Wood Nut
1 - Hex Bolt,
1/4” X 2”, with washer
2 - Tiny Nails
1 - Drill Bit,
1/16” for tiny screws
1 - Drill Bit,
5/64” for Side Markers
1 - Drill Bit,
3/16” for bridge
Assembly Instructions
DAKOTA GUITAR KIT
A NOTE ABOUT GLUE
We recommend assembling this kit with standard woodworker’s glue (such as Elmer’s Carpenters Glue or Titebond Wood
Glue). Don’t use Hotmelt glue, Superglue, 5-minute Epoxy, or the plain white School Glue for assembling the major wood
parts -- they are not strong enough for a musical instrument. There is no need to look for any special violin-maker’s adhesive.
You may, however, see epoxy or superglue recommended occasionally for installing non-wood parts.
Every time you use wood glue on this project, it is wise to have a damp rag handy for cleaning up afterwards. It is always best
to scrub away any excess glue that squeezes out of the joints before it dries, especially on the outside of the instrument. Keep
your hands and workbench as clean as possible too. Glue smudges will show up vividly on the finished instrument.
ASSEMBLY INSTRUCTIONS
_____1. CAUTION: PLEASE DO NOT OPEN THE SEALED PLASTIC BAG CONTAINING THE FRONT
AND BACK PANELS UNTIL YOU REACH STEP #14. These two parts need to be kept very dry until you glue
the braces on them. Check over your kit parts to make sure you find everything listed (see fig. 1 above). Contact us
right away if you are missing anything so we can rectify the problem without causing too much delay for you. We
also recommend checking off each step in the directions as you finish it. You might be skipping forward to another
part of the assembly while waiting for something to dry, and it helps to keep track of where you left off.
2.
Fig 1
A
B
C
D
E
E
F
F
G
G
H
H
H
H
I
J
K
L
M
N
O
P
Q
R
S
T
U
V
W
X
Y
Z
If you have any questions about the assembly of your
kit - please visit our online Builder’s Forum
www.harpkit.com/forum
Summary of Contents for PARLOR
Page 36: ......


