background image

Troubleshooting

10

LED

Color

Function Operation

Summary

DS1

Amber

Status

Blinking

DS1 blinks at one second intervals to indicate the 

driver is running. 

DS2

Green

Power

Steady on

DS2 is on and steady to indicate the driver has 

power. 

DS3

Red

Signal RX

Steady on 

or Blinking

DS3 is on or blinking when the driver is receiving a 

signal and off when there is no signal. 

Replacing a Driver

If the driver status indicators do not appear to be working correctly, it may be necessary 

to replace the driver. 

1� 

Open the control enclosure by removing the 6 screws and swinging the door open. 

2� 

Disconnect all plugs from the driver by squeezing together the locking tabs and 

pulling the connectors free. It may be helpful to label the cables or take a picture to 

know which plug goes to which jack when connecting the replacement driver. 

3� 

Remove the 4 nuts securing the driver to the control enclosure door. 

4� 

Carefully lift the driver from the enclosure and place it on a clean, flat surface. 

5� 

Position a new driver over the screws and tighten the nuts. 

6� 

Reconnect all plugs to their mating jacks on the driver. The connectors are keyed 

and will attach in one way only. Do not force the connections. 

7� 

Ensure the new driver is set to the correct address and switch settings. This will be the 

same as the old driver being replaced. Refer to 

Setting the Driver Address (p�10)


and 

Switch Settings (p�10)

8� 

Close and secure the enclosure door, then power up and test the display to verify the 

issue has been resolved. 

Setting the Driver Address

Since the same LED drivers can be used for many display 

models, each driver must be set to receive the correct signal 

input, or address, for the model in which it is being used. 

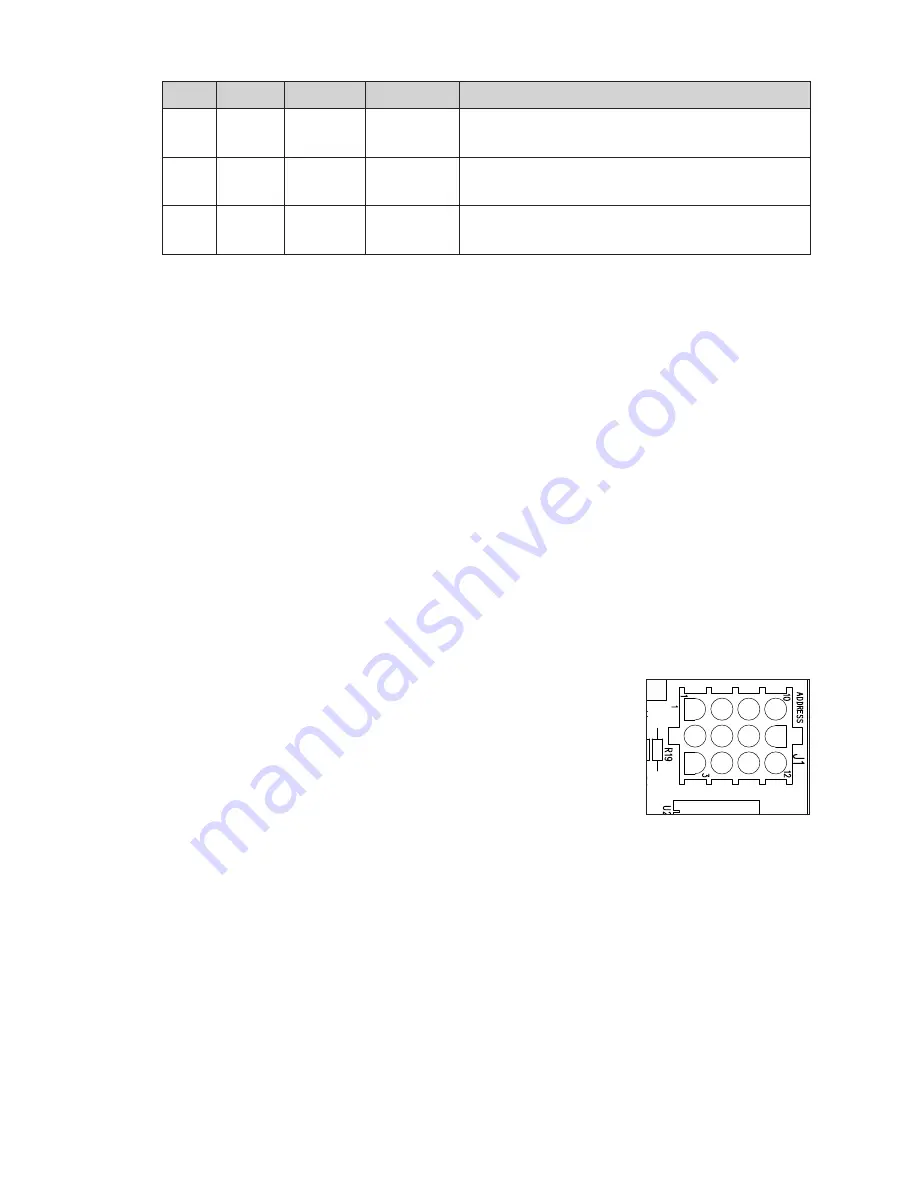
This address is set with jumper wires in a 12-pin plug which mates 

with jack 

J1

 on the driver. Refer to 

Figure 5

. After replacing the 

driver in the control enclosure, be sure to use an Address 1 plug 

in jack 

J1

. In most cases, the same plug can be reused from the 

driver that was replaced; otherwise, one may be ordered from 

Daktronics (part # 0A-1150-0122). 

Switch Settings

Reference Drawings:

Schematic: 120V Control Enclosure ...............................................................

DWG-4910448

Schematic: 240V Control Enclosure ...............................................................

DWG-4910665

Digit Switch Settings ..........................................................................................

DWG-4911300

Refer to the schematic drawings for DIP switch settings on the driver that control when 

the horn sounds and when backboard light strips illuminate. 
Refer to 

DWG-4911300

 for rotary switch settings on the shot clocks that control when the 

shot clock light strips illuminate and if tenths of a second displays on the large or small 

shot time digit. 

HAZARDOUS VOLTAGE

BEFORE SERVICING

DISCONNECT POWER

Driver Status 

Indicators 

Shot Clock Driver

Horn Interface Card

Transformers

Figure 5: 

Address Jack J1

Summary of Contents for BB-2160

Page 1: ...201 Daktronics Drive Brookings SD 57006 5128 www daktronics com support 800 325 8766 TRANSPARENT SHOT CLOCKS DISPLAY MANUAL P2345 DD4932144 Rev 01 29 March 2022 Models BB 2160 BB 2161...

Page 2: ...art of this book covered by the copyrights hereon may be reproduced or copied in any form or by any means graphic electronic or mechanical including photocopying taping or information storage and retr...

Page 3: ...on Overview 4 Power 4 Grounding 4 Power On Self Test POST 5 Radio Settings 5 Signal Connection 5 Radio Control 5 Backboard Light Strips 6 Tenth Second Shot Time 6 4 Troubleshooting 7 Troubleshooting T...

Page 4: ...This page intentionally left blank...

Page 5: ...not drop the control equipment or allow it to get wet Specifications Label Power specifications as well as serial and model number information can be found on an ID label on the display similar to th...

Page 6: ...Control Console Operation Manual ED 11976 This manual is provided on a CD with the control console and it is also available online at www daktronics com manuals Specifications The chart below details...

Page 7: ...ment and vibration The brackets need to be designed to minimize vibration and shot clock movement BB 2161 shot clocks are mounted on the rear of the backstop perpendicular to the backboard with includ...

Page 8: ...azardous to personnel Install a grounded receptacle near the equipment so that the power cord can easily reach it Each shot clock control enclosure comes with a 120 or 240 VAC twist lock power plug th...

Page 9: ...3 Install the 1 4 phone plug part 0L 40683 to the display end of the cable Be sure to connect the cable shielding only in the J box on this end DO NOT connect cable shielding at the J box near the co...

Page 10: ...ng tenths of a second on the shot time digits is not enabled by default in the All Sport 5000 console To enable this press MENU arrow down to EDIT SETTINGS and press ENTER Arrow down to SHOT CLOCK MOD...

Page 11: ...s No wired signal from control console Check that the control enclosure is receiving 120 or 240 VAC power Check that the red DS3 LED on the driver lights up when sending commands from the controller R...

Page 12: ...e connector on the back of the digit circuit board is secure Bad digit or driver Exchange the digit or driver with a working one of the same part to verify the problem Replace if necessary Refer to Co...

Page 13: ...horns The schematic drawings also show the DIP switch settings on the driver that control when the horn sounds DWG 4911300 shows the rotary switch settings on the shot clocks that control when the LE...

Page 14: ...Ensure the new driver is set to the correct address and switch settings This will be the same as the old driver being replaced Refer to Setting the Driver Address p 10 and Switch Settings p 10 8 Close...

Page 15: ...V Horn Interface Card 0P 1192 0399 5 Four Digit Clock Dual Sided Amber 0P 1322 0014 7 Four Digit Clock Dual Sided Amber 0P 1322 0015 Driver Transparent Shot Clock 0P 1322 0016 7 Two Digit plus Tenths...

Page 16: ...__________________________ Daktronics Customer ID Number ______________________________________________________ To participate in the Exchange Program follow these steps 1 Call Daktronics Customer Ser...

Page 17: ...nt damage during shipment Electronic components such as printed circuit boards should be placed in an antistatic bag before boxing Daktronics does not recommend using packing peanuts when shipping 4 E...

Page 18: ...This page intentionally left blank...

Page 19: ...e DWG 225832 Mechanical Spec Remote Horn DWG 235683 Assy Camera Cable Holder DWG 1172138 Schematic 120V Control Enclosure DWG 4910448 Schematic 240V Control Enclosure DWG 4910665 Digit Switch Settings...

Page 20: ...This page intentionally left blank...

Page 21: ......

Page 22: ......

Page 23: ...SHOT CLOCK TITLE ASSY CAMERA CABLE HOLDER DATE 26 SEP 19 DIM UNITS INCHES MILLIMETERS SHEET REV SCALE 1 8 DO NOT SCALE DRAWING 1 OF 1 01 DESIGN DOPPELT JOB NO FUNC TYPE SIZE 1172138 DRAWN DOPPELT P13...

Page 24: ...HOT CLOCK SCHEMATIC CONTROL ENCLOSURE 120 VAC TSPRACK 30 JUL 21 P2345 R 03 B NTS TSPRACK 4910448 00 OFF 8 7 6 5 4 3 2 1 AC IN DC OUT 19VDC PSU A 4854297 G L N P Pa ar rt t D DW WG G 0 04 49 91 10 04 4...

Page 25: ...HOT CLOCK SCHEMATIC CONTROL ENCLOSURE 240 VAC TSPRACK 30 JUL 21 P2345 R 03 B NTS TSPRACK 4910665 00 OFF 8 7 6 5 4 3 2 1 AC IN DC OUT 19VDC PSU A 4854297 G L N P Pa ar rt t D DW WG G 0 04 49 91 10 06 6...
Page 26: ...OT SCALE DRAWING FUNC TYPE SIZE DRAWN JOB NO TRANSPARENT SHOT CLOCK DIGIT SWITCH SETTINGS TSPRACK 02 AUG 21 P2345 E 10 A TSPRACK 4911300 00 P Pa ar rt t D DW WG G 0 04 49 91 11 13 30 00 0 V Ve er rs s...

Page 27: ...ERS DESIGN SCALE DIM UNITS DATE SHEET DO NOT SCALE DRAWING FUNC TYPE SIZE DRAWN JOB NO TRANSPARENT SHOT CLOCKS CONNECTION DIAGRAM BB 21X0 BB 21X1 TSPRACK 20 AUG 21 P2345 E 10 A NONE TSPRACK 4930529 00...

Page 28: ...CONTROL ENCL TSPRACK 20 AUG 21 P2345 E 10 A 1 10 TSPRACK 4930974 00 120VAC IN SIGNAL IN J31 HORN MAIN S C AUX S C CAUTION 120VAC BEHIND THIS PANEL RED LIGHT STRIPS AMB LIGHT STRIPS NA NA P Pa ar rt t...

Page 29: ...VIEW OPTIONAL CAMERA MOUNTS WILL ONLY ACCEPT A 2 00 PIPE ONLY USE ONE MOUNT AT A TIME THE CAMERA CAN WEIGH UP TO 40LBS THE MAX TOTAL WEIGHT OF THE CAMERA AND THE MOUNTING HARDWARE MUST NOT EXCEED 50...

Page 30: ...DRAWING 00 DESIGN JCOOK JOB NO FUNC TYPE SIZE 4934069 DRAWN JCOOK P2345 E 10 A WEIGHTS SHIPPING WEIGHT MOUNTING WEIGHT 75 LBS 34 KG 50 LBS 23 KGS BB 2161 FRONT VIEW LED LIGHT STRIPS ON ALL FOUR SIDES...

Page 31: ...THE TOP APPROXIMATELY 6 5 REMOVE THE SHIMS THAT ARE PLACED BETWEEN THE POLYCARBONATE AND THE FRAME 6 DISCONNECT THE LED LIGHT STRIPS ATTACHED TO THE TOP FROM THE WIRING HARNESS INSIDE THE SHOT CLOCK F...

Page 32: ...FUNC TYPE SIZE DRAWN JOB NO TRANSPARENT SHOT CLOCKS COURT VIEW BB 2160 BB 2161 TSPRACK 30 AUG 21 P2345 E 10 A 1 50 TSPRACK 4935896 00 DAKTRONICS P Pa ar rt t D DW WG G 0 04 49 93 35 58 89 96 6 V Ve e...

Page 33: ...Daktronics Warranty Limitation of Liability 29 B Daktronics Warranty Limitation of Liability This section includes the Daktronics Warranty Limitation of Liability statement SL 02374...

Page 34: ...This page intentionally left blank...

Page 35: ...y per Incoterms 2020 otherwise End User shall pay transportation charges to return the Equipment back to the End User and such Equipment shall be shipped Ex Works Daktronics designated facility per In...

Page 36: ...Daktronics or M paint or refinishing the Equipment or furnishing material for this purpose 3 Limitation of Liability A Daktronics shall be under no obligation to furnish continued service under this W...

Page 37: ...ation of this warranty Alternatively an Extended Service Agreement may be purchased in conjunction with this Warranty for extended additional services For further information contact Daktronics Custom...

Page 38: ...This page intentionally left blank...

Reviews: