background image

Big Stream 1 Quick Guide

DD4731212
Rev 01
02 December 2020

201 Daktronics Drive

Brookings, SD 57006-5128

www.daktronics.com/support

800.325.8766

Page 7 of 11

Optional TriCaster Mini Setup

Refer to the instructions below and 

DWG-4715862

 to set up the 

optional TriCaster Mini switcher and replay system. For more 

information, also refer to the TriCaster User Guide  

(

http://new.tk/Manual-TC1-V2

). 

1. 

Remove the TriCaster Mini, Launchpad Mini, mouse, keyboard, 

and power adapters from the travel case. Set up this equipment 

– and the TimeWarp device – within 25' of the control rack. 

2. 

Place one 22" ViewSonic monitor at the Replay operator location 

and the other 22" ViewSonic monitor at the TriCaster switcher 

operator location. Both monitors should be within 6' of the 

TriCaster Mini. 

3. 

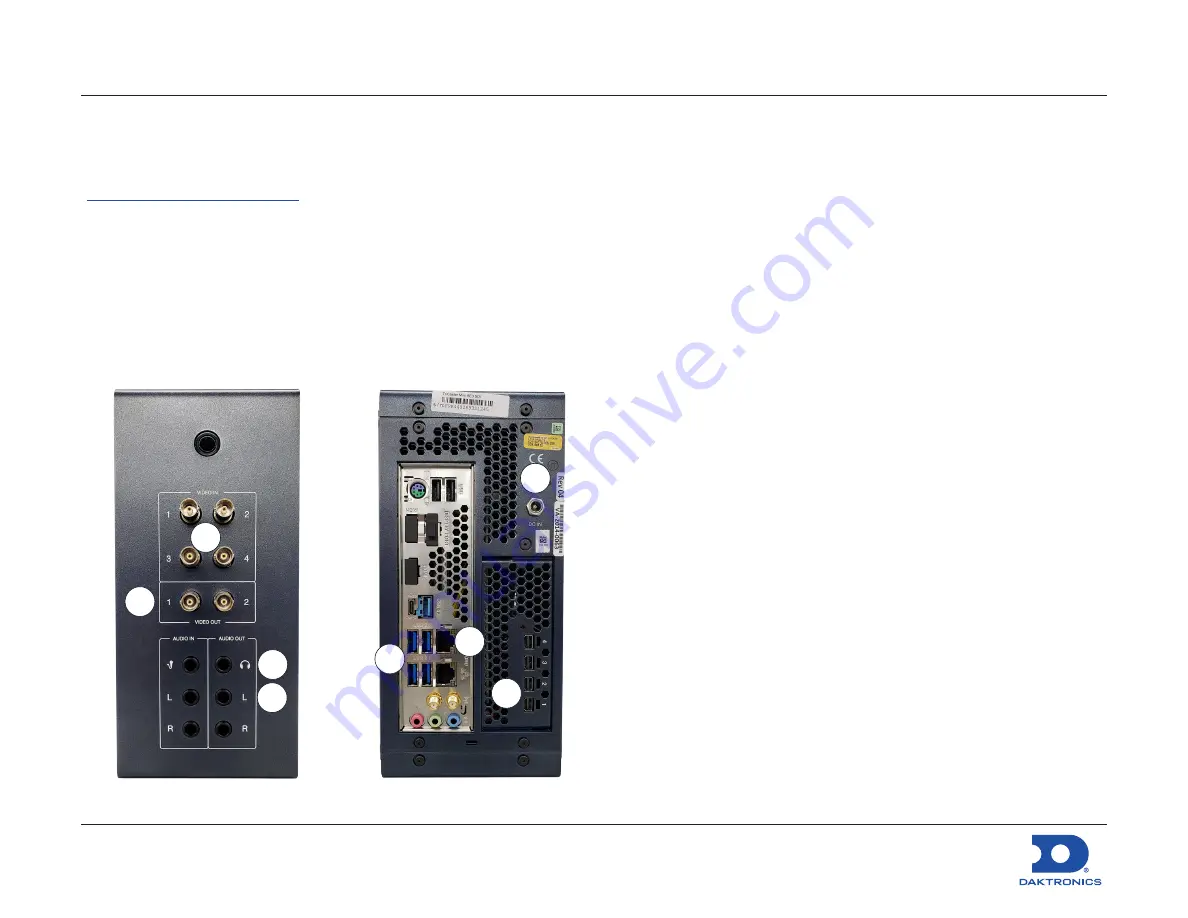
Make the following connections to the TriCaster Mini: 


3a

3g

3c

3e

3f

3b

3d

3h

a. 

Connect BNC cables from up to four cameras to 

VIDEO IN 1-4

.

b. 

Connect the 25' BNC cable (part # W-1971) between a 

VIDEO 

OUT

 jack and the 

SDI IN

 jack on the new DMP in the rack. 

c. 

Connect the 1/8"-to-1/4" adapter into the 1/8" TriCaster 

operator monitor audio cable, and then plug the adapter 

into the 

PHONES

 jack. The other end of the audio cable 

connects to the monitor’s 

AUDIO IN

 jack. 

d. 

If there is an audio system, connect the 25' 1/4"-to-XLR cable 

(part # W-4717001) between the 

AUDIO OUT L

 jack and an 

available input on the audio mixer. 

e. 

Plug the supplied mouse, keyboard, TimeWarp, and 

Launchpad Mini devices into available 

USB

 ports. 

f. 

Connect the 25' network cable (part # W-4638308) between 

NETWORK

 jack and an open jack on the network router in 

the control rack. 

g. 

Connect one Mini-DisplayPort-to-DisplayPort adapter into 

one 6' DisplayPort cable, and then plug the adapter into 

one of the Mini DisplayPort jacks. The other end of the cable 

connects to the 22" Replay operator monitor. Repeat this to 

also connect the 22" TriCaster operator monitor. 

h. 

Connect the power adapter into the 

DC IN

 jack. 

4. 

Plug power cords for all devices (TriCaster Mini, monitors, etc.) 

into standard wall outlets. 

Summary of Contents for Big Stream 1

Page 1: ...t in the desired temporary location within 25 of the existing control rack 3 Connect the DMP power cord into an available outlet on the rack power strip or nearest wall outlet 4 Connect either the 5 p...

Page 2: ...put 3 Click Continue when the confirmation message opens 4 Wait for the player to restart A green check mark indicates when the process is completed Mapping Content Directory 1 Press the Windows Start...

Page 3: ...or Wall 1 Right click in the monitor wall and select Properties 2 In the drop down list that appears select D8STREAM P Primary 3 Click the button to add it to the monitor wall 4 Drag the edge of the n...

Page 4: ...be added to existing buttons in order to play content to both the video board and streaming player Additional scripts can similarly be added to the Blank Display Full Screen Video and Scaled Video but...

Page 5: ...yers monitors Note Full Screen Video and Scaled Video buttons can be modified in a similar manner Blank Display 1 Select the appropriate Sport tab right click the Blank Display button and then select...

Page 6: ...therwise the content may still need to be recreated For example if you have a small 132 x 176 display with a 4 3 aspect ratio streaming its content will not only cause pixelation due to upscaling it w...

Page 7: ...onnect the 25 BNC cable part W 1971 between a VIDEO OUT jack and the SDI IN jack on the new DMP in the rack c Connect the 1 8 to 1 4 adapter into the 1 8 TriCaster operator monitor audio cable and the...

Page 8: ...s the TriCaster acts as a switcher for up to 4 video inputs For the Big Stream system the TriCaster Mini may also function as the streaming device For more information about connections to the TriCast...

Page 9: ...Mix 4 is the replay mix MIX 2 will be used for the separate streaming mix a Change MIX 2 Video to M E 2 b Change STREAM 1 Video to MIX 2 c Adjust the Audio output source if desired 3 Click the STREAM...

Page 10: ...TriCaster unit and Product ID presented during registration are required to obtain the necessary Registration Code For more information about registration operation or troubleshooting of the TriCaste...

Page 11: ...430 2 TIME WARP 850TW REPLAY CONTROLLER A 3343 1 LAUNCHPAD MINI MK3 A 3450 1 TRICASTER MINI ADVANCED SDI A 4715564 1 TRICASTER MINI TRAVEL CASE EN 4715565 1 25 BNC VIDEO CABLE W 1971 1 ADAPTER 1 4 PLU...

Reviews: