background image

Dashboard

8

•  Network

: This tile shows network address information. Click this tile to open 

Network


under the 

Config


 menu.

•  Storage

: This information tile shows how much 

file storage is currently being used and how 

much is available on the player. Click this tile to 

open a window to delete all content files. Refer 

to 

Figure 8

. Use caution with this action as all 

media files in the default content folder will be 

permanently deleted.

•  Monitor

: This tile shows a thumbnail of the current display output. The content shown 

in this thumbnail is not a live video stream; the image is refreshed once every 30 

seconds. Click this tile to open 

Monitor 

. Refer to 

Section 5: Monitor (p.27)

.

•  Scheduling

: This tile shows details of the software program used to schedule and 

manage the media files. Click this tile to open 

Services

 under the 

Config


 menu.

•  Security

: This tile shows the security settings for the player. Click this tile to open 

Security

 under the 

Config


 menu.

•  Outputs

: This tile provides information about the display output configuration and size. 

Click this tile to open 

Outputs

 under the 

Config


 menu.

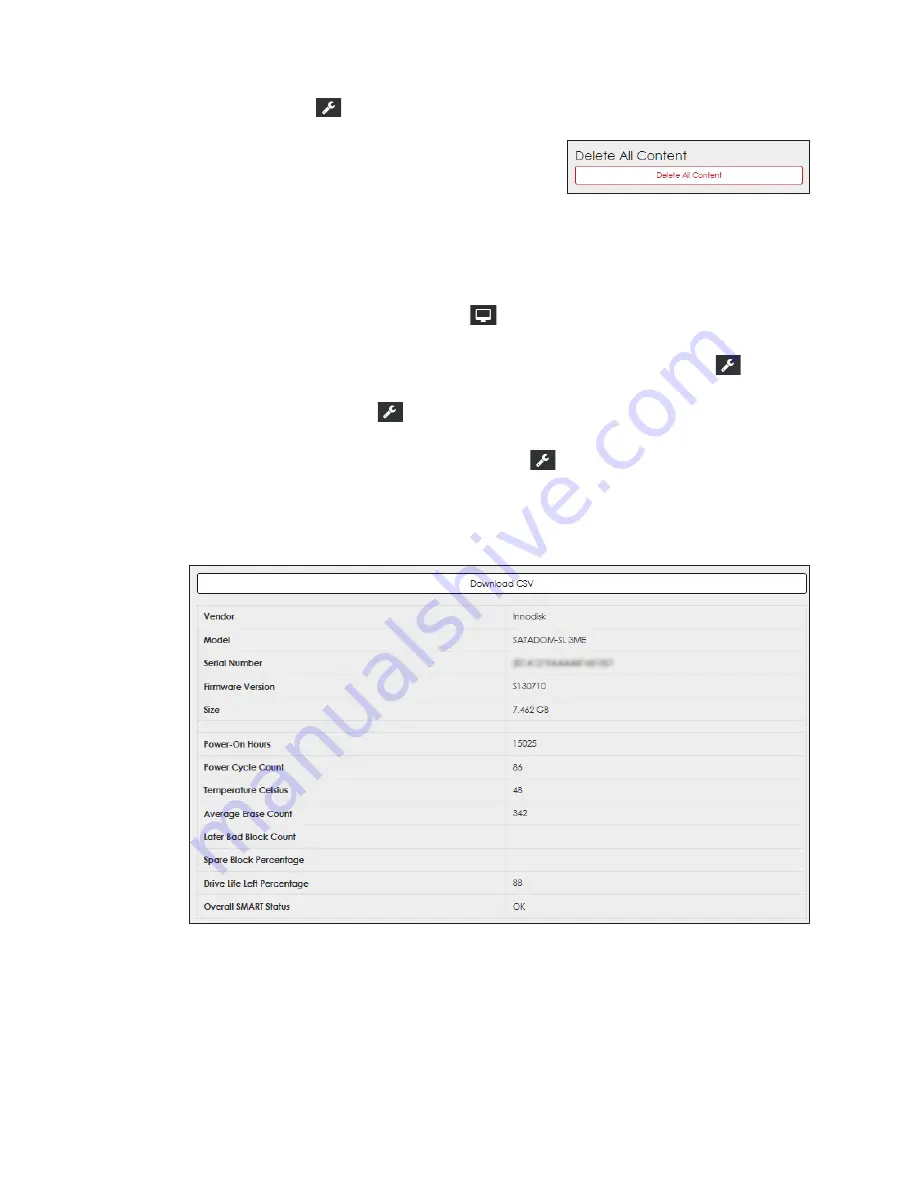
•  Drive Health

: This tile estimates the remaining health of the player’s hard drive based 

on current usage versus the expected lifespan of the drive. If the hard drive does not 

provide this data, the tile shows 

N/A

. Click this tile to open a window that shows hard 

drive details and to download a CSV file with more information. Refer to 

Figure 9

.

Figure 9: 

Drive Health

Figure 8: 

Delete Content Prompt

Summary of Contents for DMP-5000 Series

Page 1: ...201 Daktronics Drive Brookings SD 57006 5128 www daktronics com support 800 325 8766 DMP 5000 8000 SERIES DIGITAL MEDIA PLAYER OPERATION MANUAL P1603 P1833 DD1881645 Rev 12 15 July 2020...

Page 2: ...art of this book covered by the copyrights hereon may be reproduced or copied in any form or by any means graphic electronic or mechanical including photocopying taping or information storage and retr...

Page 3: ...iagnostics 20 Restart 20 VIP 21 5000 Series 21 Brightness 21 Temperature 22 Test Patterns 22 4000 Series 22 Brightness 22 Temperature 22 Test Patterns 22 Security 23 RTD 23 Sign Mapping 24 Data Source...

Page 4: ...ral Cleaning Precautions 44 Exterior Computer Cleaning 44 Interior Computer Cleaning 44 14 System Troubleshooting 46 Initial Troubleshooting Checklist 46 Retrieving Important Information 46 GUID 46 DM...

Page 5: ...Daktronics digital media players are either stand alone units normally rack mounted or embedded in the display cabinet itself Refer to Figure 1 Rack mounted player Embedded player Figure 1 Player Typ...

Page 6: ...s is unknown The computer running the DisplayFind utility must be on the same subnet as the target player Refer to the DisplayFind Utility Quick Guide DD1961783 in Appendix A Supplementary Documents p...

Page 7: ...on title across the top of the screen Right side menu is in the upper right corner of the screen Click User to expand the menu panel Refer to Right Side Menu p 4 for more information Main menu is on t...

Page 8: ...manual Opens a window showing Daktronics contact information and open source licenses used to build the player Opens an advanced configuration window for use by Daktronics Technical Support Triggers...

Page 9: ...s a PDF version of this manual About About opens a window with Daktronics customer service information and a link to the Daktronics website Click Licensing Information for a listing of the open source...

Page 10: ...eo stream of the current display content and triggers test content including test patterns Launches the Vanguard Field Controller VCF interface Saves the current system backup file or restores the sys...

Page 11: ...he Config menu Firmware This tile shows the current version of the player firmware Click this tile to open a window to trigger a firmware update Browse to the correct file and click Update Firmware to...

Page 12: ...to Section 5 Monitor p 27 Scheduling This tile shows details of the software program used to schedule and manage the media files Click this tile to open Services under the Config menu Security This t...

Page 13: ...g click the Save button to save that change If a change is made but not saved a You have pending changes warning opens in a blue banner across the top of the screen Refer to Figure 13 Figure 13 Pendin...

Page 14: ...e red Change button to change the player ID number however changing the ID will result in a loss of communication with any registered services Note Use this feature only as instructed by Daktronics te...

Page 15: ...ically to use Dynamic Host Configuration Protocol DHCP to automatically assign an IP address to the player A DHCP server is required on the network for proper operation If the network configuration is...

Page 16: ...S server address automatically to use information received from a local DHCP server to configure DNS information This is the default setting Manual Select Use the following DNS server addresses when a...

Page 17: ...tputs are listed with configuration details e g Output 1 in Figure 20 All outputs are also shown in the left side menu e g Output 1 in Figure 20 Click Add Output to add a new player output The new out...

Page 18: ...Keying option from the drop down list Off turns keying off dak alpha turns keying on 4 Select the display Color Mode from the drop down list Refer to Figure 22 sRGB Standard Dynamic Range SDR display...

Page 19: ...23 Figure 23 Add Sign Click Add Sign to add a new sign to an output A new sign is automatically added with a generic name such as Sign 1 This new sign is listed in the signs section and under the out...

Page 20: ...the video Use this setting to compensate for any video delay due to video processing Stream Offset ms delays the start of the video stream relative to the start of the audio stream This causes the aud...

Page 21: ...abled for audio 3 Enter the Width and Height of the display s active area area that shows the image in pixels 4 Choose the Mode from the drop down list Mode determines how the content is arranged on t...

Page 22: ...nted if included in messages The default time zone is UTC 06 00 Central Time US Canada NTP Servers Network Time Protocol NTP servers synchronize the controller s clock with a selected time server Refe...

Page 23: ...ng available ports The default port is 80 Media Management Server Choose the desired client program from the drop down list Refer to Figure 31 and Figure 32 If Venus is chosen from the drop down list...

Page 24: ...ive Refer to Figure 35 IDM is an internet based monitoring and diagnostic service This service is installed separately For more information on IDM refer to Intelligent Device Management p 34 Restart R...

Page 25: ...l as Brightness Temperature and Test Patterns Refer to Figure 38 Host default value Port default value Brightness The brightness mode determines how the brightness or intensity of the display is contr...

Page 26: ...display is equipped with a light sensor Dimming values are determined by the light sensor and automatically adjusted according to ambient light conditions Values vary to reflect the information from...

Page 27: ...d to either respond to a ping from the internet Active or block a ping from the internet Inactive Refer to Figure 40 Figure 40 Configuration Security RTD RTD enables the user to manage Real Time Data...

Page 28: ...t originally defined the zone names 4 Repeat Steps 1 3 to add additional zones 5 Click Save in the upper left corner when finished adding all of the desired zones The process of creating display zones...

Page 29: ...colors 5 Click the Save button at the upper left corner when finished adding all the colors To delete an RTD target color click the button to the right of the Hex text box and then click Save in the...

Page 30: ...by checking the Infinite checkbox Repeat The file remains in the playlist for the number of times specified in the Runtime Count field before being removed from the playlist The file plays back to ba...

Page 31: ...rd Monitor tile Refer to Figure 6 Note Choosing the sign name refers to the whole sign Monitor does not show specific zones within the sign Choose a player test pattern from the Test pattern drop down...

Page 32: ...l used for transmitting data and messages in the transportation industry This option is only available for DMP 5000 series players used to control a Vanguard Field Controller VFC in a transportation a...

Page 33: ...ystem Backup Create System Backup The player s current system backup ZIP file is saved according to the web browser s default save function Restore System Backup A previously saved backup ZIP file is...

Page 34: ...lick the Refresh button in the upper right corner to refresh the information Data table information is normally used by Daktronics technicians for troubleshooting purposes The Diagnostics and System d...

Page 35: ...stics Information Click one of the Save buttons to download a ZIP file containing the player s diagnostic files These files may be requested by Daktronics technicians when troubleshooting any player i...

Page 36: ...s transmitted the number of packets received the percentage of packet loss and the time it took for the signal packets to travel round trip minimum average maximum time Refer to Figure 51 Note Review...

Page 37: ...or depth standards Each control system s documentation indicates which file types are supported In addition to control system documentation refer to the DMP 8000 Content Standard Quick Guide DD3002238...

Page 38: ...ick Guide DD3241065 Venus Control Suite Quick Guide DD3016537 Venus Control Suite Operation Manual DD3315811 Intelligent Device Management Daktronics Intelligent Device Management IDM is a web based d...

Page 39: ...imary functions clip server and character generator Depending on the user s needs and the site s video production system the player can be used to fill either or both of these roles which are describe...

Page 40: ...y detects any associated third party capture device and creates a DPF file for each device in the C ProgramData Daktronics Vnet4 Content Devices folder These input files can be triggered from the syst...

Page 41: ...it uses the incoming video signal as a background and then combines it with any content files that are being played allowing the video to appear through any transparent areas of the content Refer to F...

Page 42: ...mbine with the video while the alpha channel or key signal contains data that instructs the downstream device on what parts of the background should be removed to show the video Refer to Figure 58 Vid...

Page 43: ...proportion of the video zone What sponsorship commitments exist What data or other information is available and pertinent To plan the layout of the zone follow these steps 1 Determine the locations a...

Page 44: ...ortions Example 8 Save the proportions of each zone for future use Changing Default Layout Files The player includes default copies of layout files that identify zone sizes and locations These files a...

Page 45: ...ile Copying Zones The zone copy feature creates copies of zones that can be displayed in other areas of the output This action is used frequently with fascia displays Copied zones are synchronized Sho...

Page 46: ...sing Copy Zone Feature 6 List the information for the copied zones on the lines below the original zone ID Refer to Figure 66 Original or parent zone ID Copied or child zone IDs Figure 66 Zones After...

Page 47: ...ohol Clean plastic computer parts Note Alcohol is the only solvent recommended for cleaning since others might damage the plastic computer components Isopropyl alcohol is a high quality rubbing alcoho...

Page 48: ...ning internal computer components Verify that all external cables have enough slack or are disconnected before removing the computer from its location as this can damage the computer or cables Slide t...

Page 49: ...mputer has been thoroughly cleaned replace the top or side cover and slide the computer back into the rack Reconnect any disconnected cables Note Verify that all cables are clear of the computer befor...

Page 50: ...mbers listed in Section 15 Exchange Repair Return Programs p 48 Retrieving Important Information This section explains how to retrieve a player s Globally Unique Identifier GUID and software version n...

Page 51: ...nsure the reference sync signal is configured appropriately for the video signal coming in or going out from the player For more information on diagnosing or resolving this issue contact Daktronics Da...

Page 52: ...___ Daktronics Customer ID Number ______________________________________________________ To participate in the Exchange Program follow these steps 1 Call Daktronics Customer Service Market Description...

Page 53: ...to the telephone number listed on the previous page 2 Receive a Return Materials Authorization RMA number before shipping Refer to the telephone number listed on the previous page 3 Package and pad t...

Page 54: ...This page intentionally left blank...

Page 55: ...This section includes the following DisplayFind Utility Quick Guide DD1961783 DMP 8000 Content Standards Quick Guide DD3002238 DMP 8000 Stand Alone Models Technical Specifications DD1481866 DMP 8065...

Page 56: ...This page intentionally left blank...

Page 57: ...the DisplayFinder utility or Save to save the file to the computer for later use Launching DisplayFind Utility The DisplayFind file automatically opens if Run was selected in Step 4 above If Save was...

Page 58: ...red Ignore a red next to Silverlight Version and Java Version as these programs are no longer required by the system If the connection is slow increase the Discovery Timeout value by following these s...

Page 59: ...ttom window of the utility Refer to Figure 7 Figure 7 Detected Displays 3 Double click the desired device to launch the configuration utility within a web browser Troubleshooting If the hardware and s...

Page 60: ......

Page 61: ...e used to edit video clips composite video or add special effects After editing the video with one of these programs route the content through a secondary program to convert it into its final delivery...

Page 62: ...less file compression This results in perfect image quality and no noticeable soft edges These settings also enable the content to load quickly which is an advantage in situations with multiple synchr...

Page 63: ...dio check box if the file does not contain audio 7 Go to Basic Video Settings under the Video tab and select the Render at Maximum Depth check box 8 If creating Preset 3 move to the Bitrate Settings u...

Page 64: ...display size exceeds a width of 3840 or if it exceeds a height of 1080 save content files as uncompressed AVI files or MOV files with the Animation codec RLE encoding or in another lossless format Rou...

Page 65: ...the computer that will be used to convert the files Follow the steps below 1 Back up the original uncompressed AVI or uncompressed MOV files to another location before starting the conversion process...

Page 66: ...with no alpha channel select the following setting i 0 c v hap format hap compressor none 5 y f mov 1 For large displays with an alpha channel select the following setting i 0 c v hap format hap alph...

Page 67: ...ion only if a backup exists If a backup file was not created before the conversion click No in the dialog box The files will convert to the new format 12 Verify that the new MOV files are saved in the...

Page 68: ...output formats 25 fps for international video output formats 30 fps for non video output formats e g DVI Audio if required Stereo AAC audio at 48 kHz in the MP4 or MOV file format Note If audio is not...

Page 69: ...ay Port SDI HD SDI HDMI Display Port SDI HD SDI HDMI Display Port Video input SDI HD SDI Composite Component HDMI N A SDI HD SDI Composite Component HDMI SDI HD SDI Composite Component HDMI SDI HD SDI...

Page 70: ......

Page 71: ...ed through a network the DMP 8065 is able to receive and store still graphics video files and playback schedules It provides high quality playback and is compatible with a variety of Daktronics contro...

Page 72: ...l Temperature 29 2 to 131 f 34 to 55 C Power Supply 65W Input Voltage 12VDC Power Failure Recovery Yes Physical Size l x w x h 18 5 x 8 4 x 2 4 UL CE CB fCC Mounting Options Internal to display chassi...

Page 73: ...Daktronics Warranty Limitation of Liability 53 B Daktronics Warranty Limitation of Liability This section includes the Daktronics Warranty Limitation of Liability statement...

Page 74: ...This page intentionally left blank...

Page 75: ...y per Incoterms 2020 otherwise End User shall pay transportation charges to return the Equipment back to the End User and such Equipment shall be shipped Ex Works Daktronics designated facility per In...

Page 76: ...Daktronics or M paint or refinishing the Equipment or furnishing material for this purpose 3 Limitation of Liability A Daktronics shall be under no obligation to furnish continued service under this W...

Page 77: ...ation of this warranty Alternatively an Extended Service Agreement may be purchased in conjunction with this Warranty for extended additional services For further information contact Daktronics Custom...

Page 78: ......

Reviews: