background image

DMP-8122 Installation Quick Guide

DD4945520
Rev 04
16 March 2023

201 Daktronics Drive Brookings, SD 57006

www.daktronics.com/support

800.325.8766

Page 3 of 7

9. 

Plug the power supply cable into the 

power port 

on the DMP-8122. Refer to 

Figure 5

.

10. 

Connect Ethernet cable to the Ethernet port, if performing a hardwire installation.

11. 

Connect the power cable to the power supply and plug the power supply into a power outlet. The 

DMP-8122 will power on.
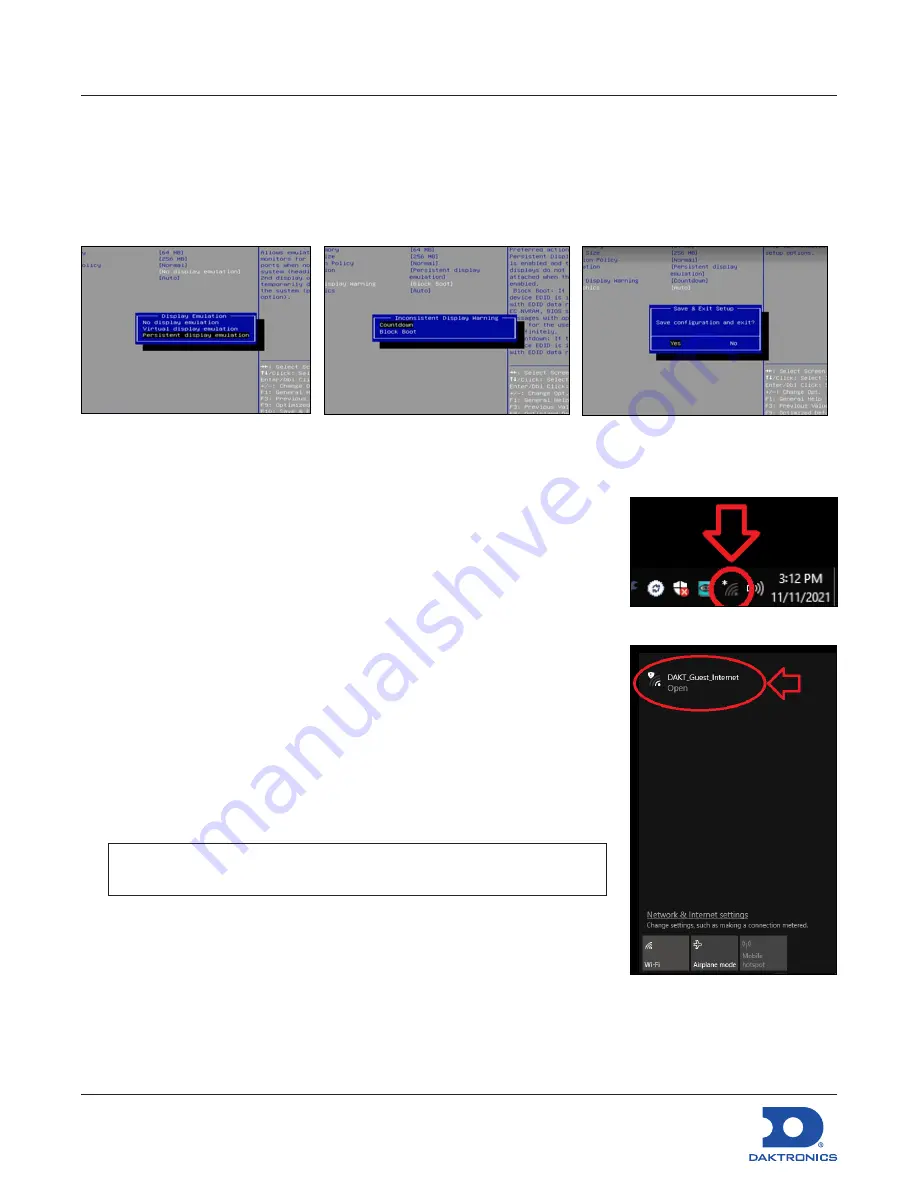
EDID Bios Setup

Figure 6: 

Display Emulation

Figure 7: 

Inconsistent Display Warning

Figure 8: 

Save Config and Exit

Figure 9: 

Network Icon

Figure 10: 

Select a Network

1. 

Restart the player and press the 

F2

 key on the keyboard to open the 

bios.

2. 

Navigate to the 

Advanced

 tab.

3. 

Open 

Video

 settings.

4. 

Select 

Display Emulation

.

5. 

Change the setting from 

[No display emulation]

 to 

[Persistent display 

emulation]

. Refer to 

Figure 6

.

6. 

At the 

[Persistent Display Emulation Alert]

 page during system boot-

up, press 

B

 on the keyboard to learn the new EDIDs.

7. 

Select 

[Inconsistent Display Warning]

.

8. 

Change the setting from 

[Block Boot]

 to 

[Countdown]

. Refer to 

Figure 

7

.

9. 

Press the 

F10

 key on the keyboard and select 

Yes

 to save 

configuration and exit. Refer to 

Figure 8

.

Connect DMP-8122 to Wi-Fi

Note: 

These steps are 

NOT

 required if the player is connected with 

an Ethernet cable.

1. 

Complete the steps in the 

DMP-8122 Setup

 section.

2. 

Boot up - observe the boot screen.

3. 

Observe the black screen.

4. 

Press the 

Esc

 Key on the keyboard.

5. 

Click the Network icon. Refer to 

Figure 9

.

6. 

Click 

Wi-Fi

.

Summary of Contents for DMP-8122

Page 1: ...ed through Daktronics or provided by customer Serial Cable Ordered through Daktronics or provided by customer Standard Installation DMP 8122 Mounting The DMP 8122 can be attached to the VESA bracket o...

Page 2: ...and 6 from the DMP 8122 Setup section to reconnect power DMP 8122 Setup 1 Unbox components and ensure all are present Refer to Figure 1 2 Screw each antenna into the DMP 8122 Refer to Figure 4 and 5 3...

Page 3: ...the keyboard to open the bios 2 Navigate to the Advanced tab 3 Open Video settings 4 Select Display Emulation 5 Change the setting from No display emulation to Persistent display emulation Refer to F...

Page 4: ...Connect Set the Intel Graphics Settings Note Only perform these steps if using more than a single display 1 Close the DMP 8000 application 2 Open Intel Graphics Command Center from the Start Menu and...

Page 5: ...in a web browser 3 Login using the default username and password Username Dak Password DakPassword Note After first time login update the login credentials with a new personalized username and passwo...

Page 6: ...can be used for content creation that will show where the created gap will appear in content This is useful when compensating for the gap while making new content for the display 6 Select Adjust Sign...

Page 7: ...to Displays Refer to Figure 15 3 Click Add New Add Display opens 4 Configure the display Refer to Figure 16 5 Enter the previously recorded Total Width in Width and Total Height in Height to configure...

Reviews: