background image

Daktronics Exchange and Repair & Return Programs

12

6  Daktronics Exchange and Repair & Return 

Programs

Exchange Program

The Daktronics Exchange Program is a service for quickly replacing key components 

in need of repair. If a component fails, Daktronics sends a replacement part to the 

customer who, in turn, returns the failed component to Daktronics. This decreases 

equipment downtime. Customers who follow the program guidelines explained below 

will receive this service. 
Before contacting Daktronics, identify these important numbers: 

Model Number: ______________________________________________________________________
Job/Contract Number: _______________________________________________________________
Date Manufactured/Installed: _________________________________________________________
Daktronics Customer ID Number: ______________________________________________________

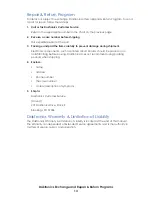
To participate in the Exchange Program, follow these steps: 

1�  Call Daktronics Customer Service� 

Market Description

Customer Service Number

Schools (including community/junior colleges), religious 

organizations, municipal clubs, and community centers

877-605-1115

Fax: 605-697-4444

Universities and professional sporting events, live events for 

auditoriums, and arenas

866-343-6018

Fax: 605-697-4444

2�  When the new exchange part is received, mail the old part to Daktronics� 

If the replacement part fixes the problem, send in the problem part being replaced. 

a� 

Package the old part in the same shipping materials in which the replacement 

part arrived. 

b� 

Fill out and attach the enclosed UPS shipping document. 

c� 

Ship the part to Daktronics. 

3�  The defective or unused parts must be returned to Daktronics within 5 weeks of initial 

order shipment�


If any part is not returned within five (5) weeks, a non-refundable invoice will be 

presented to the customer for the costs of replenishing the exchange parts inventory 

with a new part. Daktronics reserves the right to refuse parts that have been 

damaged due to acts of nature or causes other than normal wear and tear. 

Summary of Contents for P1756

Page 1: ...201 Daktronics Drive Brookings SD 57006 5128 www daktronics com support 800 325 8766 SPORTSOUND SS 200 AUDIO SYSTEM INSTALLATION MANUAL P1756 DD4310070 Rev 00 11 March 2020 ...

Page 2: ...part of this book covered by the copyrights hereon may be reproduced or copied in any form or by any means graphic electronic or mechanical including photocopying taping or information storage and retrieval systems without written permission of the publisher Daktronics trademarks are property of Daktronics Inc All other trademarks are property of their respective companies ...

Page 3: ...the Control Enclosure 7 4 Electrical Installation 8 Portable System 8 Power IN 8 Signal IN 8 Speaker OUT 8 Permanent System 9 Power IN 9 Signal IN 9 Speaker OUT 9 Grounding 9 5 Troubleshooting 10 Amplifier Indicators 10 Replacement Parts 11 Sound Cabinet 11 Control Enclosure 11 6 Daktronics Exchange and Repair Return Programs 12 Exchange Program 12 Repair Return Program 13 Daktronics Warranty Limi...

Page 4: ...This page intentionally left blank ...

Page 5: ...uipment or allow it to get wet Always turn off and or unplug the control equipment when it is not in use This keeps equipment protected from power spikes and lightning Inspect equipment for shipping damage such as rattles and dents and verify that all equipment is included as itemized on the packing slip Immediately report any problems to Daktronics save all packing materials if exchange is necess...

Page 6: ...act a Daktronics sales coordinator or project manager Daktronics Nomenclature Most components have a white label that lists the part number Figure 2 Part numbers will also appear on certain drawings If a component is not found in the Replacement Parts p 11 use the label to order a replacement Refer to Section 6 Daktronics Exchange and Repair Return Programs p 12 if replacing or repairing any compo...

Page 7: ...fety approval Loudspeaker The SPK CX 1001 loudspeaker Figure 3 is made from a durable weatherproof black ABS copolymer with a fine texture finish The speaker grille is made from powder coated perforated steel with 58 open area A hydrophobic fabric is permanently attached to the perforated grille A third layer of reticulated foam protects the driver from damage even under extreme conditions Dimensi...

Page 8: ...ntrol racks Refer to the manual provided with the control rack for proper operation Note The SS 200 will typically be controlled by the SSR AM mixer For more information refer to the Sportsound SSR AM Quick Guide DD3638236 Signal Cables Audio cable is hardwired to the speaker using 30 9 1 m 2 conductor 12 gauge wire The speaker wire may be wired directly to the amplifier rack or more commonly to o...

Page 9: ...sing this mounting yoke a speaker can be installed on a pole wall or roof Note Speakers should never be installed facing upward This will void the warranty Pole Mounting Reference Drawings Pole Mounting 15 5 Diameter and Under SPK CX DWG 4306807 SPK CX 1001 Speaker Aiming DWG 4561929 Tools Required 3 4 and 9 16 wrench socket Phillips Screwdriver Attaching a speaker to a pole depends on the pole s ...

Page 10: ...tud joist or other structural member rather than only to drywall or other non structural material Ensure adequate clearance to rotate and tilt the speaker to the desired angle Ensure that any holes drilled and hardware fastened into the mounting surface do not interfere with wiring plumbing etc on the opposite side 2 Attach the mounting yoke to the hat bracket using all three 3 sets of included 1 ...

Page 11: ...y mounts in a closet adjacent to the sound system or directly on the wall using 1 4 hardware The head of the hardware must not be larger than 5 8 or it will not fit through the keyholes on the rear of the enclosure Figure 6 Refer to DWG 1152507 in Appendix A for additional mounting specifications Also notice the square knockout in the center of the enclosure for mounting directly over a power junc...

Page 12: ...e mounted within range of the 30 9 1 m speaker whip This provides a maximum of 310 94 5 m from the speaker s to amplifier rack The Speaker Junction Box is to be mounted in an accessible location for the portable amp rack to easily plug in Power IN The portable system requires one 1 20 amp 120 VAC circuit within 3 0 9 m of the amplifier rack Connect the included power cord between the POWER inlet o...

Page 13: ...d the signal input plate Speaker OUT 1 Connected to the rear of each speaker is a 30 9 1 m speaker wire Route this wire to a local 1 gang junction box one per speaker 2 Route 1 pair 12 AWG speaker wire in conduit from each local 1 gang junction box to the rear of the amplifier inside the enclosure and terminate per the wiring diagram in DWG 4306294 Note If there is a single speaker within 30 of th...

Page 14: ... Signal cable connection issue Check signal path from speaker to J box es to amplifier rack to control rack No full range audio One or more outputs muted Ensure no outputs are muted For more troubleshooting steps refer to the appropriate audio control rack manual Amplifier Indicators The amplifier in the control enclosure features several LED indicators that are helpful when trying to diagnose iss...

Page 15: ... box EC 1166 Cover w Gasket EC 1081 Strain Relief EC 1176 Wire Connector E 1184 Speaker Junction Box EC 4276769 Speaker Cable 1 pair 12AWG W 1745 Control Enclosure Description Part Number Amplifier QSC CXD4 3 A 3812143 Signal Input Plate XLR EC 1244 25 XLR Cable W 1560 12 XLR Cable W 1750 30 Speakon Cable W 4303368 Refer to Section 6 Daktronics Exchange and Repair Return Programs p 12 for informat...

Page 16: ...am follow these steps 1 Call Daktronics Customer Service Market Description Customer Service Number Schools including community junior colleges religious organizations municipal clubs and community centers 877 605 1115 Fax 605 697 4444 Universities and professional sporting events live events for auditoriums and arenas 866 343 6018 Fax 605 697 4444 2 When the new exchange part is received mail the...

Page 17: ...nt damage during shipment Electronic components such as printed circuit boards should be placed in an antistatic bag before boxing Daktronics does not recommend using packing peanuts when shipping 4 Enclose name address phone number the case number a clear description of symptoms 5 Ship to Daktronics Customer Service Case 201 Daktronics Drive Dock E Brookings SD 57006 Daktronics Warranty Limitatio...

Page 18: ...This page intentionally left blank ...

Page 19: ...al drawings Reference Drawings Shop Drawing Standard Indoor Sound Amp Rack Mounting DWG 1152507 Schematic SS200 System Schematic DWG 4275565 Riser SS 200 Electrical Portable System DWG 4306293 Riser SS 200 Electrical Permanent System DWG 4306294 Pole Mounting 15 5 Diameter and Under SPK CX DWG 4306807 Hat Bracket Mounting SPK CX 1001 DWG 4561669 SPK CX 1001 Speaker Aiming DWG 4561929 ...

Page 20: ...This page intentionally left blank ...

Page 21: ...AMP RACK MOUNTING JROBERS 23 JUL 13 P1756 R 10 B 1 8 JROBERS 1152507 00 SPORTSOUND INDOOR AUDIO SYSTEM AMP RACK MOUNTING APPROVED APPROVED AS NOTED APPROVED AS NOTED RESUBMIT COMPANY SIGNED TITLE DATE SUBMITTAL APPROVAL FRONT VIEW 30 200 24 500 7 940 12 250 16 000 12 250 2 750 0 250 0 625 2 950 LEFT SIDE REAR VIEW THE CONCEPTS EXPRESSED AND DETAILS SHOWN ON THIS DRAWING ARE CONFIDENTIAL AND PROPRI...

Page 22: ... LF RED W 1109 BLU W 1078 BLK W 1081 RED W 1078 BLK BLK RED LOCAL JUNCTION BOX 0A 1756 0081 LJB 4 LF CONNECTIONS HF CONNECTIONS 14 SPEAKER REAR VIEW OPTIONAL OPTIONAL OPTIONAL 14 SPEAKER A 4287636 SPK 1 RED BLK RED BLK RED BLK RED BLK 30 WHIP SUPPLIED WITH SPK TYP W 1745 OPTIONAL PASSIVE CROSSOVER INPUT BLK INPUT RED A 4294937 RED BLK HF BLK HF RED LF BLK LF RED DAKTRONICS SPK CX 1001 OUTDOOR COAX...

Page 23: ...NG FROM NL8 TO TB1 TB8 BY SPEAKER JUNCTION BOX MFG 6 USE SUPPLIED NL8 TO NL8 W 4303368 SPEAKON CABLE FOR CONNECTING PORTABLE AMPLIFIER RACK TO SPEAKER JUNCTION BOX W 1745 DETAILS 1 PAIR 12 AWG SPEAKER CABLE OUTER DIAMETER 0 352 COLOR BLACK RATED FOR DIRECT BURIAL AND OUTDOOR USE CONDUIT NOT NECESSARY IF CONDUIT IS USED SIZE ACCORDING TO SITE CONDITIONS SEE DD4310070 FOR SYSTEM MANUAL SEE DWG 04275...

Page 24: ... ALL FOUR SPEAKER OUTPUTS SSR AM IS SHOWN ON THIS DRAWING BUT ANY SSR CONTROL SYSTEM CAN BE USED WITH SS200 SYSTEM W 1745 DETAILS 1 PAIR 12 AWG SPEAKER CABLE OUTER DIAMETER 0 352 COLOR BLACK RATED FOR DIRECT BURIAL AND OUTDOOR USE CONDUIT NOT NECESSARY IF CONDUIT IS USED SIZE ACCORDING TO SITE CONDITIONS W 1615 DETAILS 1 PAIR 22AWG WITH SHIELD AUDIO SIGNAL CABLE OUTER DIAMETER 0 170 COLOR BLACK CO...

Page 25: ...N ALONG BOTH SIDES OF POLE NO DRILLING NECESSARY REFERENCE DWG 4561929 FOR DETAILS ON AIMING SPEAKER 1 2 NUT 1 2 NUT 1 2 FLAT WASHER LOCK WASHER AND NUT TIGHTEN THESE TOGETHER TOP VIEW STEP 1 ROTATED VIEW STEP 1 THREADED HOLES ON RIGHT SIDE WHEN FACING SPEAKER FRONT 1 2 THREADED ROD VERTICAL POLE REAR MOUNTING ANGLE SPEAKER YOKE 1 2 FLAT WASHER LOCK WASHER AND NUT TIGHTEN THESE REAR BOLTS 1ST TOP ...

Page 26: ... 2 LONG 2 MINIMUM THREAD PENETRATION INTO WOOD MEMBERS LAGS MUST PENETRATE INTO WOOD STUDS STEEL STUD WALL ITW Bildex 1 4 14X3 TEK 3 SELF DRILLING SCREW FOLLOW ESR 1976 AND MANUFACTURER RECOMMENDATIONS MINIMUM STEEL STUD THICKNESS IS 12 GUAGE SCREWS MUST LAND ON STEEL STUD REFERENCE DWG 4561929 FOR DETAILS ON AIMING SPEAKER 3 8 HARDWARE PROVIDED WITH SPEAKER STEP 3 SPEAKER MOUNTED BELOW HAT BRACKE...

Page 27: ... ALL HARDWARE CONNECTIONS USED FOR SPEAKER MOUNTING ROTATED VIEW YOKE ARROWS ARE DIRECTION OF AUDIO TARGET CENTER OF AUDIO TARGET SHOULD BE PERPENDICULAR TO CENTERLINE OF IMAGINARY LINE BETWEEN HOLES THAT SPEAKER ATTACHES TO THREADED HOLES ON RIGHT SIDE WHEN FACING SPEAKER FRONT SCALE 1 6 REAR ROTATED VIEW LEFT SIDE AIM SCALE 1 10 SEE DETAIL A REAR ROTATED VIEW RIGHT SIDE AIM SCALE 1 10 SEE DETAIL...

Page 28: ...This page intentionally left blank ...

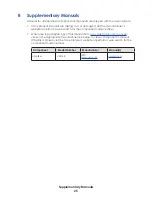
Page 29: ...site or perform a web search for the component model number When viewing a digital copy of this manual from www daktronics com manuals click on the appropriate manufacturer link below to view a component s manual If the link is broken visit the manufacturer s website or perform a web search for the component model number Component Model Number Manufacturer Manual s Amplifier CXD 4 3 QSC www qsc co...

Page 30: ...This page intentionally left blank ...

Page 31: ...Daktronics Warranty Limitation of Liability 27 C Daktronics Warranty Limitation of Liability This section includes the Daktronics Warranty Limitation of Liability statement SL 02374 ...

Page 32: ...This page intentionally left blank ...

Page 33: ...ty per Incoterms 2020 otherwise End User shall pay transportation charges to return the Equipment back to the End User and such Equipment shall be shipped Ex Works Daktronics designated facility per Incoterms 2020 All returns must be pre approved by Daktronics before shipment Daktronics shall not be obligated to pay freight for any unapproved return End User shall pay any upgraded or expedited tra...

Page 34: ... Daktronics or M paint or refinishing the Equipment or furnishing material for this purpose 3 Limitation of Liability A Daktronics shall be under no obligation to furnish continued service under this Warranty if alterations are made to the Equipment without the prior written approval of Daktronics B It is specifically agreed that the price of the Equipment is based upon the following limitation of...

Page 35: ...ration of this warranty Alternatively an Extended Service Agreement may be purchased in conjunction with this Warranty for extended additional services For further information contact Daktronics Customer Service at 1 800 DAKTRONics 1 800 325 8766 Additional Terms applicable to sales outside of the United States The following additional terms apply only where the installation site of the Equipment ...

Page 36: ...This page intentionally left blank ...

Reviews: