www.dalemans.com
DAT420_MAN02_EN.docx • V1R1
9
DAT 420
Exemples
:
Calibration gas
(CAL
Gas
)
ppm
Measuring range
300 ppm
500 ppm
1000 ppm
5000 ppm
I
Measure
mA
V
Measure
mV
I
Measure
mA
V
Measure
mV
I
Measure
mA
V
Measure
mV
I
Measure
mA
V
Measure
mV
0
4.00
40.00
4.00
40.00
4.00
40.00
4.00
40.00
50
6.67
66.70
5.60
56.00
4.80
48.00
4.16
41.60
100
9.33
93.33
7.20
72.00
5.60
56.00
4.32
43.20
200
14.67
146.67
10.40
104.00
7.20
72.00
4.64
46.40
250
17.33
173.33
12.00
120.00
8.00
80.00
4.80
48.00
300
20.00
200.00
13.60
136.00
8.80
88.00
4.96
49.60
500
20.00
200.00
12.00
120.00
5.60
56.00
1000
20.00
200.00
7.20
72.00
2000
10.40
104.00
9.
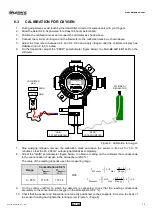
On the control unit/PLC to which the detector is connected, check that the reading corresponds
accurately to the value of the concentration of calibration gas applied.
10. Stop applying calibration gas, remove the calibration mask and check that the reading on the
voltmeter drops to its rest value of 40 mV and that the reading shown on the control unit/PLC drops to
zero.
11. Check that the sensor and transmitter are correctly positioned on their supports. Screw on the body of
the sensing head and tighten the locking screw (Figure 5 – Page 6).

