background image

>>

 10

>> 

español

   english

   française   portuguese

2-slice Belgian Baking Plate

Non-stick cooking plate, for easy cleaning

Upright stand, for compact storage

Cord storage, for tidiness
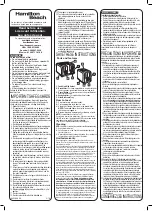
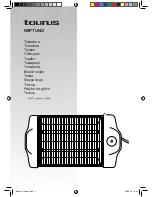
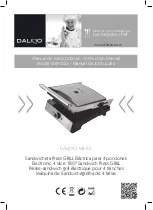
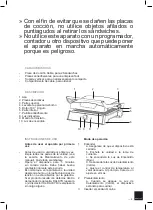
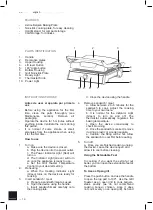
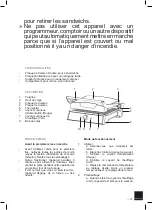
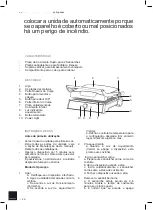
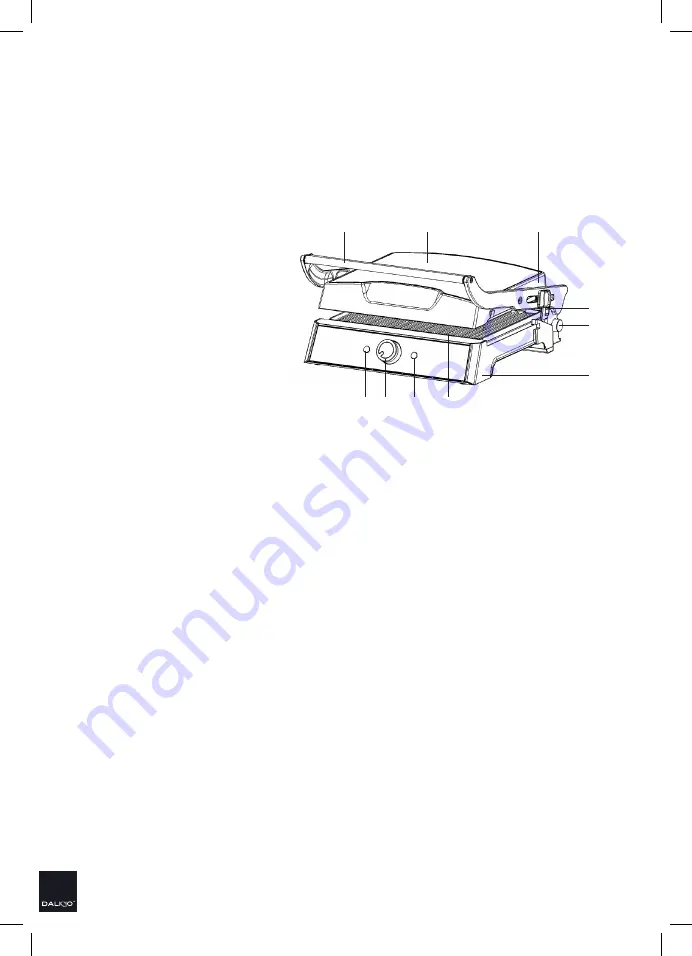
1. Handle

2.  Decorative plates

3.  Upper Housing

4.  Lift lever Button

5.  180°Angle button

6.  Bottom Housing

7.  Grill Non-stick Plate

8.  Ready Light

9.  Thermostat Knob

10.  Power Light 


FEATURES


PARTS IDENTIFICATION

1

2

3

4
5

6

7

8

9

10


INSTRUCTIONS FOR USE


Antes de usar el aparato por primera 

vez

Before  using  the  appliance  for  the  first 

time, clean the parts thoroughly (see 

Maintenance section). Remove all 

packaging.

Operate the device for 5 minutes without 

anything inside. Ventilate the room during 

this period.

-  It is normal if some smoke or smell 

emanates from the appliance when using 

it for the first time.


How to use

1.  Turn on


a.  Make sure the device is closed.


b.  Plug the device into the power outlet.


c.  The Power Indicator Light (Red) will 

turn on.


d. The Indicator Light (Green) will turn 

on once the appliance is ready to use.


e. Set the Grill Toaster Temperature 

Control to your desired setting.

2. Preheating


a. When the Heating Indicator Light 

(Green) turns on, the device is ready for 

cooking.

3.   Insert sandwich / meat


a.  Prepare a sandwich/meat as usual. 


b.  Open the device using the handle.


c. Insert sandwich/meat carefully onto 

the cooking plate. 


d.  Close the device using the handle.

4.  Remove sandwich / meat


a.  Allow between 2 to 6 minutes for the 

sandwich to cook. Adjust the cooking 

time to your own taste.


b. It is normal for the Indicator Light 

(Green) to turn on and off. The 

thermostat automatically regulates the 

baking temperature.


c. Open the device occasionally to 

check browning.


d.  Once the sandwich is cooked, remove 

it using a plastic or wooden spatula.


e.  Caution:  the  filling  will  be  hot. Allow 

the sandwich to cool first before eating.

5.  Turn off


a.  Once you are finished cooking, unplug 

the device. Leave the device open and 

allow it to cool before cleaning.


Using the Extendable Feet


In cooking, if you want the extra fat out 

better, you can open the extendable feet at 

the bottom.


To Use as Open grill

Press the push button and use the handle 

to open the top part to 180º.  Use the Grill 

Toaster as an open grill to cook burgers, 

steak, poultry (we do not recommend 

cooking bone-in chicken, since it does 

not cook evenly on an open grill), fish and 

Summary of Contents for MB-35

Page 1: ...e instru oes www dalkyo com Sandwichera Press GRILL El ctrica para 4 porciones Electronic 4 slice 180 Sandwich Press GRILL Presse sandwich grill lectrique pour 4 tranches M quina de Sanduiche grelha d...

Page 2: ...ando est encendido Antes de limpiar la unidad desench felo de la toma de corriente y deje que la unidad se enfr e No utilice este aparato en el ba o o cerca de fuentes de agua No introduzca el aparato...

Page 3: ...manera devuelva el aparato al centro autorizado m s cercano para su revisi n reparaci n o ajuste En caso de problemas de hardware no intente reparar el producto usted mismo Todas las reparaciones debe...

Page 4: ...unca el aparato El aparato no est dise ado para ser operado con un temporizador externo ni sistemas de control remoto No se debe tostar el pan por demasiado tiempo ya que se puede quemar y causar un i...

Page 5: ...ez Antes de usar la unidad por primera vez limpie todas las partes de la unidad vea la secci n de Mantenimiento de este manual Quite todo el embalaje Opere el dispositivo para 5 minutos sin comida den...

Page 6: ...ich para realzar su dorado MANTENIMIENTO Aseg rese de que la unidad est desconectada y deje enfriar antes de limpiar Nunca use detergentes abrasivos disolventes org nicos o productos qu micos agresivo...

Page 7: ...nce from the power supply and let it cool down Do not use this device in the bathroom or near water sources Never immerse the appliance or the plug in water or any other liquid In the event of the app...

Page 8: ...urself Repairsshould only be carried out by qualified technicians Ensure that the voltage indicated on the nameplate matches the mains voltage before plugging in the appliance When you want to remove...

Page 9: ...The kitchen surface can get hot while operating the device Place the device on a stable and level surface This device does not have a power switch The device starts operating as soon as it is plugged...

Page 10: ...d setting 2 Preheating a When the Heating Indicator Light Green turns on the device is ready for cooking 3 Insert sandwich meat a Prepare a sandwich meat as usual b Open the device using the handle c...

Page 11: ...uid Do not use sharp utensils or scouring pads on the cooking plate as this might damage the non stick surface Open the lid Brush off crumbs from the grooves Clean the cooking plates with a damp cloth...

Page 12: ...rement tre d branch et refroidi avant de le nettoyer et de le ranger Ne pas utiliser cet appareil dans la salle de bain ou pr s de sources d eau Ne jamais immerger le gril en totalit ou partiellement...

Page 13: ...t endommag rendre l appareil au centre autoris plus proche pour sa r vision r paration ou ajustement En cas de probl me mat riel n essayez pas de r parer le produit vous m me Les r parations doivent...

Page 14: ...isateur externe ni des syst mes de contr le distance Nepasgrillerlepainpendanttroplongtemps car il peut br ler et provoquer un incendie Ne pas positionner l appareil sous des rideaux armoires murales...

Page 15: ...I Avant la premi re mise en marche Avant d utiliser l unit pour la premi re fois nettoyez toutes les parties de l unit voyez la section d Entretien de ce mode d emploi Retirez tous les emballages Fait...

Page 16: ...ous que l unit est d branch e et laissez refroidir avant de nettoyer Ne jamais utiliser de d tergents abrasifs de solvants organiques ou de produits chimiques agressifs N est pas n cessaire d monter l...

Page 17: ...e com o cabo da alimenta o retirado da tomada el ctrica N o utilize este dispositivo no banheiro ou perto de fontes de gua N o introduza o aparelho nem a ficha de alimenta o em gua ou noutros l quido...

Page 18: ...ais pr ximo para sua revis o repara o ou ajuste Em caso de problemas de hardware n o tente reparar o produto Os reparos devem ser realizados por pessoal t cnico qualificado Antes de ligar o aparelho v...

Page 19: ...dio N o posicionaroaparelhosobcortinas arm rios de parede ou materiais combust veis A superf cie de cozinha pode ficar quente durante a opera o do dispositivo Coloque a unidade sobre uma superf cie pl...

Page 20: ...anual Retire todas as embalagens Operar o dispositivo por 5 minutos sem alimentos no interior A rea tem que estar bem arejada poss vel que na primeira vez a unidade desprenda fuma a ou cheiros Modo de...

Page 21: ...os qu micos agressivos N o h necessidade de desmontar a unidade para limpeza N o introduza o aparelho nem a ficha de alimenta o em gua ou noutros l quidos N o use utens lios pungentes ou esfreg es met...

Page 22: ...ive 2009 125 EC on the eco design requirements applicable to energy related products D CLARATION DE CONFORMIT Cet appareil est conforme la directive 2014 35 EU Directive Basse Tension 2014 30 EU sur l...

Page 23: ...uality Standards Customer Service www sogosat com sogosat sogosat com 0034 902 222 161 Ce symbole signifie que si vous souhaitez vous d faire du produit une fois que celui ci n est plus utilisable rem...

Page 24: ...Producto recomendado por Martin Berasategui Chef 3 Estrellas Michel n DALKYO MB 35 www dalkyo com...

Reviews: