Serie "LXS9"
Page 16
Rev. M - 01
-
D
ISASSEMBLY AND REASSEMBLY OF THE REFRIGERATION UNIT
Before carrying out any operation on the refrigeration unit and, in particular, before checking
any electrical part, move the
main switch
to the “OFF” position (See Figure 7).
On the
LXS9
automatic spiral vending machines it is possible, with simple operations, to remove and
perform maintenance on the refrigeration unit, extracting it from the front of the vending machine.
Follow the instructions given below to disassemble (See Figure 6 for the references given in
parentheses):
-
Open the vending machine door completely;
-
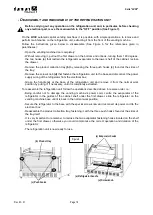
Without removing it, pull out the first drawer on the bottom and unhook, turning them 180 degrees,
the two hooks
(a)
that restrain the refrigerator evaporator to the lower shelf of the cabinet, reclose
the drawer.
-
Remove the product collection tray
(b)
by releasing the three push hooks
(c)
found at the sides of
the tray;
-
Remove the screw knob
(d)
that fastens the refrigeration unit to the base and disconnect the power
supply wiring of the refrigerator from the electrical box;
-
Grasp the handle
(e)
at the base of the refrigeration unit and remove it from the normal work
position by pulling it, if necessary, until it is completely extracted.
To reassemble the refrigeration unit, follow the operations described above in reverse order, i.e.:
-
Being careful not to damage the vending machine‟s power cord, centre the evaporator of the
refrigerator in the guides of the cabinet shelf under the first drawer, slide the refrigerator on the
vending machine base until it is back in the normal work position;
-
Secure the refrigerator to the base with the special screw know and reconnect its power cord to the
electrical box.
-
Reassemble the product collection tray, fastening it with the three push hooks found at the sides of
the tray itself:
-
It is very important to remember to reclose the two evaporator fastening hooks located on the shelf
under the first drawer, otherwise you could compromise the correct operation and duration of the
refrigerator;
-
The refrigeration unit is now ready for use.
1
(b) Product tray
(c) Push hooks
(a) Evaporator hooks
(e) Refrigerator handle
(d) Screw knob
Figure 6
Summary of Contents for LUCE X SNAC
Page 2: ...Serie LXS9 Pagina A 25 Rev M 01 ...
Page 22: ...Serie LXS9 Page 21 Rev M 01 ...


