
BACKSIDE VERTICAL 8-PART SYSTEM
which includes TWO HUMIDIFIERS
INSTALLATION INSTRUCTIONS
TOOLS REQUIRED: This System includes 1/4” hexhead screws. To install the System, you will need:
• screw starter
• pliers
• small hammer
• 1/2” or 1-1/4” hole saw (see page 4)
• cordless drill
• manual driver
• scissors
• stapler
The following is a list of components:
.
Purpose
3
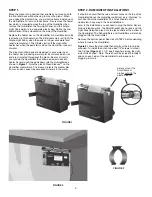
18-inch Dehumidifiers
Remove excess moisture from the piano
1
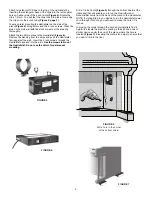
Humidistat
Controls the Humidifiers and Dehumidifiers
2
Humidifiers
Bring moisture into the piano
1
Low Water Sensor Probe
Measures water depth in Humidifier
2
Humidifier Heater Bars
Warms pads to aid evaporation
2
Clean Sleeves® (on Humidifier Heater Bars)
Protects Humidifier Heater Bar from mineral corrosion
1
Two-light Panel
Shows System is energized and when to add water
1
Single-Light Cube
Signals when Humidifier pads are dry
1
Smart Bracket
Attached to Humidifier heater bar, senses when pads are dry
1
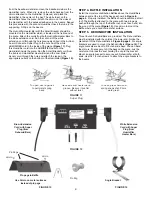
6-inch Aluminum Tube
Used to anchor the Humidistat under the keybed
1
Watering Tube (Small Diameter Plastic Tube)
Enables the delivery of water to the Humidifier
2
Humidifier Pads
Used to vaporize moisture throughout the piano
2
Moisture Distribution Baffles
Dispense moisture throughout the piano
1
4-foot Large Diameter Plastic Tube
Joins two Humidifiers
1
Watering Can
For adding water to the Humidifier
1
Bottle of Humidifier Pad Treatment
Additive that prolongs the life of the pads
2
6-foot Extension Cords (1 brown and 1 white)
Used to connect Dehumidifiers and Humidifiers to Humidistat
1
Hardware Kit
Described below
1
System Care and Maintenance Sheet / 5-Year Warranty Certificate
While we make every effort to ensure that all components are included, it is a good idea to check that none are missing prior to
arriving at the installation location. In the unlikely event that a part is missing, please call 800-438-1524 with information from the
end of the box and the assembler’s name. We will provide same-day shipment of the replacement part.
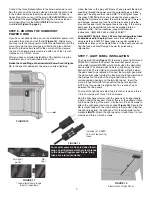
NOTE: Please read these instructions completely before beginning, as some of the later steps are affected by earlier steps.
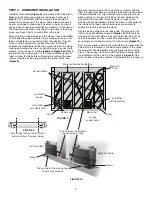
This Backside Vertical System was developed for use in Steinway uprights, player pianos, Disklaviers, and any other vertical where
the bottom front cavity is so narrow it will not accommodate a standard Humidifier. With this System, two small Humidifiers are
joined by means of a large diameter tube. As one Humidifier is being filled, it drains into the other Humidifier until the levels in both
Humidifiers are the same. Throughout usage, the water level in both Humidifiers will remain the same. The low water warning light
will blink when the level in both Humidifiers drops below the sensor probes located in just one of the Humidifiers. There is just one
watering tube for the interconnected System.
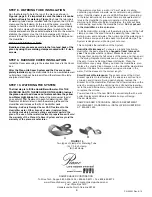
The hardware kit includes the following:
6
Angle brackets
Used to mount the 18-inch Dehumidifiers
25
1/2-inch #8 screws
Used to mount clamps and clips
2
3/4-inch #8 screws
Used to attach the light panel
2
2-inch #6 screws
Used to mount Humidistat
4
Alcohol pads
Used to clean piano before mounting Velcro
8
1/4-inch clamps
Used to anchor wires, cords, and cord bundles
2
5/8-inch clamps
1
3/4-inch clamp
3
Half clamps
Attaches the end of the watering tube for easy use
3
Serrated washers
Anchor half-clamps by biting into the wood
2
1/2-inch clamps
Anchor watering tube
2
Stand-off C-Clips
Mount Humidistat on 6-inch tube
4
C-Clips
Mount 6-inch tube and anchor tube between Humidifiers
4
Pin pegs
Used to mount Moisture Distribution Baffle above Humidifiers
2
Super Plugs
Used on cut ends of extension cords