background image

5

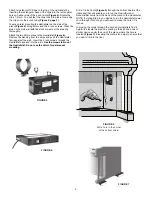
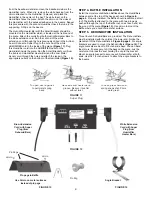
FIGURE 9

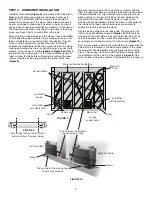
FIGURE 8

STEP 3.  HUMIDIFIER INSTALLATION

Install the Humidifiers 

(Figure 8)

 on the back side of the piano.

Make sure the elbow openings are facing each other as in

Figure 1

. The Humidifier with the watering tube should be

placed at the bass end of the piano. Some pianos will have 4

bays (4 openings contained by 5 beams or posts). Some will

have 5 bays (5 openings contained by 6 beams). In the case of

the 4-bay piano, use the 2 inner bays. In the case of the 5-bay

piano, use bays 2 and 4 counting from either side.
Mount the large diameter tube on the elbow of each Humidifier.

The elbows are sealed at the factory to make sure they do not

leak, and tightening or loosening them may destroy this seal.

Once you are assured that you have the best, level route

between the Humidifiers for the tube, mark the tube for cutting,

making absolutely sure there is enough tubing to go over both

elbows.  Note: the use of C-Clips 

(shown in Figure 8 and 10)

 to

support the tube will require 1 or 2 inches additional length of

tube, so allow for this before cutting. Before cutting off excess

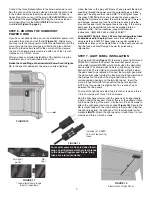
tubing, move the locking rings toward the center of the tube

(Figure 9)

.

Move the locking rings to the ends of the cut tubing. Position

them 2 inches from each end. Slip the tube end over the elbow

on each Humidifier. It’s important that you support the elbow

when pushing on it to avoid breaking the seal between the

elbow and the Humidifer. It may be easier to support the

elbows with the Humidifiers outside the piano. A little water on

the inside of the tube ends will provide some lubricant to

enable the tube to slip over the elbow.
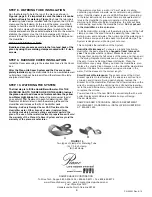
Slip the locking rings onto the tube ends. The prongs for the

locking rings should face outward 

(Figure 10). 

With the tube

mounted on the Humidifiers, measure where the tube will lie

across the beams and then mount the supporting C-Clips

accordingly on the beams, using 1/2-inch screws 

(Figure 10).

Now you are ready to secure the Humidifier in the bays with the

Velcro which is attached to the sides and bottoms of the  tanks.

Be aware that the Humidifiers may overhang the back of the

piano. This is okay—the Velcro will hold them in place. Note

the attachment of the Velcro on the beams in 

Figure 8.

  Use

alcohol pads to clean the outside of the beams 4 to 5 inches up

Treble end

Bass end

Moisture Distribution Baffles

Dehumidifiers

Low Water

Sensor

Humidifier

with Heater Bar

Humidifier

with Heater Bar

C-clips

support tube

Velcro

Velcro

FIGURE 10

Watering

Tube

Left Humidifier

Elbow

Elbow

Right Humidifier

Tube between Humidifiers

supported by C-clips

The prongs for the locking rings

should face outward

Move rings toward center of tube

before cutting off excess tubing.

Summary of Contents for Piano Life Saver System

Page 1: ...to check that none are missing prior to arriving at the installation location In the unlikely event that a part is missing please call 800 438 1524 with information from the end of the box and the assembler s name We will provide same day shipment of the replacement part NOTE Please read these instructions completely before beginning as some of the later steps are affected by earlier steps This Ba...

Page 2: ...e of another brand of treatment voids the System s warranty and may also void the piano manufacturer s warranty OTHER IMPORTANT INFORMATION 1 The newly installed Piano Life Saver System will alter the piano s wood moisture content and therefore alter the tuning Ideally the System should be installed 3 weeks BEFORE the piano is tuned 2 A frayed or cracked electrical cord wire can cause a fire or sh...

Page 3: ... push the pads down into the Humidifiers as shown in Figure 1 Note the plastic Clean Sleeves on the Humidifier Heater Bars The sleeve protects the Heater Bar from corrosion caused by excessive minerals in the water STEP 2 HUMIDISTAT INSTALLATION It should be noted that the two end vent holes on the top of the Humidistat above the Humidifier outlet act as a chimney to vent heat from the Humidistat ...

Page 4: ... the wall Insert the 2 inch screws through the Humidistat case and into the wall Use the screws to mount the Humidistat Do not use the Velcro for permanent mounting FIGURE 5 Drill a hole in the corner of the bottom board FIGURE 4 FIGURE 7 Drill a 1 2 inch hole Figure 5 through the bottom board at the treble end that will enable you to run the Humidifier and Dehumidifier cords from the back of the ...

Page 5: ...lip the tube end over the elbow on each Humidifier It s important that you support the elbow when pushing on it to avoid breaking the seal between the elbow and the Humidifer It may be easier to support the elbows with the Humidifiers outside the piano A little water on the inside of the tube ends will provide some lubricant to enable the tube to slip over the elbow Slip the locking rings onto the...

Page 6: ...tribution Baffles above the Humidifiers between and at the top of the bays as shown in Figure 8 page 5 Properly installed the Baffle should resemble a small roof The Baffle is attached to the piano with two pin pegs pushed through the top of the Baffle roof one at each end into the wood of the piano Figure 13 Use Velcro to mount the Baffle where you encounter a metal surface STEP 5 DEHUMIDIFIER IN...

Page 7: ...e is no damage remove the fuse from the brass clips inside the plug and replace it with the spare fuse in the plug If the cord is damaged the Humidistat should not be plugged into an electrical outlet Call our technical support number for instructions 800 438 1524 or 828 692 8271 Only 5 AMP 125 Volt 5 mm x 20 mm fast acting glass fuses should be used in the plug Never use a fuse with greater amper...

Page 8: ...he warranty of the Piano Life Saver System and may void the warranty of the piano manufacturer If tap water comes from a well or is hard water meaning containing significant minerals we recommend using distilled water If distilled water is used add PAD Treatment according to the label instructions to ensure there are adequate electro lytes in the Humidifier to support operation of the low water wa...

Reviews: