background image

Kollmorgen 

SYSTEM WIRING  

SERVO

STAR

®


SP3 Power Block 

17 

STANDARD OPTION 

The Standard Option has a single connector. It is located on the front of the unit. Connector C2 
interfaces between the SP3 and an external Delta Tau (or compatible) digital interface board, 
such as the Accessory 8F. Connector C2 is a standard mini-D-36 connector, with the pin 
descriptions below. A compatible point-to-point cable can be supplied by Delta Tau Data 
Systems, Inc. 

Connector 

C2

  (Standard Option) 

Pin Symbol 

Function  Description 

FC0 

Feedback 

Fault code bit 

FC2 

Feedback 

Fault code bit 


Command 

A/D converter clock 


Command 

A/D converter strobe 

C  Feedback 

Phase A actual current data 

C  Feedback 

Phase B actual current data 

7 AENA+ 

Command Amplifier 

enable 

8 FAULT+ 

Feedback  Amplifier 

fault 


Command 

Phase A top command 

10 


Command 

Phase A bottom command 

11 


Command 

Phase B top command 

12 


Command 

Phase B bottom command 

13 


Command 

Phase C top command 

14 


Command 

Phase C bottom command 

15 PMAC_GND Common  Reference 

voltage 

16 

PMAC_+5V 

Power 

+5V power from controller 

17 NC 


18 NC 


19 

FC1 

Feedback 

Fault code bit 

20 

FC3 

Feedback 

Fault code bit 

21 

ADC_CLK- 

Command 

A/D converter clock, return 

22 

ADC_STB- 

Command 

A/D converter strobe, return 

23 

CURRENTA- 

Feedback 

Phase A current data, reference 

24 

CURRENTB- 

Feedback 

Phase B current data, reference 

25 

AENA- 

Command 

Amplifier enable, return 

26 

FAULT- 

Feedback 

Amplifier fault, reference 

27 

PWMATOP- 

Command 

Phase A top command, return 

28 

PWMABOT- 

Command 

Phase A bottom command, return 

29 

PWMBTOP- 

Command 

Phase B top command, return 

30 

PWMBBOT- 

Command 

Phase B bottom command, return 

31 

PWMCTOP- 

Command 

Phase C top command, return 

32 

PWMCBOT- 

Command 

Phase C bottom command, return 

33 PMAC_GND Common  Reference 

voltage 

34 

PMAC_+5V 

Power 

+5V power from controller 

35 NC 


36 NC 


www.szcxi.com |  From

KOLLMORGEN

Summary of Contents for Kollmorgen SERVOSTAR SP3

Page 1: ...Danaher Motion SERVOSTAR SP3 Power Block Installation Manual KOLLMORGEN giving our customers freedom of design M SS 010 0104 www szcxi com From KOLLMORGEN...

Page 2: ...e Kollmorgen Corporation Therefore information contained in this manual may be updated from time to time due to product improvements etc and may not conform in every respect to former issues Not for u...

Page 3: ...d metal grounded surface Keep all covers and cabinet doors shut during operation Otherwise potential hazards could cause severe personal injury or damage to the product Be aware that during operation...

Page 4: ...ves have been tested by an authorized testing laboratory in a defined configuration with the system components deSP3 Power Blockribed in this documentation Kollmorgen is not responsible for any diverg...

Page 5: ...lated Cable Clamp 13 Alternative Bonding Methods 13 SYSTEM WIRING 15 MAIN POWER CONNECTOR 15 24V LOGIC POWER CONNECTOR OPTIONAL 16 STANDARD OPTION 17 Standard Option Block Diagram 18 INTEGRATED 8F OPT...

Page 6: ...Kollmorgen Safety Instructions SERVOSTAR SP3 Power Block ii CURRENT SCALING 25 CUSTOMER SUPPORT 26 www szcxi com From KOLLMORGEN...

Page 7: ...r additional details Metal to metal contact is important for electrical noise control 3 Wire the SP3 Power Block according to the System Wiring Diagram Pay particular attention to the pinout connector...

Page 8: ...d option A Connect the cable C2 B Connect the 8F Delta Tau accessory 13 Configure the SP3 Power Block for your particular motor if this was not done at the factory 14 Tune the SP3 Power block for the...

Page 9: ...rgen brushless motors and electronics are warranty for a period of 24 months from the time of installation or 30 months from time of shipment which ever comes first There are no other warranties expre...

Page 10: ...servo amplifiers with the standards for industrial areas stated in the front of this manual only if Danaher Motion Kollmorgen delivers the components motors cables amplifiers etc PART NUMBER CP3 03 2...

Page 11: ...volts 22 27 Power 24VDC Ext Logic Current amps sink 0 5 SoftStart Max Surge Current amps 30 Max Charge Time sec 0 25 Fault Contact Rating 1A Fault Contact Closing Period mSec Close 3mS Open 2mS OverTe...

Page 12: ...Cx10 External Shunt Peak current amps 20 Regulator Minimum resistance 20 Watts 200 Capacitance Farads 0 00082 0 00164 Application BUS Voltage nominal VDC 325 Information VHYS Regen circuit turn off V...

Page 13: ...2lb in 1 35Nm Hardware Motor Screw Size Torque Ground Screw Size Torque Control Logic AWG mm2 28 16 0 5 1 5 Motor Line AWG mm2 14 0 25 Main Input AWG mm2 14 25 12 4 Configurable I O wire gauge 22 18 A...

Page 14: ...To ensure proper grounding and to optimize EMC the enclosure should have continuous ground continuity maintained between all metal panels This ground continuity is intended to be both a safety ground...

Page 15: ...al ground The second is radiated high frequency emissions that are usually capacitively coupled from line to line and are differential in nature To properly mount the filters the enclosure should have...

Page 16: ...The filtering of the lines feeding the motor provides additional attenuation of noise currents that may enter surrounding cables and equipment I O ports in close proximity Differential mode currents...

Page 17: ...n Schaffner RD7137 36 0m5 A 96843 005 500 H 3 phase common mode choke 36 amps continuous Schaffner RD8137 64 0m5 A 96843 010 500 H 3 phase common mode choke 64 amps continuous I O Filtering I O filter...

Page 18: ...d This high frequency ground is made with the use of a flat braid or copper bus bar Do not use a standard wire for the high frequency ground When connecting high frequency grounds use the shortest bra...

Page 19: ...lide onto the bus bar The cable with exposed shield is inserted through the SK piece and the thumbscrew on top of the SK piece is used to tighten the connection between the cable shield and the bus ba...

Page 20: ...Power Block 14 copper bus bar cable shield compressed on copper bus bar Thumb screw to tighten down shield to bus bar SK 8 14 20 Shielded terminal block Phoenix Contact Side View Phoenix Contact Top V...

Page 21: ...SERVOSTAR SP3 Power Block has two options the Standard Option and the Integrated 8F Option The Integrated 8F Option includes the interface features of the Delta Tau Data Systems Inc s Accessory 8F di...

Page 22: ...B L3 L2 L1 THE SERVOSTAR SP3 OPERATES WITH VOLTAGES AS HIGH AS 230 VAC USE CAUTION REFER INSTALLATION AND TROUBLESHOOTING TO QUALIFIED PERSONNEL ONLY WARNING HIGH VOLTAGE MAY EXIST UP TO 5 MINUTES AFT...

Page 23: ...WMABOT Command Phase A bottom command 11 PWMBTOP Command Phase B top command 12 PWMBBOT Command Phase B bottom command 13 PWMCTOP Command Phase C top command 14 PWMCBOT Command Phase C bottom command...

Page 24: ...s option has four connectors C1 to C4 on the front panel and one connector C5 on the top of the unit The PMAC2 has up to 4 machine interface connectors labeled JMACH1 through JMACH4 Each JMACH connect...

Page 25: ...bles can refer to Appendix A for drive motor pinout connections Connector C1 Hall Effect Device Feedback Connector C1 interfaces between the SP3 and the Hall Effect Devices HED on the motor These sign...

Page 26: ...Return PMAC_GND 8 EV5 Return E5V Return PMAC_GND 9 Hall 1 Hall 1 H1 10 Hall 2 Hall 2 H2 11 Hall 3 Hall 3 H3 12 Shield Shield SHIELD 13 Thermostat High Thermostat High MOTOR THERMp 14 Shield Shield SH...

Page 27: ...22 B11 NC Not Connected 23 A12 ACLK Input A D Converter Clock 24 B12 ACLK Input A D Converter Clock 25 A13 ASTB Input A D Converter Strobe 26 B13 ASTB Input A D Converter Strobe 27 A14 ADAA Output Ch...

Page 28: ...below Connector C5 User Flags PIN SYMBOL FUNCTION DESCRIPTION 1 USER Input General Capture Flag 2 PLIM Input Positive Limit Flag 3 MLIM Input Negative Limit Flag 4 HOME Input Home Flag 5 FL_RT Input R...

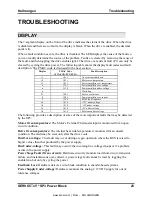
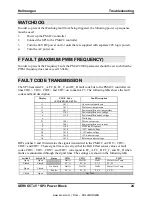
Page 29: ...mplifier over current F 1100 PWM fault frequency A1 1010 12V under voltage A2 1010 12V under voltage A3 1010 5V under voltage A4 1010 Reference under voltage The following provides a description of so...

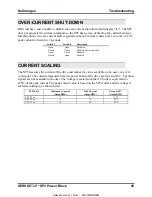
Page 30: ...on t1 1011 Over current shut down t2 1011 Motor over temperature t3 1011 Power amplifier over temperature o 1101 Power amplifier over voltage u 1110 Power amplifier under voltage Watch dog P1 1001 Dri...

Page 31: ...Enabled factory default Open Closed Enabled Closed Open Enabled CURRENT SCALING The SP3 measures the current of the drive and makes the value available to the user via a 10 volt signal The currents me...

Page 32: ...ive way contact your local sales representative for order status and delivery information product information and literature and application and field technical assistance If you are unaware of your l...

Reviews: