background image

11

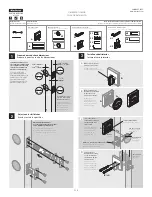
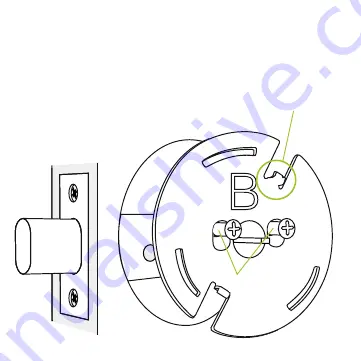
8. Fasten backplate

Fasten the backplate where the thumb-turn was using the two 

origin  al screws, with the arrow on the label pointing up. 

The notches on the backplate must be 

facing out with the tailpiece centered 

exactly in the middle hole.

Original screws

Summary of Contents for V3 US

Page 1: ...Danalock V3 US www danalock com...

Page 2: ...1 7 Remove the paper from the stickers 12 8 Fasten backplate 13 9 Select tailpiece adapter 14 10 Insert adapter into Danalock 15 11 Fit and fasten Danalock 16 12 Align the platemarks 17 13 Fasten the...

Page 3: ...3 0 Parts involved...

Page 4: ...Danalock app When the app is installed you create a user profile by pressing the blue ring You will use this profile each time you sign into the app You will need to finish set ting the Danalock up i...

Page 5: ...Get your tools together To install the Danalock you ll need a Phillips screw dri ver and tape preferably masking tape Should you need to remove or readjust the lock a pen tip or paper clip will be nee...

Page 6: ...door alignment Ensure that your door is properly aligned before beginning instal lation You should be able to lock your door without pushing pulling or lifting the door Thumb turn must move and lock...

Page 7: ...7 4 Secure outside keyhole Before removing your existing lock use tape to secure the outside keyhole This will keep it in place as you remove the screws on the inside...

Page 8: ...8 5 Remove inside thumb turn Remove the inside thumb turn leaving just the deadbolt and tail piece remaining Set aside the screws You ll reinstall them in step 8...

Page 9: ...9 6 Select a backplate Find the backplate that matches the brand of your existing lock...

Page 10: ...10 7 Remove the paper from the stickers On the backside of the backplate you ll find three stickers Remove the paper from the stickers...

Page 11: ...the backplate where the thumb turn was using the two origin al screws with the arrow on the label pointing up The notches on the backplate must be facing out with the tailpiece centered exactly in the...

Page 12: ...lect tailpiece adapter Select the tailpiece adapter that matches the shape of your existing lock s tailpiece Baldwin Emtek Omnia Weiser Weslock Baldwin Kwikset Schlage Depends on the length of your ta...

Page 13: ...13 10 Insert adapter into Danalock Insert the selected tailpiece adapter into your Danalock and press until it clicks in place Click...

Page 14: ...n Danalock Fit the Danalock onto the backplate with the battery cover fac ing down the tailpiece sliding into the adapter and the backplate notches into the back of the lock Battery cover facing down...

Page 15: ...n the platemarks Find the small marking at the edge of the backplate and align it with the hole in the cover ring surrounding the Danalock Now you are sure to hit the notches on the backplate with the...

Page 16: ...16 13 Fasten the Danalock Turn the Danalock clockwise until it clicks to fasten it to the backplate NOTE If you need to unfasten and retry see Uninstall instructions on p 22 Click...

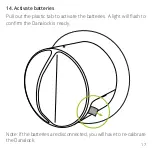
Page 17: ...Activate batteries Pull out the plastic tab to activate the batteries A light will flash to confirm the Danalock is ready Note If the batteries are disconnected you will have to re calibrate the Dana...

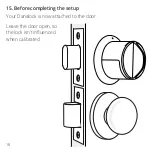
Page 18: ...18 15 Before completing the setup Your Danalock is now attached to the door Leave the door open so the lock isn t influenced when calibrated...

Page 19: ...have logged in you will see your empty keychain Press Add lock at the bottom of the screen A guide will now lead you through the installation and configuration of your Danalock Add lock Settings Lock...

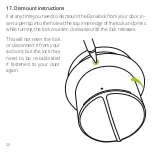
Page 20: ...r door in sert a pen tip into the hole at the top inner edge of the lock and press while turning the lock counter clockwise until the lock releases This will not reset the lock or disconnect it from y...

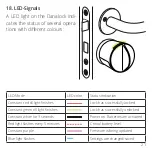
Page 21: ...ication Constant red till light finishes Lock has successfully locked Constant green till light finishes Lock has successfully unlocked Constant white for 3 seconds Power on Batteries are activated Re...

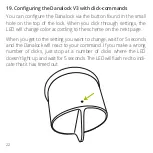
Page 22: ...h settings the LED will change color according to the scheme on the next page When you get to the setting you want to change wait for 5 seconds and the Danalock will react to your command If you make...

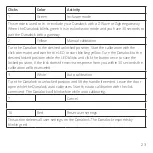
Page 23: ...yellow Turn the Danalock to the desired locked position while the LED blinks and click the button once to save the locked position If the lock doesn t receive a response from you within 30 seconds the...

Page 24: ...www danalock com Danalock International ApS Gammel Stillingvej 427C 8462 Harlev DK 45 4242 8122 info danalock com DV3 US EN 2018 09 13...

Reviews: