background image

INSTALLATION INSTRUCTIONS

1. 

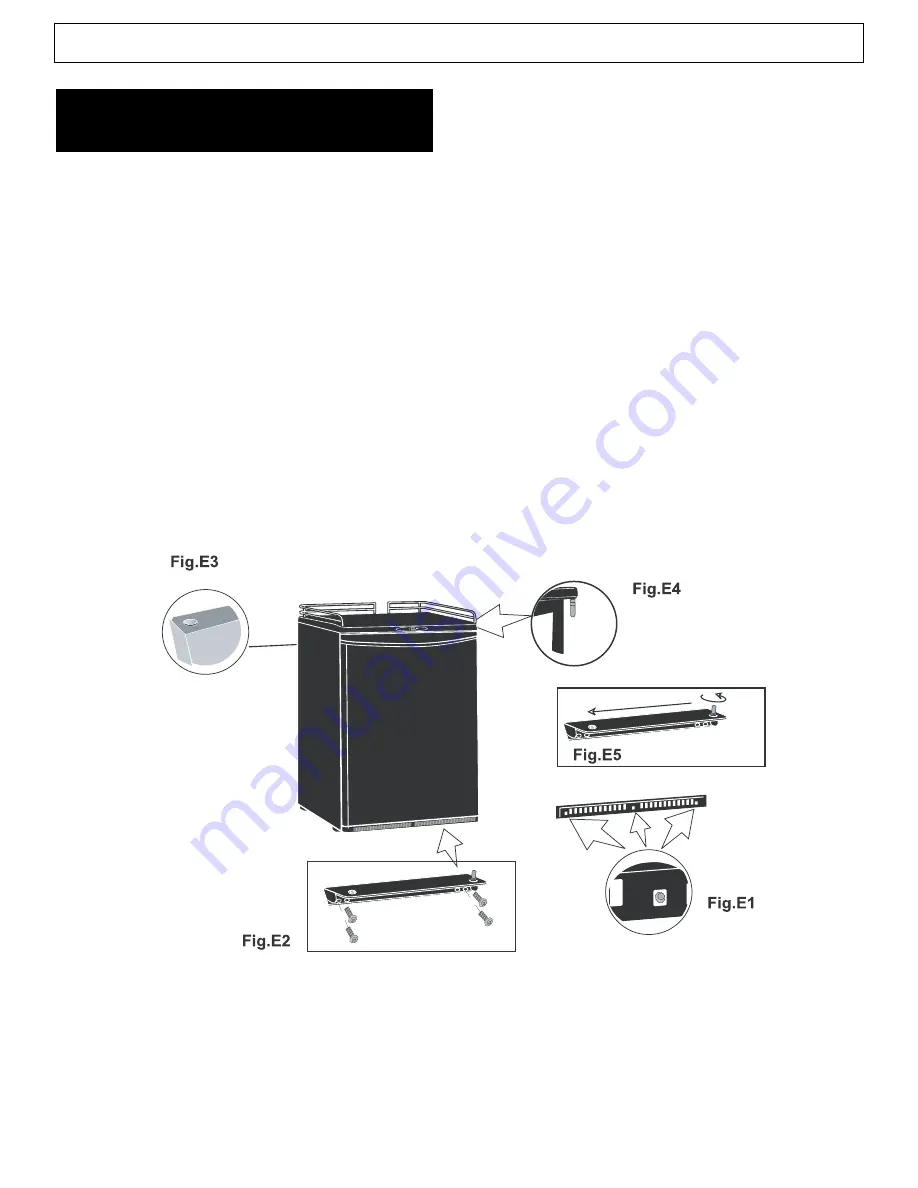
Lay the unit on it’s back.

2. 

Remove the kickplate by removing the three

retaining screws. (

locations shown in 

Fig E1

)

3. 

Remove the four screws located on the lower

door hinge.

(Fig E2)

4. 

Pull the door downward until it releases from the

upper hinge pin.

5. 

Remove the plastic screw cap from the top left

hand 

(Fig E3)

side and install it on the top right

hand side of the door frame.

6. 

Unscrew the upper door hinge 

(Fig E4)

pin from

the right side of the worktop and install it on the left
side of the worktop.

DOOR REVERSAL

INSTRUCTIONS

7.

Position the main door back on the cabinet and

push up until the top hinge pin is inserted into the
top of the door.

8.

Remove the lower support pin from the door and

reposition it on the lower hinge as shown in

Fig E5.

9. 

Re-install the lower support pin 

on the right side

of the door.

10.

Make sure to align the door and cabinet before

fastening the lower hinge screws to the cabinet.

11.

Re-install the kickplate.

3

Summary of Contents for Diplomat DAR163BLDP

Page 1: ...UT R FRIG RATEUR TODA REFRIGERADOR Owner s Use and Care Guide Guide d utilisation et soins de Propri taire Manual de Instructions pare el Uso y Cuidado de su Unidad Model Mod le Modelo DAR163BLDP DAR1...

Page 2: ...del Proprietario Instruci nes de Seguridad Importantes Instrucciones d instalaci n Instruci nes Operadoras Instrucciones de montaje Limpieza y Mantenimiento Soluci n Sugeridad Garantia 1 9 10 18 CONTE...

Page 3: ...ply See Connection to Power Supply If the food has a strange smell or color throw it away because it is very likely that it is spoiled and therefore is dangerous to consume Always disconnect the appli...

Page 4: ...on the unit must be set level This is accomplished by adjusting the 2 front leveling legs located under the refrigerator NOTES This appliance is intended for FREE STANDING INSTALLATION ONLY and is NOT...

Page 5: ...of the door frame 6 Unscrew the upper door hinge Fig E4 pin from the right side of the worktop and install it on the left side of the worktop DOOR REVERSAL INSTRUCTIONS 7 Position the main door back...

Page 6: ...ispro grammed to display independently the following temperature only information INTERNAL CABINET TEMPERATURE This setting is represented by a steady non flashing LED display and is the normal LED de...

Page 7: ...ating temperature 1 Press and release either of the temperature keys The LED display will temporarily revert to the flashing set temperature for approximately 5 seconds if you fail to set change the o...

Page 8: ...e protective plate also makes installation and removal of the keg and keg stand easier 2 Installation of the Beer Keg Position the keg stand directly in front of the open refrigerator cabinet Using pr...

Page 9: ...en to avoid possible formations of condensate mold or odors Some Important Rules for the Correct Use of the Refrigerator Never place hot foods in the refrigerator Never place spoiled foods in the unit...

Page 10: ...direct sunlight Lower temperature control Close lid securely Be sure food is at room temperature before inserting Minimize lid openings duration Do not place unit close to heat sources or direct sunli...

Page 11: ...ended by Danby or its authorized distributors and all other warranties conditions representations or guarantees including any warranties conditions representations or guarantees under any Sale of Good...

Page 12: ...t l int rieur de l appareil sans possibilit d en sortir et d tre asphyxi s L appareil doit tre correctement branch l alimentation lectrique Voir la section relative au branchement l alimentation lectr...

Page 13: ...moins 5 pouces du mur 1 Choisir une place qui a un plancher fort et a niveau 2 loigner l appareil de 5 pouces des murs arrieres et de c t 3 viter les rayons de soleil et la chaleru directs qui peuven...

Page 14: ...a vis la gauche sup rieure du cadre de porte et installez le la droite sup rieure du cadre de la porte Fig E3 6 D vissez la cheville de la charni re sup rieure de la porte du c t droit de la surface d...

Page 15: ...s comme illustr dans la Fig A Les roulettes pivotantes verrouillables doivent tre install es l avant de l appareil pour un acc s facile INSTALLATION DES ROULETTES Placez l appareil de mani re ce qu il...

Page 16: ...oin corre spondant du s lecteur s illumine afin d indiquer quelle unit de temp rature est affich e Veuillez prendre note en cas de panne lectrique tous les modifications aux r glages sont perdus et le...

Page 17: ...st utilis La plaque protectrice rend plus faciles l installation et le retrait du f t et du pied de f t 2 Installez le f t de bi re Placez le pied de f t directement devant le bo tier r frig rant ouve...

Page 18: ...se murale c Nettoyez le r frig rateur compl tement en incluant le plateau d gouttage bac de d cong lation situ dans le bas de l appareil d Laisser la porter ouverte pour viter les mauvais odeurs Impor...

Page 19: ...rcle Assurez vous que la nourriture est frais avant de la placer dans l appareil Minimisez l ouverture de la couvercle Ne placez pas l appareil pr s d une ou exposition directe aux rayons du chaleur d...

Page 20: ...garanties conditions ou repr sentations en vertu de toute loi r gissant la vente de produits ou de toute autre l gislation ou r glement semblables En vertu de la pr sente Danby ne peut tre tenue resp...

Page 21: ...aparato est conectado a tierra correctamente ADVERTENCIA INSTALLATION R GLABLE INSTRUCCIONES DE SEGURIDAD IMPORTANTES PRECAUCIONES DE SEGURIDAD Si compr este aparato para sustituir uno m s antiguo qu...

Page 22: ...tema de enfiado debido a la manipulaci n para su transporte Su refrigerador es aprobada para EL USO DE INTERIOR SOLAMENTE y no es aprobada para el uso al aire libre IMPORTANTES Instale esta Refrigerad...

Page 23: ...perior izquierda y col quelos en la parte superior derecha del marco de la puerta Fig E3 6 Desatornille la clavija de la bisagra superior de la puerta del lado dere cho de la mesada y col quela en el...

Page 24: ...Instalacion de las ruedas Como se muestra en la Fig A Las rueditas con traba deben instalarse en el frente de la unidad para facilitar el acceso INSTALACION DE LAS RUEDAS Coloque el aparato firmemente...

Page 25: ...niciales de f brica C MO ESTABLECER LA TEMPERATURA DE FUN CIONAMIENTO Para establecer o cambiar la temper atura de funcionamiento 1 Pulse y suelte cualquiera de los botones de control de temperatura L...

Page 26: ...tora tam bi n facilita la instalaci n y remoci n del barril y del soporte para el barril 2 Instalaci n del Barril de Cerveza Coloque el soporte del barril directamente delante del gabinete abierto del...

Page 27: ...idad d deje la puerta abierta para evitar la formaci n de olores Algunas reglas importantes para el uso correcto del refrigerador Nunca coloque alimentos calientes en el refrigerador No sobrecargue el...

Page 28: ...erre bien la puerta Verifique que los alimentos est n a temperatura ambiente antes de guardarlos Abra menos veces la puerta No coloque la unidad cerca defuentes de calor o bajo la luz directadel sol 3...

Page 29: ...rizados y todas las dem s garant as condiciones o representaciones incluyendo cualquier garant a condiciones o representaciones bajo cualquier Acta de Venta de Productos o legislaci n o estatuto simil...

Page 30: ...sito m s cercano del servicio Para pedir servicio y o la localizaci n del dep sito del servicio lo m s cerca posi ble usted llama Danby gratis Al pedir servicio o pidiendo piezas proporcione siempre l...

Reviews: