background image

LIMITED IN-HOME APPLIANCE WARRANTY

This quality product is warranted to be free from manufacturer’s defects in material and workmanship, provided that the unit is

 used under the normal operating

conditions intended by the manufacturer.
This warranty is available only to the person to whom the unit was originally sold by Danby Products Limited (Canada) or Danby 

Products Inc. (U.S.A.) (hereafter

“Danby”) or  by an authorized distributor of Danby, and is non-transferable.

TERMS OF WARRANTY

Plastic parts, are warranted for thirty (30) days only from purchase date, with no extensions provided.

First Year

During the first twelve (12) months, any functional parts of this product found to be defective, will be repaired or replaced, 

at warrantor’s

option, at no charge to the ORIGINAL purchaser.  

To obtain

Danby reserves the right to limit the boundaries of “In Home Service” to the proximity of an Authorized Service Depot.  Any app

liance 

Service

requiring service outside the limited boundaries of “In Home Service” ,

i

t will be the consumer’s responsibility to transport the appliance (at

their own expense) to the original retailer (point of purchase) or a service depot  for repair. See “Boundaries of In Home Serv

ice” below.  

Contact your dealer from whom your unit was purchased, or contact your nearest authorized Danby service depot, where service 
must be performed by a qualified service technician.
If service is performed on the units by anyone other than an authorized service depot, or the unit is used for commercial appli

cation, all 

obligations of Danby under this warranty shall be void.  

Boundaries of

If the appliance is installed in a location that is 100 kilometers (62 miles) or more from the nearest service center your unit

 must be 

In Home Service

delivered to the nearest  authorized Danby Service Depot, as service must only be performed by a technician qualified and certif

ied for 

warranty service by Danby. Transportation charges to and from the service location are not protected by this warranty and are t

he 

responsibility of the purchaser.

Nothing within this warranty shall imply that Danby will be responsible or liable for any spoilage or damage to food or other c

ontents of this appliance, whether due

to any defect of the appliance, or its use, whether proper or improper.

EXCLUSIONS

Save as herein provided, Danby, there are no other warranties, conditions, representations or guarantees, express or implied, m

ade or intended by Danby or its

authorized distributors and all other warranties, conditions, representations or guarantees, including any warranties, conditio

ns, representations or guarantees

under any Sale of Goods Act or like legislation or statue is hereby expressly excluded. Save as herein provided, Danby shall no

t be responsible for any damages

to persons or property, including the unit itself, howsoever caused or any consequential damages arising from the malfunction o

f the unit and by the purchase of

the unit, the purchaser does hereby agree to indemnify and hold harmless Danby from any claim for damages to persons or propert

y caused by the unit.

GENERAL PROVISIONS

No warranty or insurance herein contained or set out shall apply when damage or repair is caused by any of the following: 

1)

Power failure.

2)

Damage in transit or when moving the appliance.

3)

Improper power supply such as low voltage, defective house wiring or inadequate fuses.

4)

Accident, alteration, abuse or misuse of the appliance such as inadequate air circulation in the room or abnormal operating con

ditions

(extremely high or low room temperature).

5)

Use for commercial or industrial purposes (ie. If the appliance is not installed in a domestic residence). 

6)

Fire, water damage, theft, war, riot, hostility, acts of God such as hurricanes, floods etc.

7)

Service calls resulting in customer education.

8)

Improper Installation (ie. Building-in of a free standing appliance or using an appliance outdoors that is not approved for out

door application).

Proof of purchase date will be required for warranty claims; so, please retain bills of sale.  In the event warranty service is

 required, present this document to our

AUTHORIZED SERVICE DEPOT.

Danby Products Limited
PO Box 1778, Guelph, Ontario, Canada  N1H 6Z9
Telephone:  (519) 837-0920  FAX:  (519) 837-0449

Danby Products Inc.

PO Box 669, Findlay, Ohio, U.S.A.  45840

Telephone:  (419) 425-8627  FAX:  (419) 425-8629

04/09

1-800-263-2629

Warranty Service

In-home

If the appliance is installed in a location that is 100 kilometres (62 miles) or more from the nearest 
service centre your unit must be delivered to the nearest authorized Danby Service Depot, as service 
must only be performed by a technician qualified and certified for warranty service by Danby. Transpor-
tation charges to and from the service location are not protected by this warranty and are the responsi-
bility of the purchaser.

During the first twelve (12) months, any functional parts of this product found to be defective, will be 
repaired or replaced, at warrantor’s option, at no charge to the ORIGINAL purchaser.

Danby reserves the right to limit the boundaries of “In Home Service” to the proximity of an Authorized 
Service Depot.  Any appliance requiring service outside the limited boundaries of “In Home Service” ,it 
will be the consumer’s responsibility to transport the appliance (at their own expense) to the original 
retailer (point of purchase) or a service depot  for repair. See “Boundaries of In Home Service” below. 
Contact your dealer from whom your unit was purchased, or contact your nearest authorized Danby 
service depot, where service must be performed by a qualified service technician. If service is performed 
on the units by anyone other than an authorized service depot, or the unit is used for commercial 
application, all obligations of Danby under this warranty shall be void.

First year

To obtain
service 

Boundaries of
in-home service

LIMITED IN-HOME APPLIANCE WARRANTY

This quality product is warranted to be free from manufacturer’s defects in material and workmanship, provided that the unit is 
used under the normal operating conditions intended by the manufacturer.
This warranty is available only to the person to whom the unit was originally sold by Danby Products Limited (Canada) or 
Danby Products Inc. (U.S.A.) (hereafter “Danby”) or  by an authorized distributor of Danby, and is non-transferable.

TERMS OF WARRANTY

Plastic parts, are warranted for thirty (30) days only from purchase date, with no extensions provided.

Nothing within this warranty shall imply that Danby will be responsible or liable for any spoilage or damage to food or other 
contents of this appliance, whether due to any defect of the appliance, or its use, whether proper or improper.

EXCLUSIONS

Save as herein provided, by Danby, there are no other warranties, conditions, representations or guarantees, express or 
implied, made or intended by Danby or its authorized distributors and all other warranties, conditions, representations or 
guarantees, including any warranties, conditions, representations or guarantees under any Sale of Goods Act or like legislation 
or statute is hereby expressly excluded. Save as herein provided, Danby shall not be responsible for any damages to persons 
or property, including the unit itself, howsoever caused or any consequential damages arising from the malfunction of the unit 
and by the purchase of the unit, the purchaser does hereby agree to indemnify and hold harmless Danby from any claim for 
damages to persons or property caused by the unit.

GENERAL PROVISIONS

No warranty or insurance herein contained or set out shall apply when damage or repair is caused by any of the following: 
1) Power failure.
2) Damage in transit or when moving the appliance.
3) Improper power supply such as low voltage, defective house wiring or inadequate fuses.
4) Accident, alteration, abuse or misuse of the appliance such as inadequate air circulation in the room or abnormal operating 
conditions (extremely high or low room temperature).
5) Use for commercial or industrial purposes (i.e., If the appliance is not installed in a domestic residence). 
6) Fire, water damage, theft, war, riot, hostility, acts of God such as hurricanes, floods etc.
7) Service calls resulting in customer education.
8) Improper Installation (i.e., building-in of a free standing appliance or using an appliance outdoors that is not approved for 
outdoor application). Proof of purchase date will be required for warranty claims; so, please retain bills of sale.  In the event 
warranty service is required, present this document to our AUTHORIZED SERVICE DEPOT.

Warranty Service

In-home

Danby Products Limited
PO Box 1778, Guelph, Ontario, Canada  N1H 6Z9
Telephone:  (519) 837-0920  FAX:  (519) 837-0449

Danby Products Inc.

PO Box 669, Findlay, Ohio, U.S.A.  45840

Telephone:  (419) 425-8627  FAX:  (419) 425-8629

1-800-263-2629

07/14

Summary of Contents for DKC054A1BSL2DB

Page 1: ...ENTRETIEN GU A DE UTILIZACI N Y CUIDADO PARA EL PROPIETARIO MODEL MOD LE MODELO DANBY PRODUCTS LIMITED ONTARIO CANADA N1H 6Z9 DANBY PRODUCTS INC FINDLAY OHIO USA 45840 2017 03 03 DKC054A1BSL2DB KEG CO...

Page 2: ...bra completamente la v lvula girando en sentido antihorario El indicador del man metro mostrar un valor si el tanque contiene presi n 3 Tire suavemente el anillo de alivio de presi n Se debe oir el ga...

Page 3: ...aracter sticas Instrucciones de instalaci n Instrucciones de funcionamiento Cuidado y mantenimiento Soluci n sugerida Garant a Model Mod le Modelo DKC054A1BSL2DB Includes American Sankey tap coupler o...

Page 4: ...formation to obtain service under warranty To receive service you must provide the original receipt Model Number Serial Number Date of Purchase NEED HELP Before you call for service here are a few thi...

Page 5: ...r cord plug or the appliance itself in water Do not use this product near water for example in a wet basement laundry room or near a sink Do not use corrosive chemicals or vapors in this appliance Use...

Page 6: ...that component parts shall be replaced with like components and that servicing shall be done by factory authorized service personnel so as to minimize the risk of possible ignition due to incorrect pa...

Page 7: ...or Failure to do so could result in an explosion which can possibly result in death or injury when the cylinder valve is opened 3 Always follow correct procedures when cylinders are changed as per loc...

Page 8: ...is will reduce the possibility of a malfunction in the cooling system from handling during transportation Clean the interior surface with lukewarm water using a soft cloth 5 INCLUDED ACCESSORIES Remov...

Page 9: ...Avoid locating the keg cooler in excessive humidity Plug the keg cooler into a dedicated properly installed grounded wall outlet Do not under any circumstance cut or remove the third ground prong from...

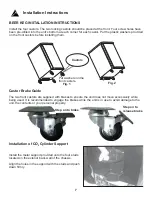
Page 10: ...asters Castor Brake Guide Step on to brake Step on to release brake 7 Installation Instructions The two front castors are supplied with brakes to ensure the unit does not move excessively while being...

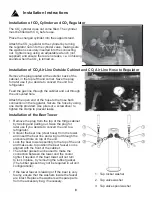
Page 11: ...necessary 8 Installation of CO2 Cylinder and CO2 Regulator Installation Instructions The CO2 cylinder does not come filled The cylinder must be filled with CO2 before use Place the charged cylinder i...

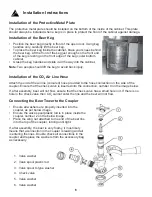
Page 12: ...heck valve then CO2 cannot enter the line and the beer will not flow 9 Installation of the Protective Metal Plate The protective metal plate should be installed on the bottom of the inside of the cabi...

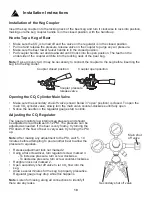
Page 13: ...slowly turn the main valve counter clockwise until fully open Notice the needle on the regulator gauge start to climb Adjusting the CO2 Regulator The gauge monitors low internal keg pressure and shou...

Page 14: ...is pushed all the way back This keg cooler has been designed to chill and dispense beer from two of the following size kegs simultaneously Note The refrigerator compartment cannot accommodate the Coor...

Page 15: ...y the compressor may not start CONVERTING TO AN ALL REFRIGERATOR 1 Turn the control knob to the OFF position 2 Close the main valve on the CO2 cylinder 3 Close the secondary shut off valve on the regu...

Page 16: ...ve the screws and bracket Place to one side 3 Slide the door down about 15 cm 6 and off the top hinge pin and lift away 4 Use a flat head screwdriver to remove te pin from the top bracket Replace it i...

Page 17: ...ion of the dispense system and seals The dispenser beer line should be cleaned approximately once every three 3 weeks or every other keg which ever comes first The dispenser faucet should be cleaned o...

Page 18: ...re the beer line hose from the tower and the CO2 air line hose from the CO2 regulator are attached to the correct connections on the coupler beer line to the top of the coupler CO2 air line to the sid...

Page 19: ...authorized Danby Service Depot as service must only be performed by a technician qualified and certified for warranty service by Danby Transpor tation charges to and from the service location are not...

Page 20: ...800 26 Danby 1 800 263 2629 S il vous pla t ayez votre facture d achat le num ro de mod le et le num ro de s rie pr s durant l appel Remarque Ces renseignements seront n cessaires si votre appareil a...

Page 21: ...e bassins d eau par exemple dans un sous sol d tremp pr s d une piscine ou d un vier N utilisez pas de produits chimiques ou vapeurs corrosives dans pr s de cet appareil N utilisez cet appareil que po...

Page 22: ...z vous que les composants doivent tre remplac s par des composants similaires et que l entretien doit tre effectu par le personnel de maintenance agr en usine afin de minimiser le risque d allumage d...

Page 23: ...bouteilles sont chang es selon les codes locaux 4 Fixez toujours la bouteille de gaz carbonique en position verticale 5 Gardez toujours la bouteille de gaz carbonique l abri de la chaleur Les bouteil...

Page 24: ...erticale pendant environ 6 heures Cela r duira le risque que le syst me de refroidissement subisse une d faillance caus e par la manutention lors du transport Nettoyez la surface int rieure avec de l...

Page 25: ...de bi re pression loin des rayons directs du soleil et de toute source de chaleur four appareil de chauffage radiateur etc Les rayons directs du soleil affectent le rev tement acrylique et les source...

Page 26: ...acez les rondelles sur les roulettes avant Instructions d installation Installation du support de la bouteille de CO2 Installez le support m tallique fourni sur les 4 goujons qui se trouvent sur la pa...

Page 27: ...ange de la poche d accessoires si n cessaire Installation de la bouteille de CO2 et du r gulateur de CO2 La bouteille de CO2 fournie n est pas remplie La bouteille doit tre remplie de CO2 avant l util...

Page 28: ...t pas p n trer dans la canalisation et la bi re ne s coule pas Installation de la plaque m tallique protectrice La plaque m tallique de protection doit tre install e au bas de l int rieur de l armoire...

Page 29: ...tement ouvert Vous verrez que l aiguille de la jauge du r gulateur commencera grimper R glage du r gulateur de CO2 La jauge surveille la basse pression interne du baril et doit tre r gl e afin de prod...

Page 30: ...ousser la poign e du robinet compl tement vers l arri re Ce refroidisseur de f t a t con u pour refroidir et distribuer la bi re de deux des f ts suivants de taille simultan ment Remarque Le compartim...

Page 31: ...resseur ne se remettra pas en marche CONVERSION EN R FRIG RATEUR 1 Tournez le bouton de r glage sur la position ARR T OFF 2 Fermez le robinet principal de la bouteille de CO2 3 Fermez le robinet d arr...

Page 32: ...r frig rateur garde manger vers le bas d environ 15 cm 6 po pour que l axe de charni re sup rieure sorte ensuite soulevez la pour l carter l appareil 4 Au moyen du tournevis lame plate enlevez l axe d...

Page 33: ...vent tre nettoy es p riodiquement cause d une accumulation de cris taux sur les raccords conduites et bouchons commun ment appel s tartre de bi re Si le tartre de bi re n est pas enti rement limin par...

Page 34: ...n est pas bien centr dans l appareil Les roulettes ne sont pas fix es Mousse de bi re excessive Assurez vous que le tuyau de ligne de bi re de la tour et le tuyau d air de CO2 du r gulateur de CO2 son...

Page 35: ...cien qualifi et certifi pour effectuer un entretien couvert par la garantie de Danby Les frais de transport entre votre domicile et le lieu de l entretien ne sont pas couverts par la pr sente garantie...

Page 36: ...frecuentes y m s En caso de necesitar asistencia adicional por favor llame al 1 800 26 DANBY 1 800 263 2629 Por favor tenga disponible su recibo de compra y n mero de modelo cuando llame Nota Esta inf...

Page 37: ...mentaci n el enchufe o el propio aparato en agua No utilice este producto cerca del agua por ejemplo en un s tano h medo lavander a o cerca de un fregadero No utilice productos qu micos corrosivos ni...

Page 38: ...E SEGURIDAD Aseg rese de que los componentes se sustituir n por componentes similares y que el servicio deber ser realizado por el personal de servicio autorizado de f brica para minimizar el riesgo d...

Page 39: ...mpre ventile y salir el rea luego de una p rdida de gas carb nico 7 Nunca conecte directamente un tanque de gas carb nico al barril de cerveza 8 Nunca deje caer ni arroje un cilindro de gas carb nico...

Page 40: ...rtical durante aproximadamente 6 horas Esto disminuir la posibilidad de mal funcionamiento del sistema de enfriamiento debido a su manipulaci n durante el transporte Limpie la superficie interior con...

Page 41: ...nchufe el equipo en un tomacorriente de uso exclusivo debidamente conectado a tierra Nun ca bajo ninguna circunstancia corte o quite la tercera pata de puesta a tierra del enchufe del cord n el ctrico...

Page 42: ...o 39 Las dos ruedas delanteras se suministran con frenos para asegurar que la unidad no se mueve excesivamente mientras se utiliza Se recomienda encender los frenos mientras la unidad est en uso para...

Page 43: ...puesto de la bolsa de accesorios si es necesario Instalaci n del tanque de gas y el regulador de gas carb nico El tanque de gas no viene lleno Antes de instalarlo debe ser llenado con gas carb nico Un...

Page 44: ...e retenci n entonces el CO2 no puede entrar en la l nea y la cerveza no fluir Instalaci n de la placa protectora de metal La placa met lica protectora debe instalarse en la parte inferior del interior...

Page 45: ...del man metro del regulador empieza a subir C mo graduar el regulador de gas carb nico El man metro m s cercano al cilindro de CO2 controla la baja presi n interna del barril y debe ajustarse para una...

Page 46: ...mpre que la palanca del grifo regrese por completo a su posici n original Este enfriador de barriles ha sido dise ado para enfriar y dispensar cerveza de dos de los siguientes barriles tama o simult n...

Page 47: ...EFRIGERADOR 1 Gire la perilla de control a la posici n de apagado OFF 2 Cierre la v lvula principal del tanque de gas 3 Cierre la v lvula de paso secundaria ubicada en el tubo del regulador 4 Cierre l...

Page 48: ...la clavija de la bisagra superior y lev ntela para sacarla del refrigerador 4 Con un destornillador de hoja plana retire la clavija del soporte superior Vuelva a colocarla en el soporte de la bisagra...

Page 49: ...se peri dicamente debido a la acumulaci n de cristales que ocurre en los accesorios mangueras y conectores com nmente llamado acumulaci n Si la acumulaci n no se quita completamente durante el proceso...

Page 50: ...ea de cerveza de la torre y la manguera de la l nea de aire CO2 del regulador de CO2 est n conectadas a las conexiones correctas en el acoplador L nea de cerveza a la parte superior del acoplador l ne...

Page 51: ...lugar en que se efect e el servicio t cnico no est n cubiertos por esta garant a y son de responsabilidad del comprador Durante los primeros 12 meses cualquier parte en buen estado de este producto q...

Page 52: ...ts la port e de la main lors de la commande de pi ce ou service Type de produit Num ro de mod le Num ro de pi ce Description de la pi ce Todas las piezas de reparaci n disponibles para la com pra o la...

Reviews:

Related manuals for DKC054A1BSL2DB