background image

3

SAFETY REQUIREMENTS

DANGER:

 Risk of fi re or explosion. Flammable 

refrigerant used. Do not puncture refrigerant tubing.

•  Do not use mechanical devices to defrost 

refrigerator.

•  Ensure that servicing is done by factory 

authorized service personnel, to minimize 

product damage or safety issues.

•  Consult repair manual or owner’s guide before 

attempting to service this product. All safety 

precautions must be followed.

•  Dispose of properly in accordance with federal 

or local regulations. 

•  Follow handling instructions carefully.

WARNING:

 Keep ventilation openings, in the 

appliance enclosure or in the built-in structure, clear 

of obstruction.

WARNING:

 Do not use mechanical devices or other 

means to accelerate the defrosting process, other 

than those recommended by the manufacturer.

WARNING:

 Do not damage the refrigerant circuit.

WARNING:

 Do not use electrical appliances inside 

the food storage compartments of the appliance, 

unless they are of the type recommended by the 

manufacturer.

CAUTION:

 Children should be supervised to ensure 

that they do not play with the appliance.

DANGER:

 Risk of child entrapment. Before throwing 

away an old appliance:

•  Remove the door or lid.

•  Leave shelves in place so that children may not 

easily climb inside.

This appliance is intended to be used in household 

and similar applications such as:

•  Staff kitchen areas in shops, offi ces and other 

working environments;

•  Farm houses and by clients in hotels, motels and 

other residential type environments;

•  Bed and breakfast type environments;

•  Catering and similar non-retail applications.

SAFETY REQUIREMENTS

This appliance is not intended for use by persons 

(including children) whose physical, sensory or 

mental capabilities may be different or reduced, 

or who lack experience or knowledge, unless such 

persons receive supervision or training to operate 

the appliance by a person responsible for their 

safety.

Do not store explosive substances such as aerosol 

cans with a fl ammable propellant in this appliance.

GROUNDING INSTRUCTIONS

This appliance must be grounded. Grounding 

reduces the risk of electrical shock by providing an 

escape wire for the electrical current. 

This appliance has a cord that has a grounding 

wire with a 3-prong plug. The power cord must be 

plugged into an outlet that is properly grounded. 

If the outlet is a 2-prong wall outlet, it must be 

replaced with a properly grounded 3-prong wall 

outlet. The serial rating plate indicates the voltage 

and frequency the appliance is designed for.

WARNING - 

Improper use of the grounding 

plug can result in a risk of electric shock. 

Consult a qualifi ed electrician or service agent 

if the grounding instructions are not completely 

understood, or if doubt exists as to whether the 

appliance is properly grounded.

Do not connect your appliance to extension 

cords or together with another appliance in the 

same wall outlet.

 Do not splice the power cord. 

Do not under any circumstances cut or remove the 

third ground prong from the power cord. Do not 

use extension cords or ungrounded (two prongs) 

adapters.

If the power supply cord is damaged, it must be 

replaced by the manufacturer, its service agent or 

similar qualifi ed person in order to avoid hazard.

Important Safety Information

READ AND FOLLOW ALL SAFETY INSTRUCTIONS

SAVE THESE INSTRUCTIONS!

Summary of Contents for DKC054A1BSL2DB

Page 1: ...OHIO USA 45840 OWNER S MANUAL MANUEL DU PROPRI TAIRE MANUAL DEL PROPIETARIO www Danby com MODEL MOD LE MODELO DKC054A1BSL2DB KEG COOLER Owner s Manual 1 14 GLACI RE DE BI RE PRESSION Manuel du propri...

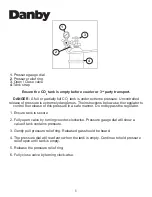
Page 2: ...use the regulator to control the release of this pressure in a safe manner Do not bypass the regulator 1 Ensure tank is secure 2 Fully open valve by turning counter clockwise Pressure gauge dial will...

Page 3: ...ide the original purchase receipt to validate your warranty and receive service Model Number _________________________________________________ Serial Number ___________________________________________...

Page 4: ...ail applications SAFETY REQUIREMENTS This appliance is not intended for use by persons including children whose physical sensory or mental capabilities may be different or reduced or who lack experien...

Page 5: ...ge of CO2 7 Never connect a CO2 gas cylinder directly to a beer keg 8 Never drop or throw a CO2 cylinder 9 Never connect a keg without at least one safety pressure release There are two safety mechani...

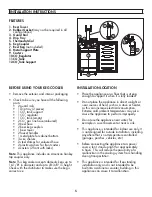
Page 6: ...Regulator 11 CO2 Tank 12 CO2 Tank Support 1 2 3 4 5 7 8 9 10 11 12 6 INSTALLATION INSTRUCTIONS INSTALLATION LOCATION Place the appliance on a oor that is strong enough to support it when it is fully l...

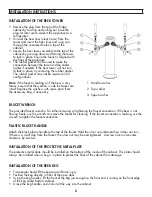
Page 7: ...Four screw holes have been pre drilled into the bottom of the cabinet at each corner for each caster Put the plastic washers provided on the front casters before installing them CASTOR BRAKES The two...

Page 8: ...ely inserted into the connecting nut Tighten snug using an adjustable wrench not supplied and ensure there are no leaks i e no hissing sounds when the CO2 is turned on INSTALLATION OF CO2 AIR LINE AND...

Page 9: ...asher 3 Spout washer INSTALLATION INSTRUCTIONS FAUCET WRENCH The provided faucet wrench is for either removing or tightening the faucet connection If the beer is not owing freely use the wrench to rem...

Page 10: ...hole in it If there is no hole in the reed valve then CO2 cannot enter the line and the beer will not ow 1 Valve washer 2 Check valve 3 O type washer 4 Reed valve 5 Valve washer 6 Valve washer CONNECT...

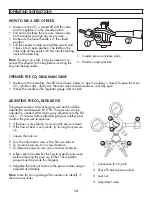
Page 11: ...S 1 2 1 Coupler pressure release valve 2 Handle in open position 1 Connection to C02 tank 2 Shut off valve open position 3 Lock nut 4 Adjustment screw 10 ADJUSTING THE CO2 REGULATOR The gauge monitors...

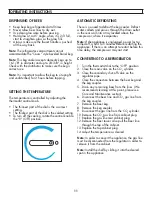
Page 12: ...ray located above the compressor where it evaporates Note If the appliance is unplugged power lost or turned off wait 3 to 5 minutes before restarting the appliance If there is an attempt to restart b...

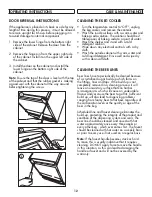
Page 13: ...ash the outside cabinet with warm water and mild liquid detergent Rinse well and wipe dry with a clean soft cloth CLEANING THE BEER LINES Beer lines have to periodically be cleaned because of a crysta...

Page 14: ...properly reinstalled The gasket is dirty The shelves or stand are out of position The keg is not properly centered in the unit The casters are not attached Excessive beer foam Ensure the beer line ho...

Page 15: ...ce depot Any appliance requiring service outside the limited boundaries of In Home Service will be the consumer s responsibility to transport at their own expense to the original point of purchase or...

Page 16: ...lib ration de cette pression de mani re s re Ne contournez pas le r gulateur 1 Assurez vous que le r servoir est bien fix 2 Ouvrir compl tement la soupape en tournant dans le sens anti horaire Le cad...

Page 17: ...u d achat original pour valider votre garantie et recevoir le service Num ro de mod le _____________________________________________ Num ro de serie _______________________________________________ Da...

Page 18: ...tions similaires non commerciales EXIGENCES DE S CURIT Cet appareil n est pas destin tre utilis par des personnes y compris des enfants dont les capacit s physiques sensorielles ou mentales peuvent tr...

Page 19: ...une bouteille de gaz CO2 directement un f t de bi re 8 Ne jamais laisser tomber ou jeter une bouteille de CO2 9 Ne branchez jamais un f t sans au moins un d clencheur de s curit Il y a deux m canismes...

Page 20: ...TION EMPLACEMENT D INSTALLATION Placez l appareil sur un sol suf samment solide pour le supporter lorsqu il est compl tement charg Ne placez pas l appareil la lumi re directe du soleil ou proximit de...

Page 21: ...us de vis ont t pr perc s dans le bas de l armoire chaque coin pour chaque roulette Mettez les rondelles en plastique fournies sur les roulettes avant lors de leur installation FREINS ROULETTES Les de...

Page 22: ...ien ins r e dans l crou de raccordement Serrez bien l aide d une cl molette non fournie et assurez vous qu il n y a pas de fuite c est dire sans sif ement lorsque le CO2 est allum INSTALLATION DE LA C...

Page 23: ...e robinet 3 Rondelle de bec INSTRUCTIONS D INSTALLATION CL DE ROBINET La cl robinet fournie sert retirer ou resserrer la connexion du robinet Si la bi re ne coule pas libre ment utilisez la cl pour re...

Page 24: ...la soupape clapet le CO2 ne peut pas entrer dans la canalisation et la bi re ne coulera pas 1 Rondelle de soupape 2 Soupape de retenue 3 Rondelle de type O 4 Soupape clapets 5 Rondelle de soupape 6 R...

Page 25: ...TILISATION 1 Soupape de d charge de pression du coupleur 2 Poign e en position ouverte 24 1 2 R GLAGE DU R GULATEUR DE CO2 La jauge surveille la pression interne des f ts et doit tre ajust e pour lire...

Page 26: ...ge dans la paroi arri re dans un bac situ au dessus du compresseur o elle s vapore Remarque Si l appareil est d branch l alimentation est coup e ou teinte attendez 3 5 minutes avant de red marrer l ap...

Page 27: ...un d tergent liquide doux Rincez bien et s chez avec un chiffon doux et propre NETTOYAGE DES LIGNES DE BI RE Les lignes de bi re doivent tre p riodiquement nettoy es cause d une accumulation de sucre...

Page 28: ...pression n est pas bien droit La porte a t invers e et n est pas correctement mont e Le joint est sale Les tablettes ou le socle se sont d plac s Le baril n est pas bien centr dans l appareil Les roul...

Page 29: ...premiers douze 12 mois toutes les pi ces fonctionnelles de ce produit qui s av rent d fectueuses seront r par es ou remplac es selon le choix du garant sans frais l acheteur initial Danby se r serve l...

Page 30: ...controlar la liberaci n de esta presi n de una manera segura No elimine el regulador 1 Aseg rese de que el tanque est seguro 2 Abra completamente la v lvula girando en sentido antihorario El indicado...

Page 31: ...ci n para obtener un servicio bajo garant a Debe proporcionar el recibo de compra original para validar su garant a y recibir servicio N mero de modelo _____________________________________________ N...

Page 32: ...o est dise ado para ser usado por personas incluyendo ni os cuyas capacidades f sicas sensoriales o mentales pueden ser diferentes o reducir o que carecen de experiencia o conocimiento a menos que dic...

Page 33: ...ca conecte un cilindro de gas CO2 directamente a un barril de cerveza 8 Nunca deje caer ni arroje un cilindro de CO2 9 Nunca conecte un barril sin al menos una liberaci n de presi n de seguridad Hay d...

Page 34: ...S DE INSTALACI N UBICACI N DE LA INSTALACI N Coloque el aparato en un piso lo su cientemente fuerte como para soportarlo cuando est completamente cargado No coloque el aparato a la luz solar directa n...

Page 35: ...ornillos en la parte inferior del gabinete en cada esquina para cada rueda Coloque las arandelas pl sticas provistas en las ruedas delanteras antes de instalarlas FRENOS DE LAS RUEDAS Las dos ruedas f...

Page 36: ...e conexi n Apriete bien con una llave ajustable no incluida y aseg rese de que no haya fugas es decir que no suenen siseos cuando se enciende el CO2 INSTALACI N DE L NEA DE AIRE DE CO2 Y CONEXI N AL R...

Page 37: ...andela de grifo 3 Arandela de surtidor LLAVE INGLESA DE GRIFO La llave inglesa de grifo provista es para quitar o apretar la conexi n del grifo Si la cerveza no uye libremente use la llave inglesa par...

Page 38: ...eta tenga un peque o ori cio Si no hay un ori cio en la v lvula de leng eta entonces el CO2 no puede entrar a la l nea y la cerveza no uir 1 Arandela de v lvula 2 La v lvula de retenci n 3 Arandela t...

Page 39: ...comienza a subir 1 2 1 V lvula de liberaci n de presi n del acoplador 2 Manija en posici n abierta AJUSTE DEL REGULADOR DE CO2 El medidor monitorea la presi n interna del barril y debe ajustarse para...

Page 40: ...pared posterior a una bandeja situada encima del compresor donde se evapora Nota Si el dispositivo est desenchufado la energ a se pierde o se apaga espere de 3 a 5 minutos antes de volver a encender...

Page 41: ...ico con un pa o seco Lave el gabinete exterior con agua tibia y un detergente l quido suave Enjuague bien y seque con un pa o suave y limpio LIMPIANDO LAS L NEAS DE CERVEZA Las l neas de cerveza deben...

Page 42: ...idamente centrado en la unidad Las ruedas no est n instaladas Excesiva espuma de cerveza Aseg rese de que la manguera de la l nea de cerveza de la torre y la manguera de la l nea de aire CO2 del regul...

Page 43: ...rea limitada de Servicio en Domicilio el cliente ser responsable por transportar dicho artefacto hasta el Taller de Servicio Autorizado mas cercano Si el electrodom stico est instalado en un lugar que...

Page 44: ...MODEL MOD LE MODELO Printed in China Imprim en Chine Impreso en China Danby Products Limited Guelph ON Canada N1H 6Z9 Danby Products Inc Findlay Ohio USA 45840 DKC054A1BSL2DB...

Reviews: