background image

LIMITED IN-HOME APPLIANCE WARRANTY

This quality product is warranted to be free from manufacturer’s defects in material and workmanship, provided that the unit is

 used under the normal operating

conditions intended by the manufacturer.
This warranty is available only to the person to whom the unit was originally sold by Danby Products Limited (Canada) or Danby 

Products Inc. (U.S.A.) (hereafter

“Danby”) or  by an authorized distributor of Danby, and is non-transferable.

TERMS OF WARRANTY

Plastic parts, are warranted for thirty (30) days only from purchase date, with no extensions provided.

First Year

During the first twelve (12) months, any functional parts of this product found to be defective, will be repaired or replaced, 

at warrantor’s

option, at no charge to the ORIGINAL purchaser.  

To obtain

Danby reserves the right to limit the boundaries of “In Home Service” to the proximity of an Authorized Service Depot.  Any app

liance 

Service

requiring service outside the limited boundaries of “In Home Service” ,

i

t will be the consumer’s responsibility to transport the appliance (at

their own expense) to the original retailer (point of purchase) or a service depot  for repair. See “Boundaries of In Home Serv

ice” below.  

Contact your dealer from whom your unit was purchased, or contact your nearest authorized Danby service depot, where service 
must be performed by a qualified service technician.
If service is performed on the units by anyone other than an authorized service depot, or the unit is used for commercial appli

cation, all 

obligations of Danby under this warranty shall be void.  

Boundaries of

If the appliance is installed in a location that is 100 kilometers (62 miles) or more from the nearest service center your unit

 must be 

In Home Service

delivered to the nearest  authorized Danby Service Depot, as service must only be performed by a technician qualified and certif

ied for 

warranty service by Danby. Transportation charges to and from the service location are not protected by this warranty and are t

he 

responsibility of the purchaser.

Nothing within this warranty shall imply that Danby will be responsible or liable for any spoilage or damage to food or other c

ontents of this appliance, whether due

to any defect of the appliance, or its use, whether proper or improper.

EXCLUSIONS

Save as herein provided, Danby, there are no other warranties, conditions, representations or guarantees, express or implied, m

ade or intended by Danby or its

authorized distributors and all other warranties, conditions, representations or guarantees, including any warranties, conditio

ns, representations or guarantees

under any Sale of Goods Act or like legislation or statue is hereby expressly excluded. Save as herein provided, Danby shall no

t be responsible for any damages

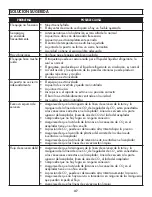
to persons or property, including the unit itself, howsoever caused or any consequential damages arising from the malfunction o

f the unit and by the purchase of

the unit, the purchaser does hereby agree to indemnify and hold harmless Danby from any claim for damages to persons or propert

y caused by the unit.

GENERAL PROVISIONS

No warranty or insurance herein contained or set out shall apply when damage or repair is caused by any of the following: 

1)

Power failure.

2)

Damage in transit or when moving the appliance.

3)

Improper power supply such as low voltage, defective house wiring or inadequate fuses.

4)

Accident, alteration, abuse or misuse of the appliance such as inadequate air circulation in the room or abnormal operating con

ditions

(extremely high or low room temperature).

5)

Use for commercial or industrial purposes (ie. If the appliance is not installed in a domestic residence). 

6)

Fire, water damage, theft, war, riot, hostility, acts of God such as hurricanes, floods etc.

7)

Service calls resulting in customer education.

8)

Improper Installation (ie. Building-in of a free standing appliance or using an appliance outdoors that is not approved for out

door application).

Proof of purchase date will be required for warranty claims; so, please retain bills of sale.  In the event warranty service is

 required, present this document to our

AUTHORIZED SERVICE DEPOT.

Danby Products Limited
PO Box 1778, Guelph, Ontario, Canada  N1H 6Z9
Telephone:  (519) 837-0920  FAX:  (519) 837-0449

Danby Products Inc.

PO Box 669, Findlay, Ohio, U.S.A.  45840

Telephone:  (419) 425-8627  FAX:  (419) 425-8629

04/09

1-800-263-2629

Warranty Service

In-home

Durante los primeros 

doce (12) meses

, cualquier parte en buen estado de este producto que resulte defectuosa, 

incluyendo cualquier sistema sellado, será reparado o reemplazado, a opción del 
fabricante, sin cargo para el comprador ORIGINAL.

Danby se reserva el derecho de limitar la cobertura de "Servicio en Domicilio" sujeto a la proximidad de un 
Taller de Servicio Autorizado.

 Para todo artefacto que requiera servicio fuera del área limitada de "Servicio en 

Domicilio", el cliente será responsable por transportar dicho artefacto hasta el Taller de Servicio Autorizado 
mas cercano. Si el electrodoméstico está instalado en un lugar que se encuentra a 

100 kilómetros (62 millas)


o más del centro de servicios más cercano, se debe llevar la unidad al Centro de servicios Danby autorizado 
más cercano, ya que dicho servicio sólo puede realizarlo un técnico calificado y certificado por Danby para 
prestar servicios de garantía.
 

Los cargos por transporte desde y hacia el lugar en que se efectúe el servicio técnico no están cubiertos por 
esta garantía y son de responsabilidad del comprador.


Primeros 12 meses

Para obtener 
servicio

Límites del servicio
técnico a domicilio


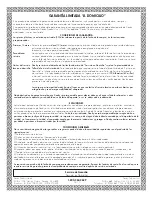
GARANTÍA LIMITADA “A DOMICILIO”

Este producto de calidad está garantizado contra defectos de fabricación, incluyendo partes y mano de obra, siempre y 
cuando la unidad se utilice bajo las condiciones normales de funcionamiento para las que fue diseñado.  
Esta garantía está solamente disponible para la persona que haya comprado originalmente esta unidad directamente de Danby 
Products Limited (Canada) o Danby Products Inc. (U.S.A.) (en adelante “Danby”) o uno de sus distribuidores 
autorizados, y no es transferible. 

CONDICIONES DE LA GARANTÍA

Las piezas plásticas, se autorizan por treinta (30) días solamente a partir de la fecha de la compra, sin las extensiones 
proporcionadas.

Nada dentro de esta garantía implica que Danby será responsable por cualquier daño que hayan sufrido los alimentos u otros 
contenidos de este aparato, ya sea debido a un defecto del aparato, o su uso, adecuado o inadecuado.

EXCLUSIONES

Salvo lo aquí indicado  por Danby, no existen otras garantías, condiciones o representaciones, explícitas o implícitas, concretas o 
intencionales por parte de Danby o sus  distribuidores autorizados y todas las demás garantías, condiciones o representaciones, 
incluyendo cualquier garantía, condiciones o representaciones bajo cualquier Acta de Venta de Productos o legislación o estatuto 
similar, quedan de esta forma expresamente excluidas. 

Salvo lo aquí indicado, Danby no serán responsables por ningún daño a 

personas o bienes, incluyendo la propia unidad, sin importar su causa, o de ningún daño indirecto causado por el desperfecto de la 
unidad, y al comprar esta unidad, el comprador acepta por la presente, indemnizar y proteger a Danby contra cualquier reclamo 
por daños a personas o bienes causados por la unidad. 

CONDICIONES GENERALES

No se considerará ninguna de estas garantías o seguros cuando el daño o la necesidad de reparación sea el producto de los 
siguientes casos: 


1) Falla del suministro eléctrico. 
2) Daños en tránsito o durante el transporte de la unidad.  
3) Alimentación incorrecta, como bajo voltaje, instalación eléctrica defectuosa o fusibles inadecuados. 
4) Accidente, modificación, abuso o uso incorrecto del artefacto, tal como insuficiente ventilación del ambiente o condiciones de 
operación anormales (temperatura ambiente extremadamente alta o baja). 
5) Utilización comercial o industrial (v.g., si el electrodoméstico no está instalado en una vivienda particular). 
6) Incendio, daños por agua, robo, guerra, disturbios, hostilidades, actos de fuerza mayor como huracanes, inundaciones, etc.
7) Pedidos de servicio debido a desinformación del usuario. 
8) Instalación inadecuada (v.g., instalación empotrada de un electrodoméstico diseñado como unidad independiente o uso de un 
electrodoméstico al aire libre que no esté aprobado para dicho fin, incluyendo pero no limitado a: garajes, patios, porches o en 
cualquier lugar que no esté bien aislado o controlado por el clima).

Se requerirá una prueba de la fecha de compra para reclamaciones de garantía; Retener las facturas de venta. En el caso de que se 
requiera servicio de garantía, presente el comprobante de compra a nuestro depósito de servicio autorizado.

Servicio de Garantía

Servicio en Domicilio

Danby Products Limited
PO Box 1778, Guelph, Ontario, Canada  N1H 6Z9
Telephone:  (519) 837-0920  FAX:  (519) 837-0449

Danby Products Inc.

PO Box 669, Findlay, Ohio, U.S.A.  45840

Telephone:  (419) 425-8627  FAX:  (419) 425-8629

1-800-263-2629

04/17

Comuníquese con el distribuidor donde haya comprado la unidad, o llame al Taller de Servicio Autorizado más 
cercano, donde debe ser reparada por un técnico calificado. Si esta unidad es reparada en otro lugar que no 
sea un Taller de Servicio Autorizado, o si la unidad se utiliza para aplicaciones comerciales, Danby no se hará 
responsable de ninguna forma y la garantía será anulada.

Summary of Contents for DKC054A9SLDB

Page 1: ...Y OHIO USA 45840 OWNER S MANUAL MANUEL DU PROPRI TAIRE MANUAL DEL PROPIETARIO www Danby com MODEL MOD LE MODELO DKC054A9SLDB KEG COOLER Owner s Manual 1 16 GLACI RE DE BI RE PRESSION Manuel du propri...

Page 2: ...use the regulator to control the release of this pressure in a safe manner Do not bypass the regulator 1 Ensure tank is secure 2 Fully open valve by turning counter clockwise Pressure gauge dial will...

Page 3: ...TH WARRANTY EXTENSION after lling out a product survey at www danby com support product registration Need Help 1 Read your Owner s Manual for installation help troubleshooting and maintenance assistan...

Page 4: ...IREMENTS This appliance is not intended for use by persons including children whose physical sensory or mental capabilities may be different or reduced or who lack experience or knowledge unless such...

Page 5: ...ge of CO2 7 Never connect a CO2 gas cylinder directly to a beer keg 8 Never drop or throw a CO2 cylinder 9 Never connect a keg without at least one safety pressure release There are two safety mechani...

Page 6: ...egulator 11 CO2 Tank 12 CO2 Tank Support 10 11 9 8 7 6 5 4 3 1 2 12 INSTALLATION INSTRUCTIONS INSTALLATION LOCATION Place the appliance on a oor that is strong enough to support it when it is fully lo...

Page 7: ...ur screw holes have been pre drilled into the bottom of the cabinet at each corner for each caster Put the plastic washers provided on the front casters before installing them CASTOR BRAKES The two fr...

Page 8: ...ly inserted into the connecting nut Tighten snug using an adjustable wrench not supplied and ensure there are no leaks i e no hissing sounds when the CO2 is turned on INSTALLATION OF CO2 AIR LINE AND...

Page 9: ...her 3 Spout washer INSTALLATION INSTRUCTIONS FAUCET WRENCH The provided faucet wrench is for either removing or tightening the faucet connection If the beer is not owing freely use the wrench to remov...

Page 10: ...hole in it If there is no hole in the reed valve then CO2 cannot enter the line and the beer will not ow 1 Valve washer 2 Check valve 3 O type washer 4 Reed valve 5 Valve washer 6 Valve washer CONNECT...

Page 11: ...GULATOR The gauge monitors internal keg pressure and should be adjusted to read between 8 12 PSI The pressure can be adjusted as needed After making any adjustment to the PSI wait 5 10 minutes before...

Page 12: ...y located above the compressor where it evaporates Note If the appliance is unplugged power lost or turned off wait 3 to 5 minutes before restarting the appliance If there is an attempt to restart bef...

Page 13: ...5 Remove the lower hinge from the bottom of the cabinet and remove the hinge pin from the lower hinge Flip the lower hinge over and install the hinge pin on the other side 6 Remove the adjustable foo...

Page 14: ...ce that can harbor microorganisms which will cause an undesirable avour and or cause the beer to go at Suf cient build up will also lead to dispensing problems ranging from foamy beer to at beer regar...

Page 15: ...r Kinked beer line Low or no pressure in the CO2 tank pressure set at the recommended pressure No beer in the keg Handle on coupler not down all the way and locked in the open position A very large am...

Page 16: ...red in the unit The casters are not attached Excessive beer foam Ensure the beer line hose from the tower and the CO2 air line hose from the CO2 regulator are attached to the correct connections on th...

Page 17: ...ce depot Any appliance requiring service outside the limited boundaries of In Home Service will be the consumer s responsibility to transport at their own expense to the original point of purchase or...

Page 18: ...lib ration de cette pression de mani re s re Ne contournez pas le r gulateur 1 Assurez vous que le r servoir est bien fix 2 Ouvrir compl tement la soupape en tournant dans le sens anti horaire Le cad...

Page 19: ...rempli une enqu te sur les produits l adresse www danby com support product registration Besoin d assistance 1 Lisez votre manuel du propri taire pour obtenir de l aide l installation au d pannage et...

Page 20: ...peuvent tre diff rentes ou r duites ou qui n ont pas d exp rience ou de connaissances moins que ces personnes ne re oivent de supervision ou de formation pour faire fonctionner l appareil par une per...

Page 21: ...une bouteille de gaz CO2 directement un f t de bi re 8 Ne jamais laisser tomber ou jeter une bouteille de CO2 9 Ne branchez jamais un f t sans au moins un d clencheur de s curit Il y a deux m canismes...

Page 22: ...2 12 INSTRUCTIONS D INSTALLATION EMPLACEMENT D INSTALLATION Placez l appareil sur un sol suf samment solide pour le supporter lorsqu il est compl tement charg Ne placez pas l appareil la lumi re dire...

Page 23: ...avant Quatre trous de vis ont t pr perc s dans le bas de l armoire chaque coin pour chaque roulette Mettez les rondelles en plastique fournies sur les roulettes avant lors de leur installation FREINS...

Page 24: ...ien ins r e dans l crou de raccordement Serrez bien l aide d une cl molette non fournie et assurez vous qu il n y a pas de fuite c est dire sans sif ement lorsque le CO2 est allum INSTALLATION DE LA C...

Page 25: ...e robinet 3 Rondelle de bec INSTRUCTIONS D INSTALLATION CL DE ROBINET La cl robinet fournie sert retirer ou resserrer la connexion du robinet Si la bi re ne coule pas libre ment utilisez la cl pour re...

Page 26: ...la soupape clapet le CO2 ne peut pas entrer dans la canalisation et la bi re ne coulera pas 1 Rondelle de soupape 2 Soupape de retenue 3 Rondelle de type O 4 Soupape clapets 5 Rondelle de soupape 6 R...

Page 27: ...UTILISATION 1 Soupape de d charge de pression du coupleur 2 Poign e en position ouverte 26 1 2 R GLAGE DU R GULATEUR DE CO2 La jauge surveille la pression interne des f ts et doit tre ajust e pour lir...

Page 28: ...ge dans la paroi arri re dans un bac situ au dessus du compresseur o elle s vapore Remarque Si l appareil est d branch l alimentation est coup e ou teinte attendez 3 5 minutes avant de red marrer l ap...

Page 29: ...c t inf rieur droit de la porte 5 Retirez la charni re inf rieure du bas de l armoire et retirez l axe de charni re de la charni re inf rieure Retournez la charni re inf rieure et installez l axe de c...

Page 30: ...e pouvant contenir des microorganismes qui provoqueront une saveur ind sirable et ou provoqueront une aplatissement de la bi re Une accumulation suf sante entra nera galement des probl mes de distribu...

Page 31: ...s lente Ligne de bi re pli e Pression faible ou nulle dans le r servoir de CO2 pression r gl e la pression recommand e Pas de bi re dans le f t La poign e du coupleur n est pas compl tement abaiss e...

Page 32: ...s ou le socle se sont d plac s Le baril n est pas bien centr dans l appareil Les roulettes ne sont pas x es Mousse de bi re excessive Assurez vous que le tuyau de ligne de bi re de la tour et le tuyau...

Page 33: ...premiers douze 12 mois toutes les pi ces fonctionnelles de ce produit qui s av rent d fectueuses seront r par es ou remplac es selon le choix du garant sans frais l acheteur initial Danby se r serve l...

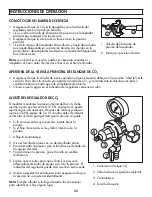
Page 34: ...controlar la liberaci n de esta presi n de una manera segura No elimine el regulador 1 Aseg rese de que el tanque est seguro 2 Abra completamente la v lvula girando en sentido antihorario El indicado...

Page 35: ...MESES despu s de completar una encuesta sobre el producto en www danby com support product registration Necesitas ayuda 1 Lea el manual del propietario para obtener ayuda con la instalaci n resoluci...

Page 36: ...xperiencia o conocimiento a menos que dichas personas reciban supervisi n o entrenamiento para operar el aparato por una persona responsable de su la seguridad Este dispositivo est destinado a ser uti...

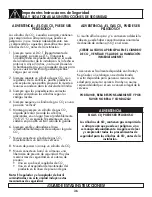
Page 37: ...ca conecte un cilindro de gas CO2 directamente a un barril de cerveza 8 Nunca deje caer ni arroje un cilindro de CO2 9 Nunca conecte un barril sin al menos una liberaci n de presi n de seguridad Hay d...

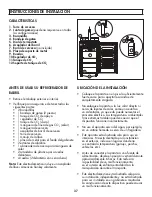
Page 38: ...6 5 4 3 1 2 12 INSTRUCCIONES DE INSTALACI N UBICACI N DE LA INSTALACI N Coloque el aparato en un piso lo su cientemente fuerte como para soportarlo cuando est completamente cargado No coloque el apara...

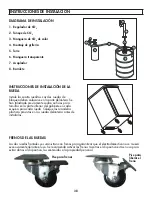
Page 39: ...ori cios para tornillos en la parte inferior del gabinete en cada esquina para cada rueda Coloque las arandelas pl sticas provistas en las ruedas delanteras antes de instalarlas FRENOS DE LAS RUEDAS...

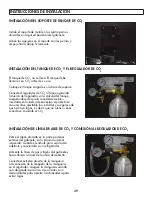
Page 40: ...e conexi n Apriete bien con una llave ajustable no incluida y aseg rese de que no haya fugas es decir que no suenen siseos cuando se enciende el CO2 INSTALACI N DE L NEA DE AIRE DE CO2 Y CONEXI N AL R...

Page 41: ...andela de grifo 3 Arandela de surtidor LLAVE INGLESA DE GRIFO La llave inglesa de grifo provista es para quitar o apretar la conexi n del grifo Si la cerveza no uye libremente use la llave inglesa par...

Page 42: ...eta tenga un peque o ori cio Si no hay un ori cio en la v lvula de leng eta entonces el CO2 no puede entrar a la l nea y la cerveza no uir 1 Arandela de v lvula 2 La v lvula de retenci n 3 Arandela t...

Page 43: ...r comienza a subir 1 2 1 V lvula de liberaci n de presi n del acoplador 2 Manija en posici n abierta AJUSTE DEL REGULADOR DE CO2 El medidor monitorea la presi n interna del barril y debe ajustarse par...

Page 44: ...pared posterior a una bandeja situada encima del compresor donde se evapora Nota Si el dispositivo est desenchufado la energ a se pierde o se apaga espere de 3 a 5 minutos antes de volver a encender...

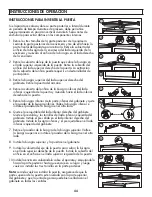
Page 45: ...lado inferior derecho de la puerta 5 Retire la bisagra inferior de la parte inferior del gabinete y quite el pasador de la bisagra inferior Voltee la bisagra inferior e instale el pasador de la bisagr...

Page 46: ...super cie insalubre que puede albergar microorganismos que causar n un sabor indeseable y o har n que la cerveza se desin e Una acumulaci n su ciente tambi n conducir a problemas de dispensaci n que...

Page 47: ...t torcida Un vertido muy lento L nea de cerveza retorcida Presi n baja o nula en el tanque de CO2 presi n ajustada a la presi n recomendada Sin cerveza en el barril La manija del acoplador no est comp...

Page 48: ...e la l nea de cerveza de la torre y la manguera de la l nea de aire CO2 del regulador de CO2 est n conectadas a las conexiones correctas en el acoplador L nea de cerveza a la parte superior del acopla...

Page 49: ...rea limitada de Servicio en Domicilio el cliente ser responsable por transportar dicho artefacto hasta el Taller de Servicio Autorizado mas cercano Si el electrodom stico est instalado en un lugar que...

Page 50: ...___________________ __________________________________________________________________________________________ _________________________________________________________________________________________...

Page 51: ...___________________ __________________________________________________________________________________________ _________________________________________________________________________________________...

Page 52: ...mited Guelph ON Canada N1H 6Z9 Danby Products Inc Findlay Ohio USA 45840 Trademarks of Danby Products Limited and or its subsidiaries Marques de commerce de Danby Products Limited et ou de ses filiale...

Reviews: