At least 24
.&87287)25+25,=217$/
2876,'((;+$867
72('*(
5($5:$//7(03/$7(
0,1,080:,'7+5(48,5('
&$87,21,)(;+$867$'$3725,6326,7,21('2876,'(
&87+2/(7+528*+5($5:$//)25(;+$867$'$3725
5(&200(1'('',0(16,21ˈ*5($6(/$'(1$,5:,//
',6&+$5*(,172+286(6758&785(
IN THE INSTALLATION INSTRUCTI
O
N
N
S
S
N
REA
OT
D
E
:I
A
T
N
I
D
S
F
V
O
E
L
R
L
Y
O
IM
W
P
T
O
H
R
E
T
D
A
I
N
RE
T
C
T
T
O
IO
BEFORE PROCEEDING WITH THIS
REAR WALL TEMPLATE.
let.
This Rear Wall Template serves to position the bottom
ut
1
a
m
.
cc
o
Us
u
e
r
a
unting
a
t
el
lev
y
p
.
el
late
to
an
che
d t
c
o
k
th
loc
a
a
t
te
the
th
e
te
h
m
o
p
riz
late
o
i
ntal
s
p
e
osi
xha
tion
ust
e
d
o
o
2
f
.
Locate and mark at least one stud on the left or right side
the centerline.
IMPROTANT:
m
Loc
o
ate
unting
an
d
p
m
late
a
.
rk holes to align with holes in the
THE CENTERLINE.
LOCATE AT LEAST ONE STUD ON EITHER SIDE OF
MARK THE LOCATION FOR 2 ADDITIONAL, EVENLY
SP
AR
A
EA.
CED TOGGLE BOLTS IN THE MOUNTING PLATE
A
C
B
Trim the rear wall template along the dotted line.
6"
1
.&87287)25+25,=217$/
2876,'((;+$867
72('*(
5($5:$//7(03/$7(
0,1,080:,'7+5(48,5('
&$87,21,)(;+$867$'$3725,6326,7,21('2876,'(
5(&200(1'('',0(16,21ˈ*5($6(/$'(1$,5:,//
&87+2/(7+528*+5($5:$//)25(;+$867$'$3725
',6&+$5*(,172+286(6758&785(
N
REA
OT
D
E
:I
A
T
N
I
D
S
F
V
O
E
L
R
L
Y
O
IM
W
P
T
O
H
R
E
T
D
A
I
N
RE
T
C
T
T
O
IO
IN THE INSTALLATION INSTRUCTI
O
N
N
S
S
BEFORE PROCEEDING WITH THIS
REAR WALL TEMPLATE.
let.
This Rear Wall Template serves to position the bottom
ut
1
a
m
.
cc
U
o
s
u
e
r
a
unting
a
t
el
lev
y
p
.
el
late
to
an
che
d t
c
o
k
th
loc
a
a
t
te
the
th
e
te
h
m
o
p
riz
late
o
i
ntal
s p
e
osi
xha
tion
ust
e
d
o
o
2
f
.
Lo
the
c
a
c
t
e
e a
nter
nd
li
m
ne
a
.
rk at least one stud on the left or right side
IMPROTANT:
m
Loc
o
ate
unting
an
d
p
m
late
a
.
rk holes to align with holes in the
THE CENTERLINE.
LOCATE AT LEAST ONE STUD ON EITHER SIDE OF
MARK THE LOCATION FOR 2 ADDITIONAL, EVENLY
SP
AR
A
EA.
CED TOGGLE BOLTS IN THE MOUNTING PLATE
A
C
B
Trim the rear wall template along the dotted line.
6"
2
.&87287)25+25,=217$/
2876,'((;+$867
72('*(
5($5:$//7(03/$7(
0,1,080:,'7+5(48,5('
&$87,21,)(;+$867$'$3725,6326,7,21('2876,'(
5(&200(1'('',0(16,21ˈ*5($6(/$'(1$,5:,//
&87+2/(7+528*+5($5:$//)25(;+$867$'$3725
',6&+$5*(,172+286(6758&785(
N
REA
OT
D
E
:I
A
T
N
I
D
S
F
V
O
E
L
R
L
Y
O
IM
W
P
T
O
H
R
E
T
D
A
I
N
RE
T
C
T
T
O
IO
IN THE INSTALLATION INSTRUCTI
O
N
N
S
S
BEFORE PROCEEDING WITH THIS
REAR WALL TEMPLATE.
let.
This Rear Wall Template serves to position the bottom
ut
1
a
m
.
cc
o
Us
u
e
r
a
unting
a
t
el
lev
y
p
.
el
late
to
an
che
d t
c
o
k
th
loc
a
a
t
te
the
th
e
te
h
m
o
p
riz
late
o
i
ntal
s p
e
osi
xha
tion
ust
e
d
o
o
2
f
.
Locate and mark at least one stud on the left or right side
the centerline.
IMPROTANT:
m
Loc
o
ate
unting
an
d
p
m
late
a
.
rk holes to align with holes in the
THE CENTERLINE.
LOCATE AT LEAST ONE STUD ON EITHER SIDE OF
MARK THE LOCATION FOR 2 ADDITIONAL, EVENLY
SP
AR
A
EA.
CED TOGGLE BOLTS IN THE MOUNTING PLATE
A
C
B
Trim the rear wall template along the dotted line.
6"
3
.&87287)25+25,=217$/
2876,'((;+$867
72('*(
5(&200(1'('',0(16,21ˈ*5($6(/$'(1$,5:,//
',6&+$5*(,172+286(6758&785(
5($5:$//7(03/$7(
&$87,21,)(;+$867$'$3725,6326,7,21('2876,'(
&87+2/(7+528*+5($5:$//)25(;+$867$'$3725
N
RE
O
A
T
D
E
:I
A
T
N
I
D
S
F
V
O
E
L
R
L
Y
O
IM
W
P
T
O
H
R
E
T
D
A
I
N
RE
T
C
T
T
O
IO
IN THE INSTALLATION INSTRUCTI
O
N
N
S
S
BEFORE PROCEEDING WITH THIS
REAR WALL TEMPLATE.
let.
This Rear Wall Template serves to position the bottom
ut
1
a
m
.
cc
U
o
s
u
e
r
a
unting
a
t
el
lev
y.
plat
el
e
to
an
che
d t
c
o
k
th
loc
a
a
t
te
the
th
e
te
h
m
o
p
riz
late
o
i
ntal
s p
e
osi
xha
tion
ust
e
d
o
o
2
f
.
Lo
the
c
a
c
t
e
e a
nter
nd
li
m
ne
a
.
rk at least one stud on the left or right side
IMPROTANT:
m
Loc
o
ate
unting
an
d
plat
m
e
a
.
rk holes to align with holes in the
THE CENTERLINE.
LOCATE AT LEAST ONE STUD ON EITHER SIDE OF
MARK THE LOCATION FOR 2 ADDITIONAL, EVENLY
SP
ARE
A
A.
CED TOGGLE BOLTS IN THE MOUNTING PLATE
A
B
Trim the rear wall template along the dotted line.
0,1,080:,'7+5(48,5('
C
6"
4
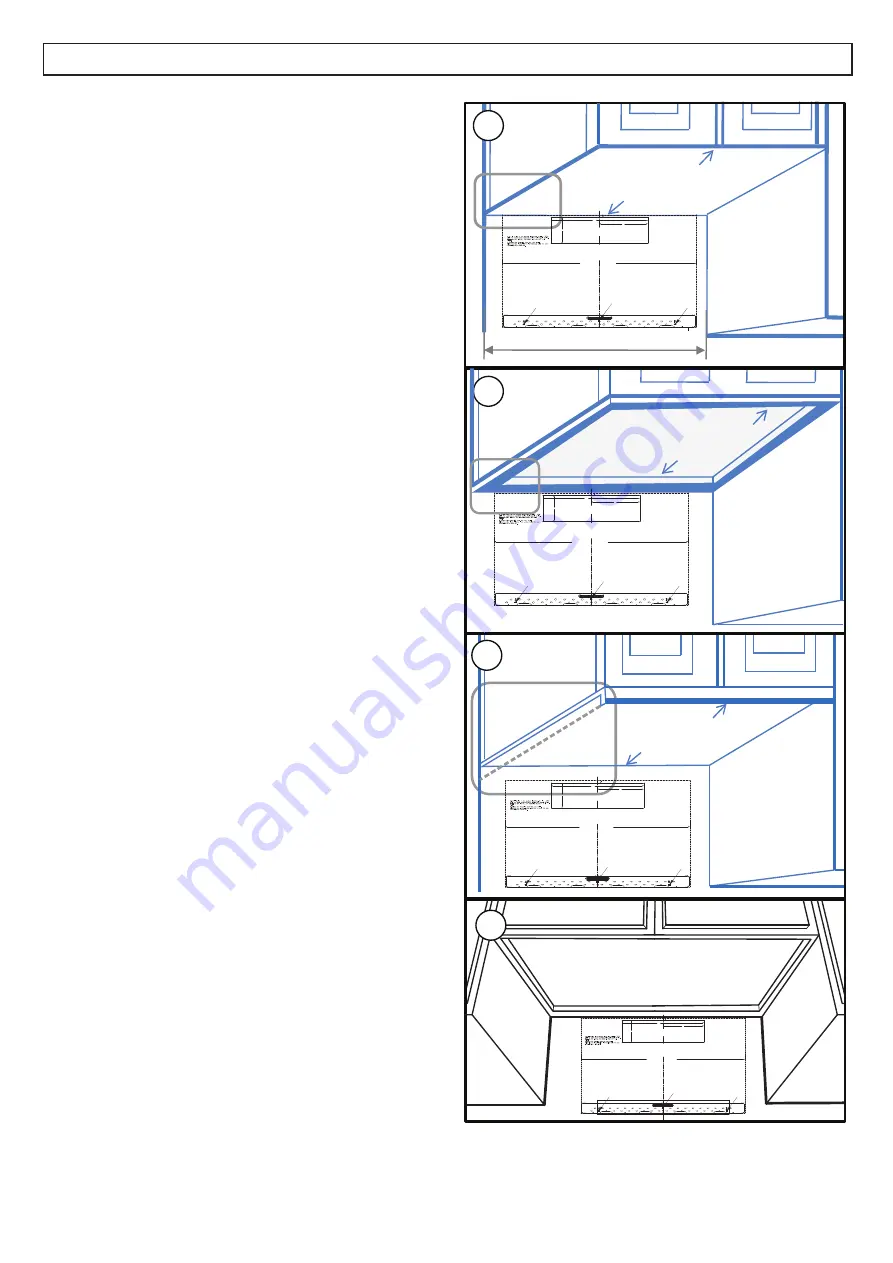
USO DE LA PLANTILLA DE INSTALACIÓN
There are three different types of cabinetry that will
change how the rear wall template should be used
to determine where to install the mounting bracket.
1. Gabinete de fondo plano:
La parte superior de
la plantilla debe alinearse con la parte inferior
del gabinete.
2. Gabinete empotrado enmarcado:
La parte
superior de la plantilla debe alinearse con
el marco posterior de la parte inferior del
gabinete.
3. Gabinete inferior empotrado enmarcado
con voladizo frontal:
La parte superior de la
plantilla debe alinearse con el voladizo frontal.
Puede ser útil medir el voladizo, luego medir
la misma distancia desde la parte inferior del
gabinete y marcar ese punto.
4. Alineación de la línea central de la plantilla
de la pared trasera:
Mida el espacio donde
se instalará el microondas y encuentre la línea
central. Marque esta línea con un lápiz y una
regla. Alinee la línea central de la plantilla con
la línea central de la pared.
INSTRUCCIONES DE INSTALACIÓN
51


