background image

WARNING

Make sure the handles of cookware do not stick 
out over the edge of the range to avoid being 
knocked over by accident. This also makes it more 
diffi cult for children to reach hot cookware and 
possibly injure themselves.

12

OPERATING INSTRUCTIONS

BEFORE BEGINNING

Carefully unpack the appliance and ensure there 
is no damage to the oven, cooktop or structure 
and that the oven door opens and closes properly. 
Remove all packing materials such as plastic bags, 
polystyrene foam, packing straps, etc. Keep packing 
materials out of reach of children at all times to 
prevent possible serious injury. The range has been 
thoroughly tested for safe and effi cient operation. 
However, as with any appliance, there are specifi c 
installation and safety precautions that must be 
followed to ensure safe and satisfactory operation.

SURFACE COOKING CONTROLS

•  The surface heating elements of the appliance 

are designed for a variety of heat settings. MAX 
indicates the highest setting. MIN indicates the 
lowest setting.

•  Changing to a higher heat setting will happen 

faster than changing to a lower heat setting as it 
will take time for the heat to dissipate.

•  To use the surface burner, push the control knob 

in and turn to the desired setting. The knob 
only needs to be pushed in when moving out 
of the “OFF” position. When the knob is in any 
position other than “OFF”, it can be turned 
without pushing in.

•  Use medium or heavyweight cookware. 

Aluminum cookware conducts heat faster than 
other metals. Cast-iron and coated cast-iron 
cookware is slow to absorb heat, but generally 
cooks evenly at low or medium heat settings. 
Steel pans may cook unevenly if not combined 
with other metals.

•  Do not overfi ll cookware with fat that may 

spill over when adding food. Frosty foods 
bubble vigorously. Watch foods frying at high 
temperatures. Keep range and hood clean from 
accumulated grease.

•  To conserve the most cooking energy, pans 

should be fl at on the bottom, have straight 
sides and tight- fi tting lids. Match the size of the 
saucepan to the size of the surface element. A 
pan that extends more than an inch beyond the 
edge of the drip pan traps heat, which causes 
“crazing” (fi ne hairline cracks) on porcelain, 
and discoloration ranging from blue to dark 
gray on chrome drip pans.

•  Only certain types of glass, ceramic, 

earthenware or other glazed utensils are 
suitable for use on the cooktop. Use low or 
medium heat when using this type of cookware.

•  Wipe spills with a damp cloth as soon as they 

cool down. Be sure the control knob is set to 
OFF.

•  Never leave an empty pot or one that has boiled 

dry on a hot surface element. The pot could 
overheat and damage the pot or the surface of 
the appliance. Always be sure that all control 
knobs are turned to OFF and that the indicator 
lights are off when the appliance is not in use.

•  Ensure that the element is turned off when 

cooking is fi nished. An indicator light will glow 
when any heating element is turned on.

Summary of Contents for DRCA240BSS

Page 1: ...of Danby Products Limited and or its subsidiaries Marques de commerce de Danby Products Limited et ou de ses liales Marcas comerciales de Danby Products Limited y o sus subsidiarias 2022 06 13 24 SMOO...

Page 2: ...TH WARRANTY EXTENSION after lling out a product survey at www danby com support product registration Need Help 1 Read your Owner s Manual for installation help troubleshooting and maintenance assistan...

Page 3: ...ns can result in death or serious burns to children or adults 1 Foot 2 Anti tip bracket ANTI TIP DEVICE To reduce the risk of the range tipping by abnormal usage or improper door loading the range mus...

Page 4: ...and oven windows Important Safety Information READ AND FOLLOW ALL SAFETY INSTRUCTIONS SAVE THESE INSTRUCTIONS It is recommended that this appliance be connected to a separate circuit that is not share...

Page 5: ...ce element is ON the surface element will turn back on as soon as power is restored In the event of power loss failure to turn all surface element knobs to the OFF position may result in ignition of i...

Page 6: ...erent sizes Select utensils that have at bottoms large enough to cover the surface of the heating element The use of undersized utensils will expose a portion of the heating element to direct contact...

Page 7: ...r WARNING Improper use of the grounding plug can result in a risk of electric shock Consult a quali ed electrician if the grounding instructions are not completely understood or if doubt exists as to...

Page 8: ...ian The range may be connected by means of permanent hard wiring or by the addition of a power cord The power cord is not supplied but can be purchased at a local hardware store Use only 3 conductor o...

Page 9: ...l block 5 Plug the 2 wire terminals into the terminal block as shown and then tighten the nuts 6 Loosen the ground nut and plug the grounding wire terminal into the nut as shown and then tighten the n...

Page 10: ...s terminal L1 L2 N nuts and washers on the terminal block 5 Plug the 3 wire terminals into the terminal block as shown and then tighten the nuts 6 Loosen the ground nut and plug the grounding wire ter...

Page 11: ...x2 1 2 3 4 5 6 OPERATING INSTRUCTIONS AIR FRY RACK HOLDER The air fry rack holder can be used to place or remove the air fry rack and the oven racks by hooking it onto the edge of the rack Please be v...

Page 12: ...djust the leveling legs until the appliance is level Use a carpenter s level to con rm OPERATING INSTRUCTIONS 11 It is the installer s responsibility to comply with installation clearances speci ed in...

Page 13: ...be turned without pushing in Use medium or heavyweight cookware Aluminum cookware conducts heat faster than other metals Cast iron and coated cast iron cookware is slow to absorb heat but generally c...

Page 14: ...r leave food unattended while cooking Boil overs cause smoking Greasy spill overs may catch re Note that the icon above the knob indicates which burner the knob controls MAX MIN OVEN COOKING CONTROLS...

Page 15: ...e using a package mix follow label directions Do not open the oven door while baking or roasting Heat will be lost and the cook time might need to be extended If you must open the door open it partial...

Page 16: ...ature 7 Food can be turned during broiling if necessary Be cautious of hot air or steam when opening the oven door 8 Make sure to turn the oven temperature knob to OFF once broiling is complete BROILI...

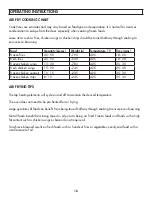
Page 17: ...oods such as hand cut fries or vegetables evenly coat food with a small amount of oil Food Quantity pieces Weight g Temperature F Time mins Frozen fries 45 50 190 425 18 20 Fresh fries 45 50 520 425 1...

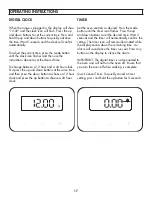
Page 18: ...then press the down button to choose a 12 hour clock and press the up button to choose a 24 hour clock TIMER Set the oven controls as desired Press the mode button until the timer icon ashes Press the...

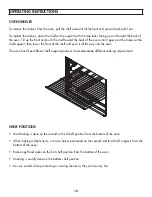
Page 19: ...push it all the way into the oven The oven has three different shelf support positions to accommodate different cooking requirements SHELF POSITIONS Most baking is done on the second or third shelf p...

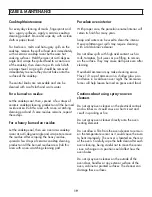
Page 20: ...spray oven cleaner on the outside of the oven door handles or any exterior surface of the oven cabinet or painted surfaces The cleaner can damage these surfaces Cooktop Maintenance For everyday clean...

Page 21: ...plastic ware and towels as well as ammable liquids explosives and aerosol cans When the oven is in use the drawer may become hot Do not touch the hot surface between the bottom of the oven door and t...

Page 22: ...the oven light bulb make sure the electrical power is disconnected from the appliance Failure to do so may result in electric shock or burn Be sure to let the light cover and bulb cool completely bef...

Page 23: ...pot Any appliance requiring service outside the limited boundaries of In Home Service will be the consumer s responsibility to transport at their own expense to the original point of purchase or a ser...

Page 24: ...rempli une enqu te sur les produits l adresse www danby com support product registration Besoin d assistance 1 Lisez votre manuel du propri taire pour obtenir de l aide l installation au d pannage et...

Page 25: ...ner la mort ou des br lures graves chez les enfants ou les adultes 1 Le pied 2 Support anti basculement DISPOSITIF ANTI BASCULEMENT Pour r duire le risque de basculement de la cuisini re par une util...

Page 26: ...es et les fen tres du four CONSERVEZ CES INSTRUCTIONS Il est recommand que cet appareil soit connect un circuit s par qui n est partag avec aucun autre appareil Ne nettoyez jamais les pi ces de l appa...

Page 27: ...ue est coup e alors qu un l ment de surface est allum l l ment de surface se rallumera d s que l alimentation sera r tablie En cas de panne de courant le fait de ne pas tourner tous les boutons des l...

Page 28: ...st suf samment grand pour couvrir la surface de l l ment chauffant L utilisation d ustensiles trop petits exposera une partie de l l ment chauffant un contact direct et peut provoquer l in ammation de...

Page 29: ...e mise la terre peut entra ner un risque de choc lectrique Consultez un lectricien quali si les instructions de mise la terre ne sont pas enti rement comprises ou si vous avez des doutes quant la bonn...

Page 30: ...onnect e au moyen d un c blage xe permanent ou par l ajout d un cordon d alimentation Le cordon d alimentation n est pas fourni mais peut tre achet dans une quincaillerie locale Utilisez uniquement un...

Page 31: ...anchez les bornes 2 ls dans le bornier comme illustr puis serrez les crous 6 Desserrez l crou de mise la terre et branchez la borne du l de mise la terre dans l crou comme illustr puis serrez l crou 7...

Page 32: ...es d alimentation L1 L2 N sur le bornier 5 Branchez les bornes 3 ls dans le bornier comme illustr puis serrez les crous 6 Desserrez l crou de mise la terre et branchez la borne du l de mise la terre d...

Page 33: ...UCTIONS D UTILISATION SUPPORT DE GRILLE FRITURE L AIR Le support de grille de friture air peut tre utilis pour placer ou retirer la grille de friture air et les grilles du four en l accrochant au bord...

Page 34: ...ce que l appareil soit de niveau Utilisez un niveau de charpentier pour con rmer INSTRUCTIONS D UTILISATION 33 Il est de la responsabilit de l installateur de se conformer aux d gagements d installat...

Page 35: ...Les ustensiles de cuisine en aluminium conduisent la chaleur plus rapidement que les autres m taux Les ustensiles de cuisine en fonte et en fonte rev tue absorbent lentement la chaleur mais cuisent g...

Page 36: ...ans surveillance pendant la cuisson Les d bordements provoquent de la fum e Les d versements graisseux peuvent s en ammer Notez que l ic ne au dessus du bouton indique quel br leur le bouton contr le...

Page 37: ...l tiquette N ouvrez pas la porte du four pendant la cuisson ou le r tissage La chaleur sera perdue et le temps de cuisson devra peut tre tre prolong Si vous devez ouvrir la porte ouvrez la partielleme...

Page 38: ...si n cessaire Faites attention l air chaud ou la vapeur lors de l ouverture de la porte du four 8 Assurez vous de tourner le bouton de temp rature du four sur OFF une fois la cuisson au gril termin e...

Page 39: ...l gumes coup s la main enduisez uniform ment les aliments d une petite quantit d huile Aliments Quantit pi ces Poids g Temp rature F Temps minutes Frites surgel es 45 50 190 425 18 20 Frites fra ches...

Page 40: ...ge de 12 heures et appuyez sur le bouton haut pour choisir une horloge de 24 heures MINUTEUR R glez les commandes du four comme vous le souhaitez Appuyez sur le bouton de mode jusqu ce que l ic ne de...

Page 41: ...trois positions de support d tag re diff rentes pour s adapter aux diff rentes exigences de cuisson EMPLACEMENTS DES RAYONS La plupart des cuissons se font sur la deuxi me ou la troisi me position de...

Page 42: ...ieur de la porte du four les poign es ou toute surface ext rieure du four le meuble ou les surfaces peintes Le nettoyant peut endommager ces surfaces Entretien de la table de cuisson Pour le nettoyage...

Page 43: ...icles en plastique et les serviettes ainsi que les liquides in ammables les explosifs et les bombes a rosols Lorsque le four est en marche le tiroir peut devenir chaud Ne touchez pas la surface chaude...

Page 44: ...AGE DU FOUR Important Avant de remplacer l ampoule du four assurez vous que l alimentation lectrique est d branch e de l appareil Le non respect de cette consigne peut entra ner un choc lectrique ou d...

Page 45: ...iers vingt quatre 24 mois toutes les pi ces fonctionnelles de ce produit qui s av rent d fectueuses seront r par es ou remplac es selon le choix du garant sans frais l acheteur initial Danby se r serv...

Page 46: ...MESES despu s de completar una encuesta sobre el producto en www danby com support product registration Necesitas ayuda 1 Lea el manual del propietario para obtener ayuda con la instalaci n resoluci...

Page 47: ...instrucciones puede causar la muerte o quemaduras graves a ni os o adultos 1 Pie 2 Soporte antivuelco DISPOSITIVO ANTIVUELCO Para reducir el riesgo de que la estufa se vuelque debido a un uso anormal...

Page 48: ...canas a estas aberturas las puertas y las ventanas del horno GUARDA ESTAS INSTRUCCIONES Se recomienda que este electrodom stico se conecte a un circuito separado que no se comparta con ning n otro ele...

Page 49: ...per cie est encendido el elemento de super cie se volver a encender tan pronto como se restablezca la energ a En caso de p rdida de energ a si no se giran todas las perillas de los elementos de super...

Page 50: ...n cuatro quemadores de diferentes tama os Seleccione utensilios que tengan fondos planos lo su cientemente grandes como para cubrir la super cie del elemento calefactor El uso de utensilios de menor t...

Page 51: ...uso inadecuado del enchufe con conexi n a tierra puede resultar en un riesgo de descarga el ctrica Consulte a un electricista cali cado si no comprende completamente las instrucciones de conexi n a ti...

Page 52: ...r medio de un cableado jo permanente o mediante la adici n de un cable de alimentaci n El cable de alimentaci n no se incluye pero se puede comprar en una ferreter a local Utilice nicamente un cable d...

Page 53: ...ales de cable en el bloque de terminales como se muestra y luego apriete las tuercas 6 A oje la tuerca de conexi n a tierra y enchufe el terminal del cable de conexi n a tierra en la tuerca como se mu...

Page 54: ...n el bloque de terminales 5 Enchufe los terminales de 3 cables en el bloque de terminales como se muestra y luego apriete las tuercas 6 A oje la tuerca de conexi n a tierra y enchufe el terminal del c...

Page 55: ...CCIONES DE OPERACI N SOPORTE DE LA PARRILLA PARA FRITAS DE AIRE El soporte de la rejilla para fre r con aire se puede usar para colocar o quitar la rejilla para fre r con aire y las rejillas del horno...

Page 56: ...s niveladoras hasta que el aparato est nivelado Use un nivel de carpintero para con rmar INSTRUCCIONES DE OPERACI N 55 Es responsabilidad del instalador cumplir con los espacios libres de instalaci n...

Page 57: ...pesado Los utensilios de cocina de aluminio conducen el calor m s r pido que otros metales Los utensilios de cocina de hierro fundido y de hierro fundido revestido absorben el calor con lentitud pero...

Page 58: ...alimentos desatendidos mientras cocina Los hervores provocan humo Los derrames grasientos pueden incendiarse Tenga en cuenta que el icono sobre la perilla indica qu quemador controla la perilla MAX MI...

Page 59: ...de paquete siga las instrucciones de la etiqueta No abra la puerta del horno mientras hornea o asa Se perder calor y es posible que sea necesario extender el tiempo de cocci n Si debe abrir la puerta...

Page 60: ...si es necesario Tenga cuidado con el aire caliente o el vapor al abrir la puerta del horno 8 Aseg rese de girar la perilla de temperatura del horno a la posici n APAGADO una vez que termine de asar CO...

Page 61: ...fritas cortadas a mano o vegetales cubra uniformemente los alimentos con una peque a cantidad de aceite Alimento Cantidad piezas Peso g Temperatura F Tiempo minutos papas fritas congeladas 45 50 190 4...

Page 62: ...ne el bot n arriba para elegir un reloj de 24 horas TEMPORIZADOR Ajuste los controles del horno como desee Pulse el bot n de modo hasta que el icono del temporizador parpadee Pulse los botones arriba...

Page 63: ...do del horno El horno tiene tres posiciones diferentes de soporte de estantes para adaptarse a diferentes requisitos de cocci n POSICIONES DE LOS ESTANTES La mayor a de los horneados se realizan en la...

Page 64: ...hornos en el exterior de la puerta del horno manijas o cualquier super cie exterior del horno gabinete o super cies pintadas El limpiador puede da ar estas super cies Mantenimiento de la estufa Para...

Page 65: ...rt culos de pl stico y toallas as como l quidos in amables explosivos y latas de aerosol Cuando el horno est en uso el caj n puede calentarse No toque la super cie caliente entre la parte inferior de...

Page 66: ...LAZO DE LA LUZ DEL HORNO Importante Antes de reemplazar la bombilla del horno aseg rese de que la energ a el ctrica est desconectada del aparato Si no lo hace podr a sufrir una descarga el ctrica o un...

Page 67: ...rea limitada de Servicio en Domicilio el cliente ser responsable por transportar dicho artefacto hasta el Taller de Servicio Autorizado mas cercano Si el electrodom stico est instalado en un lugar que...

Page 68: ...___________________ __________________________________________________________________________________________ _________________________________________________________________________________________...

Reviews: