17
OPERATING INSTRUCTIONS
DIGITAL CLOCK
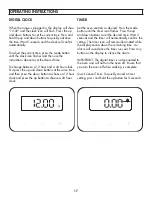
When the range is plugged in, the display will show
“12:00” and the clock icon will fl ash. Press the up
and down buttons to set the current time. Press and
hold the up and down buttons to quickly advance
the time. Wait 5 seconds and the clock will confi rm
automatically.
To adjust the current time, press the mode button
until the clock icon fl ashes and then use the
instructions above to set the desired time.
To change between a 12 hour and a 24 hour clock
fi rst press the up and down buttons at the same time
and then press the down button to choose a 12 hour
clock and press the up button to choose a 24 hour
clock.
TIMER
Set the oven controls as desired. Press the mode
button until the timer icon fl ashes. Press the up
and down buttons to set the desired time. Wait 5
seconds and the timer will automatically confi rm the
setting. The timer icon will remain illuminated while
the display counts down the remaining time. An
alarm will sound once the timer runs out. Press any
button on the display to silence the alarm.
IMPORTANT: The digital timer is not connected to
the oven and will not turn the oven off. Ensure that
you turn the oven off when cooking is complete.
Quick Cancel Timer: To quickly cancel a timer
setting, press and hold the up button for 3 seconds.


