background image

13

CONSIGNES D’UTILISATION

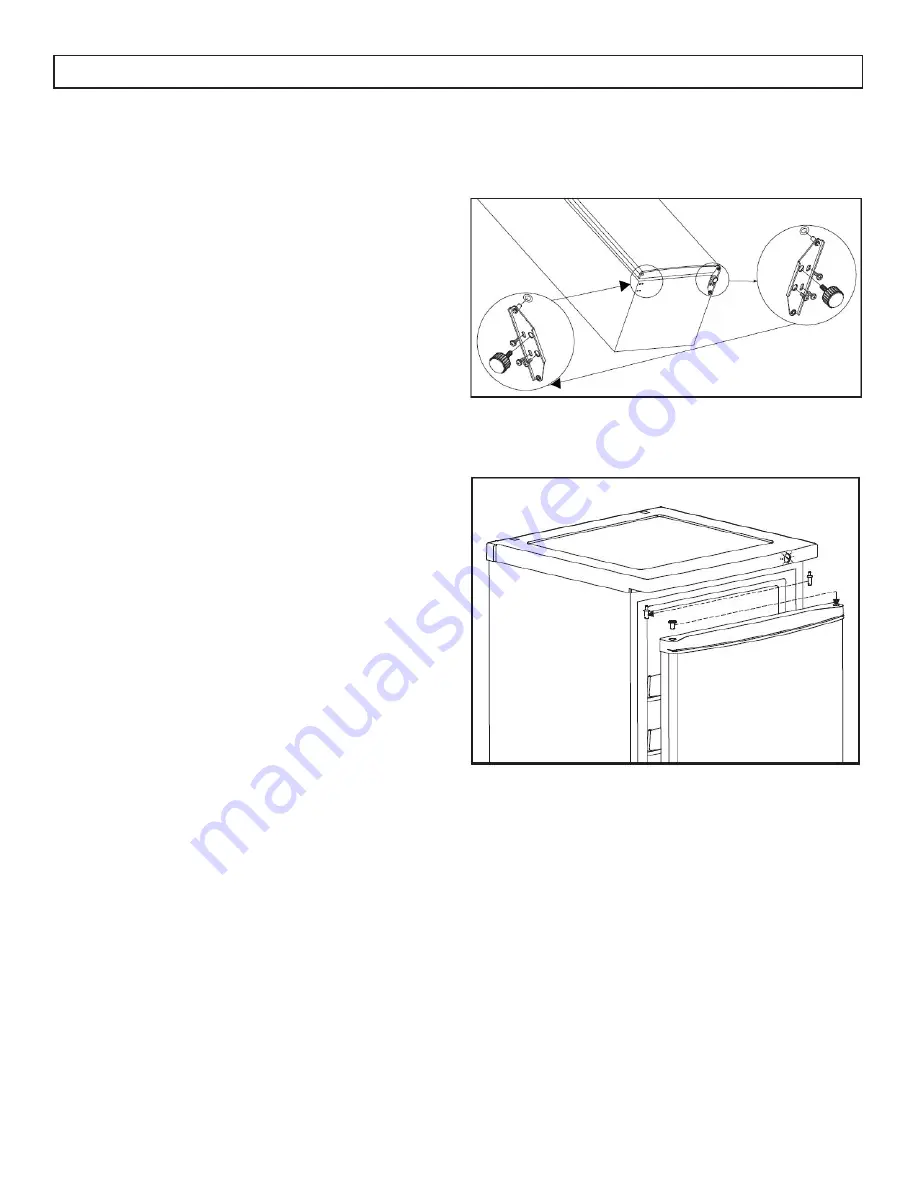
DOOR REVERSAL INSTRUCTIONS

If the appliance is placed on its back or side for any 

length of time during this process, it must be allowed 

to remain upright for 6 hours before plugging it in 

to avoid damage to the internal components.

1.  Remove both leveling legs from the appliance.

2.  Remove the screws securing the lower hinge 

assembly on the right side of the appliance. 

3.  Move the lower hinge pin from the front of the 

hinge assembly to the back.

4.  Remove the door from the appliance.

5.  Remove the hinge pin from the top right side of 

the worktop and the hole cover from the top left 

of the door and swap their positions.

6.  Remove the hole cover from the bottom left of 

the door and place it in the hole on the bottom 

right side of the door.

7.  Reinstall the door on the appliance. Ensure the 

top of the door is properly aligned with the top 

of the cabinet and that the rubber gasket makes 

a good seal with the cabinet all the way around.

8.  Reinstall the lower hinge on the left side of the 

door. It will need to be fl ipped 180

°

 from its 

original position to ensure that the hinge pin 

enters the hinge hole on the bottom left side of 

the door.

9.  Reinstall both leveling legs and ensure that the 

appliance is level.

Summary of Contents for DUFM071A1WDB

Page 1: ...6Z9 DANBY PRODUCTS INC FINDLAY OHIO USA 45840 OWNER S MANUAL MANUEL DU PROPRIÉTAIRE MANUAL DEL PROPIETARIO DUFM071A1WDB 2017 05 25 UPRIGHT FREEZER Owner s Manual 1 8 CONGÉLATEUR VERTICAL Manuel du propriétaire 9 16 CONGELADOR VERTICAL Manual del propietario 17 24 ...

Page 2: ...u will need this information to obtain service under warranty You must provide the original purchase receipt to validate your warranty and receive service Model Number Serial Number Date of Purchase Need Help Before you call for service here are a few things you can do to help us serve you better Read this owner s manual It contains instructions to help you use and maintain your appliance properly...

Page 3: ...ed DO NOT USE AN EXTENSION CORD Do not connect your appliance to extension cords or together with another appliance in the same wall outlet Do not splice the power cord Do not under any circumstances cut or remove the third ground prong from the power cord If the power supply cord is damaged it must be replaced by the manufacturer its service agent or similar qualified person in order to avoid haz...

Page 4: ...ransportation This appliance is 54 9 cm 21 6 inches wide by 164 2 cm 64 7 inches high by 56 cm 22 1 inches deep Make sure that you leave the minimum amount of space between the appliance and all surrounding walls and vents Allow 12 7 cm 5 inches of space between the back sides and top of the appliance and all adjacent walls This appliance is intended for free standing installation only and is not ...

Page 5: ... the control knob to the desired setting The setting 3 or 4 should be satisfactory for home use To stop the cooling function turn the control knob to the 0 position 4 Tips when storing fresh food The freezing capacity of this appliance is 7 Kg 15 Lbs in 24 hours Do not overload the appliance as this can affect performance Do not freeze large quantities of fresh food at the same time OPERATING INST...

Page 6: ...e the hinge pin from the top right side of the worktop and the hole cover from the top left of the door and swap their positions 6 Remove the hole cover from the bottom left of the door and place it in the hole on the bottom right side of the door 7 Reinstall the door on the appliance Ensure the top of the door is properly aligned with the top of the cabinet and that the rubber gasket makes a good...

Page 7: ... of leaking Remove all food and set the thermostat to the 0 position Unplug the appliance and leave the door open After the frost has melted leave the appliance off with the door open until the interior is dry 6 VACATION Short vacations Leave the appliance operating during vacations of less than three weeks Long vacations If the appliance will not be used for several months remove all items and tu...

Page 8: ...unlight Ambient temperature or humidity is very high Appliance runs continuously Temperature setting is too cold Door not shut properly or opened excessively Exhaust vent is obstructed Recently added a large quantity of warm food to the cabinet Close proximity to heat source or direct sunlight Ambient temperature or humidity is very high Danby Consumer Care 1 800 263 2629 Hours of operation Monday...

Page 9: ...e depot Any appliance requiring service outside the limited boundaries of In Home Service will be the consumer s responsibility to transport at their own expense to the original point of purchase or a service depot for repair If the appliance is installed in a location that is 100 kilometers 62 miles or more from the nearest service center it must be delivered to the nearest authorized Danby Servi...

Page 10: ... information pour obtenir un service sous garantie Vous devez fournir le reçu d achat original pour valider votre garantie et recevoir le service Numéro de modèle Numéro de serie Date d achat Besoin d assistance Avant d appeler pour service voici quelques choses que vous pouvez faire pour nous aider à mieux vous servir Lire ce manuel du propriétaire Il contient des instructions pour vous aider à u...

Page 11: ...it être remplacé par le fabricant son agent de service ou une personne qualifiée similaire afin d éviter tout risque GARDER CES INSTRUCTIONS AVERTISSMENT DANGER D EXPLOSION Risque d incendie ou d explosion causé par la perforation de tuyaux frigorigènes Ne jamais utiliser un objet pointu pour assister au dégel Manipuler avec soin Garder les matériaux et vapeurs inflammables comme de l essence loin...

Page 12: ...ipulation pendant le transport Cet appareil est 54 9 cm 21 6 pouces de large par 164 2 cm 64 7 pouces de haut par 56 cm 22 1 pouces de profondeur assurez vous de laisser le dégagement minimum d entre l appareil et tous les murs environnants et les ouvertures Laisser 12 7 cm 5 pouces d espace entre le dos les côtés et le dessus de l appareil et les parois adjacentes Cet appareil est destiné uniquem...

Page 13: ...siré Le réglage 3 ou 4 devrait être satisfaisant pour une utilisation domestique Pour arrêter la fonction de refroidissement tournez le bouton de commande sur la position 0 Conseils pour le stockage des aliments frais La capacité de congélation de cet appareil est de 7 Kg 15 Lbs en 24 heures Ne pas surcharger l appareil car cela peut affecter les performances Ne pas congeler de grandes quantités d...

Page 14: ...ve the hinge pin from the top right side of the worktop and the hole cover from the top left of the door and swap their positions 6 Remove the hole cover from the bottom left of the door and place it in the hole on the bottom right side of the door 7 Reinstall the door on the appliance Ensure the top of the door is properly aligned with the top of the cabinet and that the rubber gasket makes a goo...

Page 15: ... sur la position 0 Débranchez l appareil et laissez la porte ouverte Une fois que le givre a fondu laissez l appareil hors tension avec la porte ouverte jusqu à ce que l intérieur soit sec 14 VACANCES Courtes vacances Laissez le unité fonctionner pendant les vacances durant moins de trois 3 semaines Longues vacances Si l unité ne doit pas être utilisé pendant plusieurs mois retirez tout ce qu il c...

Page 16: ...umière directe du soleil La température ambiante ou l humidité est très élevée L appareil fonctionne en continu Le réglage de la température est trop froid La porte n est pas fermées correctement ou ouverte trop souvent L échappement est obstrué Ajout récemment d une grande quantité de nourriture chaude au cabinet Proximité de la source de chaleur ou de la lumière directe du soleil La température ...

Page 17: ...toutes les pièces fonctionnelles de ce produit qui s avèrent défectueuses seront réparées ou remplacées selon le choix du garant sans frais à l acheteur initial Danby se réserve le droit de limiter les limites de Service au domicile à proximité d un dépôt de service agréé Tout appareil nécessitant un service en dehors des limites de Service à domicile sera la responsabilité du consommateur de tran...

Page 18: ...ación siguiente Necesitará esta información para obtener un servicio bajo garantía Debe proporcionar el recibo de compra original para validar su garantía y recibir servicio Número de modelo Número de serie Fecha de compra Necesitas ayuda Antes de llamar al servicio aquí hay algunas cosas que puede hacer para ayudarnos a servirle mejor Lea este manual del propietario Contiene instrucciones para ay...

Page 19: ...e su agente de servicio o persona igualmente qualificada para así evitar riesgos GUARDE ESTAS INSTRUCCIONES 18 ADVERTENCIA PELIGRO DE EXPLOSIÓN Riesgo de incendio o explosión debido a la perforación de tuberías de refrigerante No utilice objetos afilados para ayudar en el desescarche Por favor manejese con precaución Mantenga los materiales y vapores inflamables como la gasolina lejos del refriger...

Page 20: ...lación durante el transporte Esta aparato tiene 54 9 cm 21 6 pulgadas de ancho por 164 2 cm 64 7 pulgadas de alto por 56 cm 22 1 pulgadas de profundidad por favor asegúrese de dejar un espacio mínimo entre la unidad y todas las paredes circundantes y las aberturas de ventilación Espere 12 7 cm 5 pulgadas de espacio entre la parte posterior los lados y la parte superior del aparato y todas las pare...

Page 21: ...eado El ajuste 3 o 4 debe ser satisfactorio para uso doméstico Para detener la función de enfriamiento gire la perilla de control a la posición 0 Consejos para almacenar alimentos frescos La capacidad de congelación de este aparato es de 7 Kg 15 Lbs en 24 horas No sobrecargue el aparato ya que esto puede afectar el rendimiento No congele grandes cantidades de alimentos frescos al mismo tiempo INST...

Page 22: ...ove the hinge pin from the top right side of the worktop and the hole cover from the top left of the door and swap their positions 6 Remove the hole cover from the bottom left of the door and place it in the hole on the bottom right side of the door 7 Reinstall the door on the appliance Ensure the top of the door is properly aligned with the top of the cabinet and that the rubber gasket makes a go...

Page 23: ... posición 0 Desconecte el aparato y deje la puerta abierta Después de que la escarcha se haya derretido deje el aparato apagado con la puerta abierta hasta que el interior esté seco 22 VACACIONES Vacaciones cortas Deje el aparato en funcionamiento durante las vacaciones de menos de tres semanas Largas vacaciones Si el aparato no se va a utilizar durante varios meses retire todos los artículos y ap...

Page 24: ...de la luz solar directa La temperatura ambiente o la humedad es muy alta El aparato funciona continuamente La temperatura está demasiado fría La puerta no se cierra correctamente o se abre demasiado El respiradero de escape está obstruido Recientemente se agregó una gran cantidad de alimentos calientes al armario Muy cerca de la fuente de calor o de la luz solar directa La temperatura ambiente o l...

Page 25: ...ada de Servicio en Domicilio el cliente será responsable por transportar dicho artefacto hasta el Taller de Servicio Autorizado mas cercano Si el electrodoméstico está instalado en un lugar que se encuentra a 100 kilómetros 62 millas o más del centro de servicios más cercano se debe llevar la unidad al Centro de servicios Danby autorizado más cercano ya que dicho servicio sólo puede realizarlo un ...

Page 26: ...____________________ __________________________________________________________________________________________ __________________________________________________________________________________________ __________________________________________________________________________________________ __________________________________________________________________________________________ _______________...

Page 27: ...____________________ __________________________________________________________________________________________ __________________________________________________________________________________________ __________________________________________________________________________________________ __________________________________________________________________________________________ _______________...

Page 28: ...MODEL MODÈLE MODELO Printed in China Imprimé en Chine Impreso en China Danby Products Limited Guelph ON Canada N1H 6Z9 Danby Products Inc Findlay Ohio USA 45840 DUFM071A1WDB ...

Reviews: