background image

OPERATION:

Before turning on the wine cooler, ensure that the cabinet is level. This will eliminate any vibrations.
NOTE: The power (RUN) indicator light is located on the LED control panel inside the unit and will illuminate 
when the compressor (cooling) cycle is operational. Set the desired cooling temperature by pressing the 
buttons adjacent to the “up”/”down” arrows. Each depression of the buttons will increase/decrease the set

temperature in increments of 1degree. The set temperature will be displayed in the LED (TEMPSET) window.

It is possible to display temperatures in either Celsius or Fahrenheit. To change the setting, press and hold
both buttons simultaneously for approximately 5 seconds. The green pilot light adjacent to the mode 
selection will illuminate the selection made.

To temporarily disconnect the cooling cycle, unplug the wine cooler.  When disengaging the cooling function
for long periods of time, disconnect the plug and leave the door partially open.  
NOTE:  Wait 3 to 5 minutes before restarting the wine cooler if operation has been interrupted.

INTERIOR LIGHT
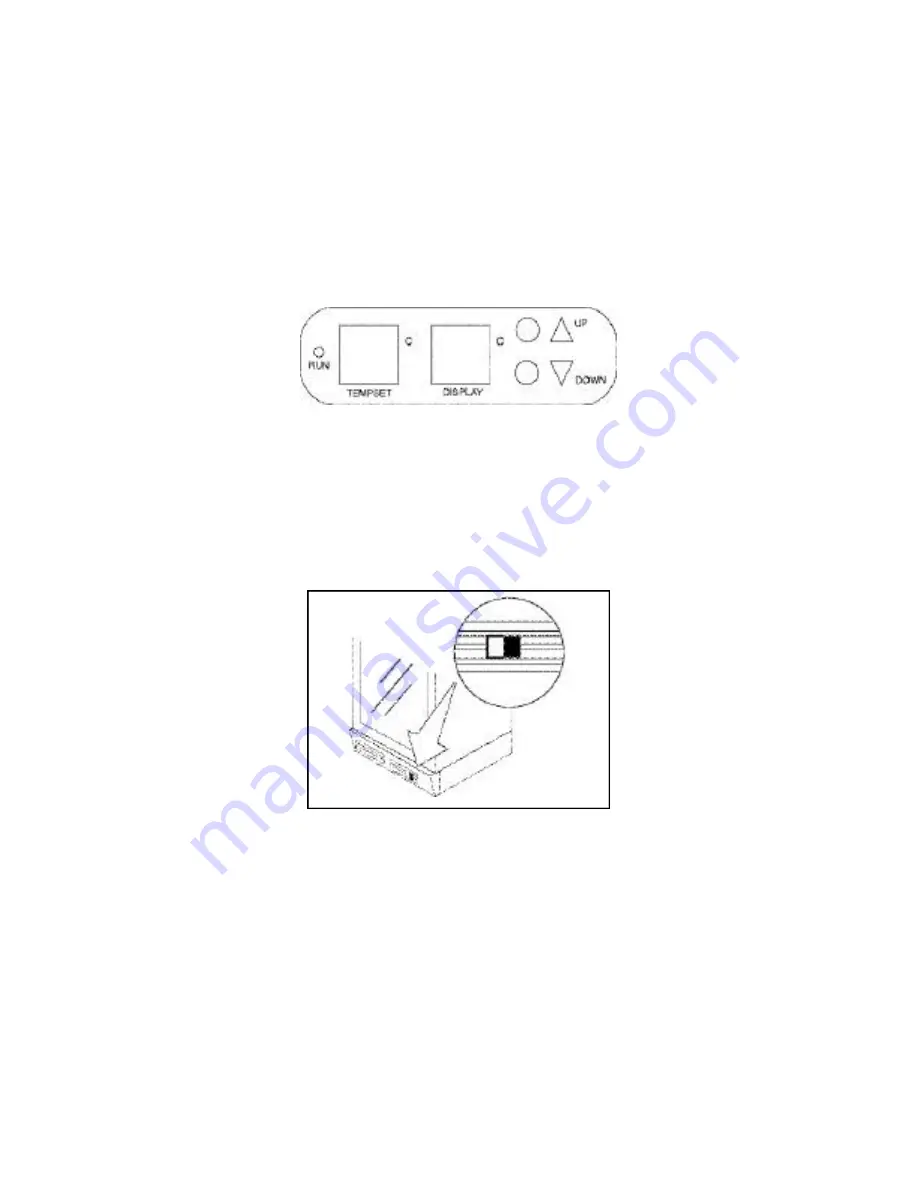
The interior light can operate “manually” or “automatically”.  The light automatically comes on with the opening
of the door and goes out when the door is closed.  To operate the light manually, press the light/toggle switch
located at the bottom right of the wine cooler exterior cabinet to the “on” position.  To turn the light off, toggle
the switch to the “off” position.

DEFROSTING/CONDENSATION
Your wine cooler is designed with an “Auto-Cycle” defrost system.  During the “Off Cycle” the refrigerated
surfaces of the wine cooler defrost automatically.  Defrost water from the wine cooler storage compartment
drains automatically, and is channeled into a condensate drain pan which is located in the back of the wine
cooler next to the compressor.  The heat transferred from the compressor evaporates any condensation that
has collected in the pan.

CARE & MAINTENANCE
Upon receiving your wine cooler, leave the door open for 24 hours.  When cleaning the inside of the wine
cooler you can use a solution of a tablespoon of baking soda to one (1) quart of water, or a mild soap suds
solution, or some mild detergent.  Wood shelving does not require cleaning.  To clean the exterior cabinet of
your wine cooler, use a soft damp cloth with mild detergent or appliance cleaner.

4

Summary of Contents for DWC513

Page 1: ...méro de modèle Numéro de pièce Description de la pièce REFRIGERADOR PARA VINOS El número del modelo de su refrigerador para vinos se encuentra en la placa de serie ubicada en el ángulo posterior superior izquierdo del refrigerador Todas las piezas de repuesto se encuentran disponibles para la compra o por pedido especial cuando Ud visite su departamento de servicio más cercano Para solicitar servi...

Page 2: ... reglas de seguridad y las instrucciones de operación antes de usar este producto por primera vez DELUXE WINE COOLER Owner s Manual 1 5 Safety Instructions Installation Operation Care and Maintenance REFROIDISSEUR DE VIN Manuel d utilisation 6 10 Consignes de sécurité Installation Fonctionnement Soins et entretien REFRIGERADOR PARA VINOS Manual del propietario 11 15 Instrucciones de seguridad Inst...

Page 3: ...clause refers to single and double door refrigerators supplied with or without a separate freezer section Nothing within this warranty shall imply that Danby will be responsible or liable for any spoilage or damage to food or other contents of this appliance whether due to any defect of the appliance or its use whether proper or improper EXCLUSIONS Save as herein provided Danby Products Limited Ca...

Page 4: ...utside of the wine cooler Use a wet lukewarm cloth to wipe the inside of the wine cooler Air must circulate freely in front of the wine cooler Avoid placing the wine cooler near any heat source direct sunlight or moisture Direct sunlight may affect the finish of the wine cooler Nearby heat sources will cause higher electricity consumption INSTALLATION OF SHELVES WOOD SHELVES 1 Place wood shelves o...

Page 5: ...eed to revert back to a right hand door swing 7 Remove the plastic screw caps from the left hand side of the door frame There are six 6 plastic caps to be removed 8 Install the left hand top and bottom hinge supplied with the unit There are three 3 screws for each hinge 9 Insert the lower door support onto the bottom hinge Do not secure with screws until the door is installed 10 Carefully re posit...

Page 6: ... INTERIOR LIGHT The interior light can operate manually or automatically The light automatically comes on with the opening of the door and goes out when the door is closed To operate the light manually press the light toggle switch located at the bottom right of the wine cooler exterior cabinet to the on position To turn the light off toggle the switch to the off position DEFROSTING CONDENSATION Y...

Page 7: ...Fill this reservoir 3 4 full with water Check water level occasionally and refill as necessary REPLACING INTERIOR LIGHT BULBS To replace an interior light bulb 1 Remove the screw holding the light bulb cover Remove the cover 2 Unscrew light bulb Replace the light bulb NOTE The light bulb should not exceed 25 watts 3 Replace light bulb cover Re install screw to secure cover FEATURES AND BENEFITS Po...

Page 8: ...méro de modèle Numéro de pièce Description de la pièce REFRIGERADOR PARA VINOS El número del modelo de su refrigerador para vinos se encuentra en la placa de serie ubicada en el ángulo posterior superior izquierdo del refrigerador Todas las piezas de repuesto se encuentran disponibles para la compra o por pedido especial cuando Ud visite su departamento de servicio más cercano Para solicitar servi...

Page 9: ... reglas de seguridad y las instrucciones de operación antes de usar este producto por primera vez DELUXE WINE COOLER Owner s Manual 1 5 Safety Instructions Installation Operation Care and Maintenance REFROIDISSEUR DE VIN Manuel d utilisation 6 10 Consignes de sécurité Installation Fonctionnement Soins et entretien REFRIGERADOR PARA VINOS Manual del propietario 11 15 Instrucciones de seguridad Inst...

Page 10: ...e reporte aux réfrigérateurs à porte simple ou double avec ou sans une section de congélation Cette garantie indique en aucun temps la responsabilité de Danby de l avarie ou dommage de la nourriture ou autre contenu soit par les vices de l appareil ou soit par l utilisation convenable ou inexacte EXCLUSIONS En vertu de la présente il n existe aucune autre garantie condition ou représentation qu el...

Page 11: ...ssez le aux trois quarts d eau Vérifiez occasionnellement le niveau d eau et ajoutez en au besoin REMPLACEMENT DES AMPOULES INTÉRIEURES Pour remplacer les ampoules électriques intérieures procédez comme suit 1 Retirez la vis retenant le couvre ampoule Retirez le couvercle 2 Dévissez l ampoule et remplacez la NOTA La puissance de l ampoule ne devrait pas dépasser 25 watts 3 Remettez le couvre ampou...

Page 12: ...uyer l intérieur du cabinet à vin L air doit circuler librement à l avant du cabinet à vin Évitez le placer le cabinet à vin près d une source de chaleur sous les rayons solaires directs ou en présence de sources d humidité Les rayons solaires directs pourraient ternir le fini du cabinet à vin Les sources de chaleur à proximité du cabinet à vin feront augmenter la consommation d électricité INSTAL...

Page 13: ... le sens d ouverture de la porte pour qu elle ouvre du côté droit 7 Retirez les capuchons en plastique insérés du côté gauche du cadre de la porte Vous devrez retirer six 6 capuchons en plastique 8 Installez les charnières supérieure et inférieure gauches fournies avec l unité Chaque charnière comporte trois 3 vis 9 Insérez le support inférieur de la porte dans la charnière inférieure Ne serrez pa...

Page 14: ...e période débranchez également le cordon d alimentation électrique et laissez la porte entrouverte NOTA Si l alimentation électrique est coupée pendant un certain temps attendez entre 3 à 5 minutes avant de rebrancher le cordon d alimentation électrique LUMIÈRE INTÉRIEURE La lumière intérieure peut être utilisée en mode manuel ou automatique Le voyant s allume automatiquement lorsque la porte s ou...

Reviews: