INSTRUCCIONES IMPORTANTES DE SEGURIDAD
¡CUIDADO, EL
CO2 PUEDE SER
PELIGROSO!
LEA TODAS LAS INSTRUCCIONES DE SEGURIDAD ANTES DE UTILIZARLO
LEA TODAS LAS
INSTRUCCIONES DE
SEGURIDAD ANTES
DE UTILIZARLO
•
Este artefacto debe ser conectado a tierra. En caso de
falla o avería, la conexión a tierra reducirá el riesgo de
descarga eléctrica proporcionando un camino de menor
resistencia para la corriente eléctrica.
•
Este artefacto viene con un cable de alimentación que
tiene un conductor y pata del enchufe de tierra. El
enchufe debe conectarse a un tomacorriente apropiado
que esté instalado y conectado a tierra de acuerdo con
las normas y reglamentaciones locales.
•
Si no entiende claramente las instrucciones de conexión
a tierra, o si no está seguro de que su tomacorriente esté
correctamente conectado a tierra, llame a un electricista
calificado.
POR SU SEGURIDAD…
Para reducir el riesgo de
incendio, descarga eléctrica
o daños personales.
1.
Siempre conecte el cilindro
de CO
2
a un regulador. El
no hacerlo podría provocar
una explosión que podría
causarle la muerte o herirlo
al abrir la válvula del
cilindro.
2.
Nunca conecte
directamente un cilindro de
CO2 al barril de cerveza.
3.
Siempre coloque el cilindro
de CO
2
en posición "vertical".
4.
Mantenga siempre el
cilindro de CO
2
lejos del
calor.
5.
Nunca deje caer o arroje
un cilindro de CO
2
.
6.
Siempre verifique la fecha
de prueba del D.O.T
(Departamento de
Transporte) del cuello del
cilindro antes de instalarlo.
Si tiene más de cinco (5)
años no lo use, devuélvalo
al proveedor de gas.
Los cilindros cargados de
CO
2
contienen gas a alta
presión que puede ser
peligroso si no se lo trata
correctamente. Lea y
entienda los siguientes
procedimientos para los
cilindros de
CO
2
antes de
instalarlos:
Si se le hace difícil respirar
y/o le empieza a doler la
cabeza, puede haber una
concentración anormal de
dióxido de carbono (
CO
2
)
en el área…
¡CIERRE LA VÁLVULA
GENERAL DEL CILINDRO DE
CO2, VENTILE Y ABANDONE
EL AMBIENTE
INMEDIATAMENTE!
7.
Nunca conecte un
contenedor a menos que
tenga dos (2) mecanismos
de seguridad en el sistema
de presión:
(a) Uno en el regulador de
CO
2
.
(b) Uno en el acople del
contenedor de producto,
en la línea de gas a
presión
NOTA:
El regulador y acople
del barril suministrados con
esta unidad son aparte de los
mecanismos de seguridad
antes mencionados.
8.
Los cilindros de CO
2
deben
guardarse en el lugar más
frío posible
(preferentemente) a 70º F
(21º C) y deben estar
siempre firmemente
sujetados en posición
vertical.
9.
Siempre ventile el área
luego de una pérdida de
CO
2
.
ADVERTENCIA
44
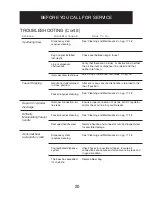
Problem
Possible Causes What To Do
Excess formation of
foam ‘head’.
Flat Draft, no
formation of foam.
No beer flow from
dispenser
Recent keg agitation
Improper regulator
setting
Internal temperature of
keg cooler (or beer keg)
too warm.
Pressure build up
Improper draw technique
Improper regulator
setting.
Glassware is not
“Beer clean”
Elongated dispensing
hose.
Low/Empty CO
2
cylinder.
Closed CO
2
valve and/or
shut-off valve.
Empty CO
2
cylinder.
Empty beer keg.
Line or dispenser
obstructions.
Improper connection(s)
If the keg has recently been moved (transported), you
should let it stand for a minimum of two (2) hours
before tapping.
Verify that the ‘LOW’ side (CO
2
) pressure is reading
between 10 ~ 12 p.s.i.
Ensure that the keg cooler is operating within 36 - 40
º
F (2-4
º
C). If the beer keg has been exposed to a
warm environment for an extended period, give it
sufficient time to cool before attempting a pour.
Activate the pressure relief valve that is located on the
keg coupler for 3 seconds.
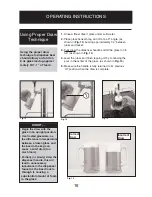
see “Using Proper Draw Technique” on pg. 16.
Verify that the ‘LOW’ side (CO
2
) pressure is reading
between 10 ~ 12 p.s.i.
Residue on glassware in the form of oils will quickly
dissolve the formation of foam. (see “Beer Clean
Glassware” on pg. 18)
All recommended temperatures and gauge settings are
calculated for a dispensing hose five (5) feet in length.
Check that ‘HIGH’ pressure gauge is not reading “0”
p.s.i. Refill if necessary.
Ensure that both the CO
2
cylinder and regulator shut-
off valve are open.
Check that ‘HIGH’ pressure gauge is not reading “0”
p.s.i. Refill if necessary.
Replace beer keg.
Verify that there are no ‘kinks’ or obstructions in either
the air line (red) or dispenser line (clear) and that
neither are frozen.
Ensure all connections are secure and all seals are in
place and in good condition.
BEFORE YOU CALL FOR SERVICE
TROUBLESHOOTING
19


