background image


Step 6 
Sliding Door To Front Panel 

The front sliding door comes assembled with slides and latch. Line up the holes in the 
front panel with the studs on the slides and secure using 1/4-20 Nylock nuts. Ensure 
proper slide movement and latch functioning.
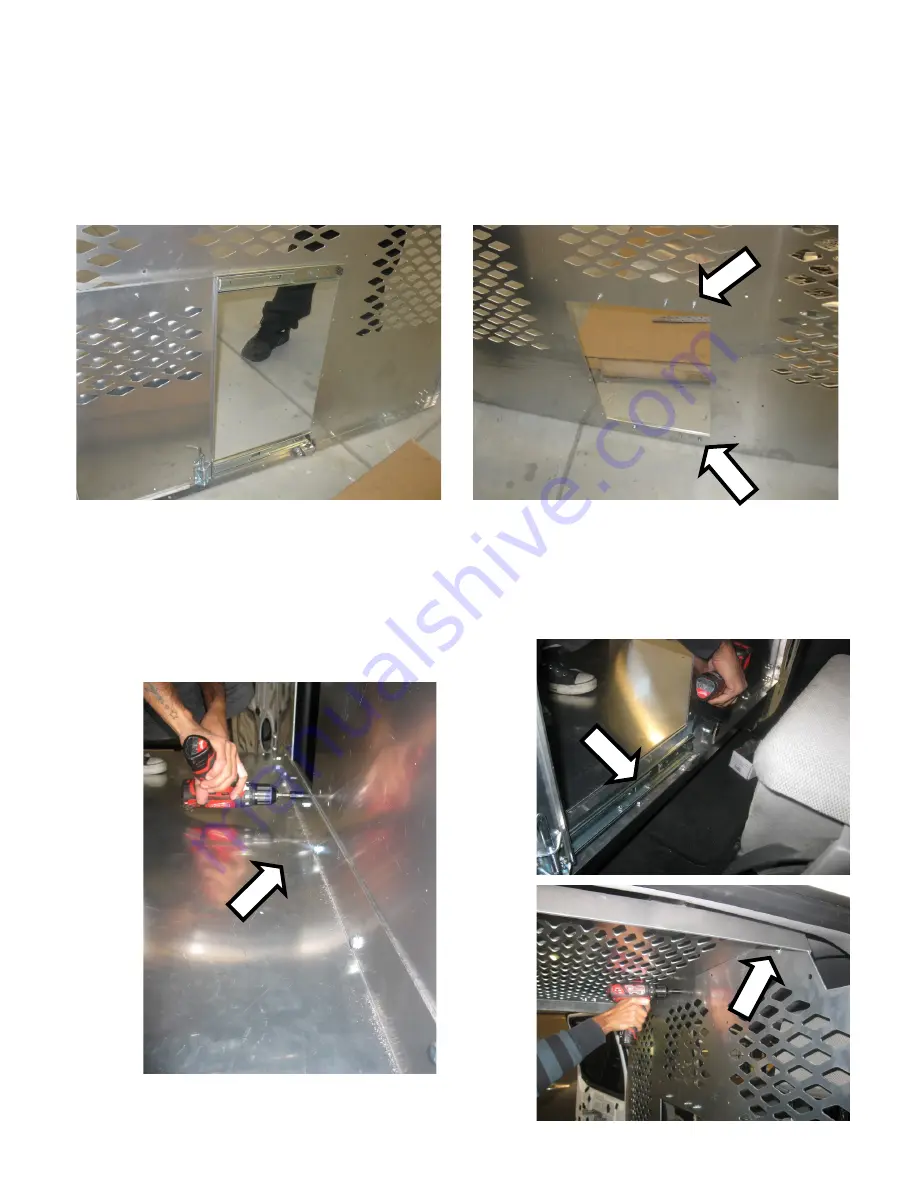


Step 7 
Front Panel to Floor Panel, Sub-frame & Roof Panel 

Place Front Panel on Sub-frame and secure using 1/4-20-3/4” Round Head Bolt. Also,  
secure Front Panel to Floor Panel and Roof Panel using 1/4-20-3/4” Button head 
screw, 1/4” Lock Washer and 1/4” Flat Washer. 


Summary of Contents for Ford F-150 K9 Kennel

Page 1: ...1 INSTALLATION MANUAL Ford F 150 K9 Kennel P N 934 0729A Unpacking 2 Installation 3 Warranty 11 Return Policy 11 CONTENTS...

Page 2: ...heck ALL envelopes packing slips shipping labels and tags before removing or destroying them To ensure your satisfaction open all cartons and report any shortages with in 48 hours of receipt Quantity...

Page 3: ...or Remove Passenger and Driver Side Rear door panels and set aside The Door Locks may require disassembly in order to tuck away door lock rods Contact D R if you are unsure how to remove the Seats or...

Page 4: ...l on sub frame Do not secure Step 3 Back Panel and Side Panel to Floor Panel Sub frame Place Back panel and both side panels on sub frame and secure with Sub frame and Floor Panel using 1 4 20 3 4 But...

Page 5: ...els and Roof Holding Brackets Place the roof panel on the back panel and secure to the back panel side panel and roof brackets Step 4 Install Roof Holding Brackets Remove the hook from the roof and in...

Page 6: ...the slides and secure using 1 4 20 Nylock nuts Ensure proper slide movement and latch functioning Step 7 Front Panel to Floor Panel Sub frame Roof Panel Place Front Panel on Sub frame and secure using...

Page 7: ...Front Panel and Side Panel using 1 4 20 x 3 4 Button head screw 1 4 Lock Washer and 1 4 Flat Washers Repeat for DS Side cover Step 8 Front Panel Enforce Chan to Front Panel Install the front panel enf...

Page 8: ...cover Slide the Door cover on and mark the holes to be drilled for 3 16 rivets Rivet and secure the Door Cover Panel in place Repeat for PS Side Step 10 Side Steps Insert Side Steps both sides and se...

Page 9: ...kets if required Note Divider Assembly The divider assembly comes pre installed on the back panel for ease of installation For using the divider remove the 1 4 20 screws on divider joining bracket on...

Page 10: ...ing Place Rubber Matting in Vehicle CAUTION HEAVY LIFTING REQUIRED The Installation procedure is now complete Please contact D R Electronics if you require fur ther assistance or would like a soft cop...

Reviews: