background image


5  

Jan 15, 2020 


4. Installation


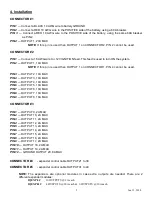
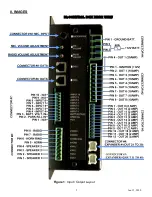
CONNECTOR #1  


PIN 1 

— Connect a BLACK 10 AWG wire to battery GROUND.  

PIN 2 

— Connect a RED 10 AWG wire to the POSITIVE side of the battery, using a 60A breaker.  

PIN  3 

— Connect a RED 10 AWG wire to the POSITIVE side of the battery, using the same 60A breaker  


     as PIN 2.  

PIN 4 

— OUTPUT 1, 20A MAX  


NOTE:

 If this pin is used then OUTPUT 1 on CONNECTOR 2, PIN 2 cannot be used.  


CONNECTOR #2  


PIN 1 

— Connect a 16 AWG wire to +12V IGNITION feed. This feed is used to turn ON the system.  

PIN 2 

— OUTPUT 1, 10A MAX  


NOTE:

 If this pin is used then OUTPUT 1 on CONNECTOR 1, PIN 4 cannot be used.  


PIN 3 

— OUTPUT 2, 10A MAX  

PIN 4 

— OUTPUT 3, 10A MAX  

PIN 5 

— OUTPUT 4, 10A MAX  

PIN 6 

— OUTPUT 5, 10A MAX  

PIN 7 

— OUTPUT 6, 10A MAX  

PIN 8 

— OUTPUT 7, 10A MAX  

PIN 9 

— OUTPUT 8, 10A MAX  


CONNECTOR #3  


PIN 1 

— OUTPUT 9, 2A MAX  

PIN 2 

— OUTPUT 10, 2A MAX  

PIN 3 

— OUTPUT 11, 2A MAX  

PIN 4 

— OUTPUT 12, 2A MAX  

PIN 5 

— OUTPUT 13, 2A MAX  

PIN 6 

— OUTPUT 14, 2A MAX  

PIN 7 

— OUTPUT 15, 2A MAX  

PIN 8 

— OUTPUT 16, 2A MAX  

PIN 9 

— OUTPUT 17, 2A MAX 

PIN 10 

— OUTPUT 18, 2A MAX 

PIN 11 

— OUTPUT 19, 2A MAX  

PIN 12 

— GROUND OUTPUT 20, 8A MAX  


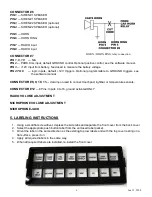
CONNECTOR #4


- expander control cable OUTPUT 21 to 30


CONNECTOR #5


- expander control cable OUTPUT 31 to 40


NOTE:

  The  expanders  are  optional  modules  in  case  extra  outputs  are  needed.  There  are  2   


different expander modules:  


IQEXP-LC  

10 OUTPUTS @ 2A each 


IQEXP-HC  

4 OUTPUTS @ 20A each &  6 OUTPUTS @ 10A each 


Summary of Contents for RDS16S-ELITE-R1

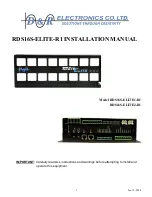
Page 1: ...1 Jan 15 2020 RDS16S ELITE R1 INSTALLATION MANUAL Model RDS16S ELITE1 R1 RDS16S ELITE2 R1 IMPORTANT Carefully read ALL instructions and warnings before attempting to install and operate this equipment ...

Page 2: ...LABELING INSTRUCTIONS Page 6 6 RDS16S ELITE R1 DEFAULT CONFIGURATION Page 7 7 RDS16S ELITE R1 TOUCHPAD BACKLIGHT QUICK SETTING Page 8 8 IMAGES Page 9 REAR VIEW CONNECTORS LAYOUT Page 9 FRONT VIEW CONNECTORS LAYOUT Page 10 TOP VIEW FUSES AND LED INDICATORS Page 10 9 TOUCHPAD SETUP FILE UPLOAD ERROR CODES Page 11 10 WARRANTY PRODUCT RETURN POLICY Page 12 ...

Page 3: ...n hardware should be used to anchor and protect wires Splices should be minimized and made in a fashion so as to protect them from corrosion to minimize the possibility of loss of conductivity over time INSTALLATION OF ALL EQUIPMENT AND WIRING SHALL NOT OBSRUCT IMPEDE OR INTER FERE WITH THE DEPLOYMENT OF VEHICLE AIR BAGS OTHERWISE IT COULD POSSIBLY RE DUCE THE EFFECTIVENESS THE AIR BAG SYSTEM CAUS...

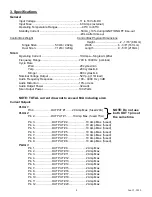
Page 4: ...ortion 10 or less Audio Output Power 32 watts Siren Output Power 100 Watts NOTE TOTAL current draw not to exceed 60A including siren Current Outputs PLUG 1 Pin 4 OUTPUT 1 20 Amp Max fused 20A PLUG 2 Pin 2 OUTPUT 1 10 Amp Max fused 15A Pin 3 OUTPUT 2 10 Amp Max fused Pin 4 OUTPUT 3 10 Amp Max fused Pin 5 OUTPUT 4 10 Amp Max fused Pin 6 OUTPUT 5 10 Amp Max fused Pin 7 OUTPUT 6 10 Amp Max fused Pin 8...

Page 5: ...N 4 cannot be used PIN 3 OUTPUT 2 10A MAX PIN 4 OUTPUT 3 10A MAX PIN 5 OUTPUT 4 10A MAX PIN 6 OUTPUT 5 10A MAX PIN 7 OUTPUT 6 10A MAX PIN 8 OUTPUT 7 10A MAX PIN 9 OUTPUT 8 10A MAX CONNECTOR 3 PIN 1 OUTPUT 9 2A MAX PIN 2 OUTPUT 10 2A MAX PIN 3 OUTPUT 11 2A MAX PIN 4 OUTPUT 12 2A MAX PIN 5 OUTPUT 13 2A MAX PIN 6 OUTPUT 14 2A MAX PIN 7 OUTPUT 15 2A MAX PIN 8 OUTPUT 16 2A MAX PIN 9 OUTPUT 17 2A MAX PI...

Page 6: ...al CONNECTOR 8 9 10 11 data input used to connect touchpad lightbar or temperature sensors CONNECTOR 12 8 Pins Inputs 9 to 16 ground activated ONLY RADIO VOLUME ADJUSTMENT MICROPHONE VOLUME ADJUSTMENT MICROPHONE JACK 5 LABELING INSTRUCTIONS 1 Using a small flat screwdriver depress the side tabs and separate the front cover from the back cover 2 Select the appropriate push button label from the enc...

Page 7: ...ates the YELP tone STINGER Activates the STINGER tone AIR HORN Activates momentary the AIR HORN tone HANDS FREE The Hands Free mode is activated when STBY or any of the siren tones is selected using the ROTARY switch A first press of the horn ring it will activate the WAIL tone A second press it will activate the YELP tone A third press it will activate the STINGER tone A fourth press it will acti...

Page 8: ... down SW1 Step 2 After 3 seconds the backlight quick adjustment is enabled Keep holding down SW1 Step 3 Every couple of seconds the touchpad will beep and change the backlight to the next intensity level Once the highest level is reached it will start a new cycle by selecting the lowest backlight level Step 4 Once the desired backlight level is selected release SW1 The new backlight level is saved...

Page 9: ...9 Jan 15 2020 8 IMAGES IQ CONTROL BOX REAR VIEW Figure 1 Input Output Layout 8 ...

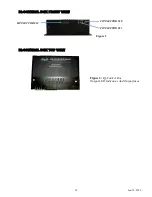
Page 10: ...10 Jan 15 2020 IQ CONTROL BOX FRONT VIEW IQ CONTROL BOX TOP VIEW Figure 3 IQ Control Box Output LED Indicators And Output fuses Figure 2 CONNECTOR 10 CONNECTOR 11 CONNECTOR 12 ...

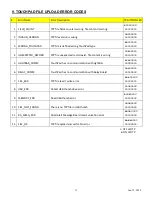
Page 11: ...chPad type 4 UNEXPECTED_RECORD TPP file unexpected record exist file content is wrong 5 LIGHTBAR_COMM TouchPad has no communication with LightBar 6 RELAY_COMM TouchPad has no communication with Relay Board 7 FILE_ERR TPP file read write error 8 USB_ERR Detect USB thumb drive error 9 MEMORY_ERR Read USB thumb error 10 FILE_NOT_FOUND There is no TPP file in USB thumb 11 RA_MESG_ERR Road Alert Messag...

Page 12: ... installation Lamps flash tubes batteries or other items considered consumables are not covered under warranty This warranty is in lieu of all other express warranties D R Electronics makes no warranties expressed or implied other than the express warranties contained herein WARRANTY PRODUCT RETURN POLICY In order to provide you with faster service product returns for repair or replacement must ha...

Reviews: