background image

© Danfoss | Climate Solutions | 2023.07

AX450533577373en-000201 | 9

Assembly

HGZ7/1620+1860


X

Do not damage any cables or component parts.

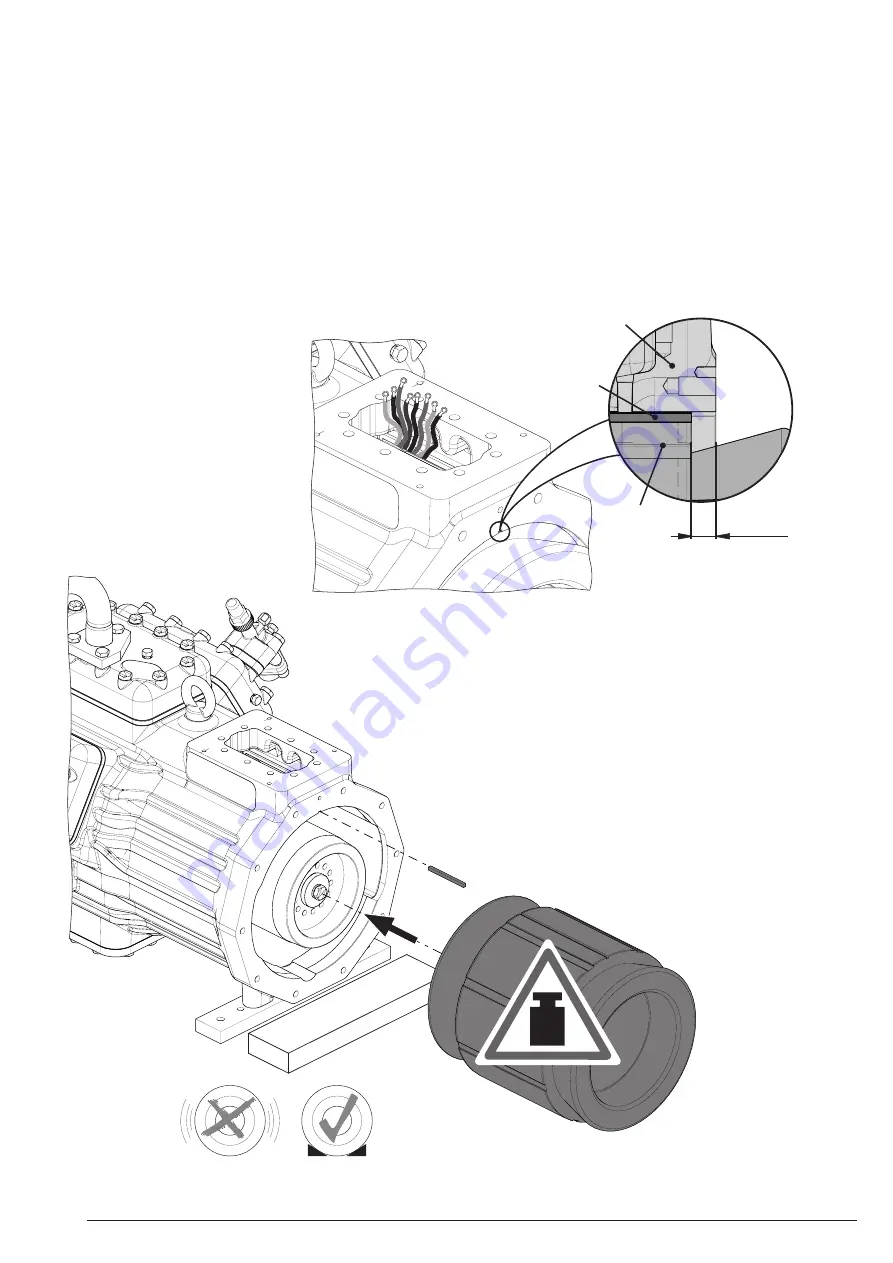
 Push the stator with the cables leading into the motor housing to a 

depth of 13.5 mm. At the same time, carefully pull the cables upwards through the terminal board opening.


¾

Align the stator such that the feather key can be pushed in the the groove on the motor housing flush with the stator.


¾

Fix the feather key and stator in this position using the new stator screws, as described on page 10.

max.

75kg

13,5 mm

Motor housing

Feather key

Stator

Summary of Contents for HG7

Page 1: ...AX450533577373en 000201 HG88e HG7 Repair instruction electric motor Service guide...

Page 2: ...igeration technician for example Note that electrical work may only be carried our by a qualified electrician Alternatively on a country specific basis persons who have undergone electrotechnical inst...

Page 3: ...sk of electric shock X Before you carry out any repair work disconnect the compressor from the electricity network X Turn the main switch to O OFF X Secure the main switch against an unauthorised rest...

Page 4: ...embly 3 Disassembly WARNING Ensure that the compressor is depressurised before starting work 3 1 Draining the oil NOTE Do not dispose of oil in domestic waste X Dispose of the old oil in accordance wi...

Page 5: ...derside of the terminal board Remove the terminal box 4 hexagon head screws M8 AF13 Remove the socket head screws 10x M10x20 AF8 from the terminal board The terminal board must be pushed off the compr...

Page 6: ...heavy weight of the compressor and parts can potentially be dangerous risk of falling danger of crushing X ATTENTION The residual oil flows out when the case cover is removed Lay an absorbent materia...

Page 7: ...ake the measures required to safely remove the stator by placing a square of the correct height at the open end of the motor housing Prevent inadvertent rolling of the removed stator Carefully pull th...

Page 8: ...NG The heavy weight of the stator can potentially be dangerous risk of falling danger of crushing X Use a suitable hoist for the removal X Note the direction of the feather key stator You must align t...

Page 9: ...housing to a depth of 13 5 mm At the same time carefully pull the cables upwards through the terminal board opening Align the stator such that the feather key can be pushed in the the groove on the m...

Page 10: ...crew in the new stator screws The hardening time of the thread coating is 6 hours The stator screw must only be used once HG8 HG88e A A B B A A B B Threaded pin presses on stator assembly Threaded pin...

Page 11: ...per the illustration on page 12 Slightly oil the new seal Carefully remove the residual silicone from the terminal board without damaging the sealing surface NOTE HG7 HGZ7 X At voltages below 400 V sp...

Page 12: ...7 8 9 Part winding 1 Part winding 2 Terminal assignment on the terminal board HG7 and HGZ7 Star delta Connections for PTC sensors U1 V1 W1 W2 U2 V2 W V U Z X Y Cable harness 1 Cable harness 2 Termina...

Page 13: ...Climate Solutions 2023 07 AX450533577373en 000201 13 4 4 Assembling the housing cover X Slightly oil the new O ring Install the case cover with the O ring Ensure the O ring is correctly seated Assemb...

Page 14: ...7 4 5 Assembling Fit the terminal box with the seal DANGER Carry out the additional work steps such as filling the oil etc as per the assembly instruction See the assembly instruction in particular th...

Page 15: ...2023 07 AX450533577373en 000201 15 Dear customer If you have any questions about installation operation and accessories please contact our technical service or your refrigerating system wholesaler or...

Page 16: ...16 AX450533577373en 000201 Danfoss Climate Solutions 2023 07...

Reviews: