background image

User manual 

iSave 21

15

180R9221 / 521B1174 / DKCFN.PS.003.A1.02

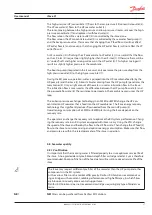
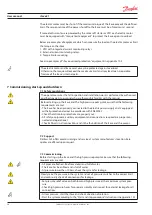
5.7  How does the iSave work?

Figure 5.1 shows a section view of the iSave

The iSave consists of a rotating isobaric pressure exchanger and a positive displacement 

pump, also called booster pump. The rotation speed of the pressure exchanger and the 

pump is exactly the same, as they are driven by the same electric motor.

Fig. 5.1.

5.7.1  Pressure exchanger function:

The pressure exchanger consists of two port plates, one at the concentrate side and one at 

the seawater side. In between there is a rotor with several ducts that connect the concen-

trate side with the seawater side.

The pressure exchanger transfers pressure from the high-pressure (HP) concentrate (HP in) 

to the low-pressure (LP) seawater coming from low-pressure feed pump (LP in).

To separate the HP side from the LP side there is a sealing zone on both port plates. A single 

duct in the rotor is either on the HP side, or on the LP side or in the sealing zone. A single 

duct is never in contact with more than one zone at the time. When the rotor rotates a duct 

will go from the LP zone over the first sealing zone into the HP zone, and hereafter from the 

HP zone over the second sealing zone and back to the LP zone.

The flow through the HP side of the iSave is forced and controlled by the booster pump.

When the high-pressure concentrate is flowing into the iSave it pressurizes the sea water in 

the duct coming from “LP in”. The pressurized seawater is then pumped out of “HP out”. Just 

before the HP concentrate in the duct comes to the seawater port plate, the duct goes into 

the sealing zone and the flow in the duct stops. When the duct goes into the LP zone the 

concentrate water is de-pressurized. The (LP) seawater coming from the LP feed pump (LP 

in) forces the LP concentrate out of “LP out”.

This pressure exchange process is repeated for each duct with every rotation of the rotor, 

and the ducts are thus continuously filling and discharging. The flow on the HP side and LP 

side of the iSave is nearly constant over time.

There is no physical barrier in the ducts between the concentrate and seawater. This means 

that there will be a small amount of mixing between the two liquids.  

When the iSave is rotating the water always flows respectively from LP-in to HP-out, AND 

from HP-in to LP-out. However, if the feed flow into LP-in is higher than the flow into HP-in, 

some of the LP feed flow will flow directly to LP-out.

When the iSave is not rotating the seawater can only run directly from LP-in to LP-out.

NB! 

HP-in

Concentrate 

side

LP-out

LP-in

Seawater side

HP-out

Summary of Contents for iSave 21

Page 1: ...isave danfoss com Installation Operation and Maintenance Manual iSave 21 521B1174 DKCFN PS 003 A1 02 User manual...

Page 2: ...tice This also applies to products already on order provided that such alterations can be made without subsequential chan ges being necessary in specifications already agreed All rights reserved Conte...

Page 3: ...esign details 13 5 2 Sound level of the iSave 13 5 3 Materials 14 5 4 Temperature and corrosion 14 5 5 Dimensions and weights 14 5 6 Electrical motor data 14 5 7 How does the iSave work 15 5 7 1 Press...

Page 4: ...iSave 25 7 Commissioning start up and shutdown 26 7 1 Safety regulations 26 7 2 Support 26 7 3 Commisioning 26 8 Service Maintenance 27 8 1 Safety regulations 27 8 2 Support 27 8 3 Maintenance schedul...

Page 5: ...User manual iSave 21 5 180R9221 521B1174 DKCFN PS 003 A1 02 1 CE Declaration of conformity...

Page 6: ...al motor and instrumentation Commissioning the unit Servicing the iSave unit mechanics and electrics Decommissioning the iSave unit Ensure that these instructions are always readily available to all p...

Page 7: ...ription of how to start and stop the iSave in the preferred RO system set up Instruction Membrane cleaning of RO system with iSave unit Description of how to clean the membranes in the preferred RO sy...

Page 8: ...and over pressure protection equipment is essential All electrical installation work must be carried out by authorised personnel in accordance with EN60204 1 and or local regulations Install a lockab...

Page 9: ...pressure maximum 10 Bar 145 psig Low pressure outlet pressure minimum 1 Bar 14 5 psig High pressure outlet pressure maximum 83 Bar 1200 psig Torque maximum 36 Nm 26 5 lbf ft Maximum speed 1500 rpm Mi...

Page 10: ...hould be drawn up and presented to the carrier at once The identification label on the iSave states the specific type the serial number and the code number of the iSave see fig below The last three di...

Page 11: ...e units weight more than 20 kg Secure lifting slings around the part of the iSave and the back of the electric motor Make sure that the load is balanced before attempting the lift Never lift the iSave...

Page 12: ...d at temperatures below 1 C Danfoss recommends using DOW FROST from DOW Chemical Company or Chillsafe mono propylene glycol from Arco Chemi cal Company If the iSave is protected against frost the stor...

Page 13: ...mined for the complete unit system It is therefore important that the iSave unit is mounted correctly on a frame with dampers to minimise vibrations and noise It is also strongly recommended to use hi...

Page 14: ...e chart below illustrates the corrosive resistance of different types of stainless steel re lated to NaCl concentration and temperature Depending on the NaCl concentration the fluid temperature must b...

Page 15: ...econd sealing zone and back to the LP zone The flow through the HP side of the iSave is forced and controlled by the booster pump When the high pressure concentrate is flowing into the iSave it pressu...

Page 16: ...ks go from the high pressure side to the low pressure side of the pressure exchanger and from the booster pump to the low pressure side of the pressure exchanger 5 7 4 Mixing There is no physical barr...

Page 17: ...mp flow rate 4 and the permeate flow rate 8 The resistance to permeate in the membrane pressurises the HP loop The isobaric pressure exchanger technology in an SWRO or BWRO change the HP con centrate...

Page 18: ...down It is recommended to disconnect all connections to the iSave and to thoroughly flush the piping before the iSave is connected to the inlet and outlet connections It is essential that the water us...

Page 19: ...the iSave to about 750 rpm and keeping the pressure in the HP line at the minimum of 1 bar At this low pressure the iSave may only run for a maximum of 10 minutes Failing to flush the iSave with fresh...

Page 20: ...be implemented to assure that the HP of the iSave is depressurised prior to the isolation of the LP side 5 15 Over pressurisation caused by the high pressure pump The HP pump may be able to generate...

Page 21: ...valve 6 protects the entire system against pressure overload and relieves the water if the pressure exceeds the maximum set pressure If the high pressure pump is a positive displacement pump the pump...

Page 22: ...f must be aligned to avoid bending caused by bolting to an uneven foundation A rigid foundation for the iSave assembly is important and the iSave assembly must be bolted to the foundation The bolts us...

Page 23: ...to the iSave must be properly aligned to avoid stress on the iSave port connec tions Pipe connections must be aligned as shown in the figures below Don t use the iSave as a strain for hard piping The...

Page 24: ...ions used must be of proper design and must be installed in accordance with the manufacturer s recommendations A failure to comply with this will or may result in personal injury and or damage to the...

Page 25: ...r Special attention has to be on NON PROTECTED FREE ROTATING shaft on the electrical motor Ignorance will or could result in personal injury Running the iSave in the wrong direction for more than a fe...

Page 26: ...that the following requirements are met The iSave has been properly connected to the electric power supply and is equipped with all protection devices in accordance with EN60204 1 Check that all moto...

Page 27: ...le of preventive maintenance below will help ensure that the iSave provides years of trouble free performance One day after commissioning 1 Re check bolts in the foundation and the baseplate of the iS...

Page 28: ...ling and replace if necessary 9 Audibly inspect the iSave assembly If there is irregular sounds or vibrations inspect the internals parts of the iSave and replace if necessary 10 Check power consumpti...

Page 29: ...in the HP line is low Torque on iSave too high during operation Pressure difference from HP out 5 to HP in 10 is too high Clean or change membranes Debris in the booster pump or iSave Wear in the boos...

Page 30: ...Membrane cleaning of the RO system with iSave unit 180R9214 10 3 Data sheet 521B1116 10 4 iSave part list 180R9209 10 5 iSave overload protection 180R9222 10 6 Hose assembly and installation 180R9084...

Page 31: ...User manual iSave 21 31 180R9221 521B1174 DKCFN PS 003 A1 02 10 1 Instruction for start and stop of the SWRO with isave unit...

Page 32: ...User manual iSave 21 32 180R9221 521B1174 DKCFN PS 003 A1 02...

Page 33: ...www isave danfoss com Start and stop of the SWRO with iSave unit 180R9213 521B1164 DKCFN PI 003 F2 02 Instruction...

Page 34: ...or to initial start up all piping connected with the iSave unit must be thoroughly flushed to ensure that no impurities enter the iSave Inadequate pre flushing will strongly influence the life of the...

Page 35: ...permeate flow 17 almost equals the flow 2 from the high pressure pump Check the low pressure flow rates 12 and if required adjust flow to achieve balanced flow to the iSave unit It might be a benefit...

Page 36: ...bars 43 5 psig is acceptable for less than 10 minutes within a period of 6 hours Also see datasheet for iSave If possible run the iSave at maximum 750 rpm 4 Stop the iSave unit 11 5 After minimum one...

Page 37: ...User manual iSave 21 37 180R9221 521B1174 DKCFN PS 003 A1 02 10 2 Membrane cleaning of the RO system with iSave unit...

Page 38: ...User manual iSave 21 38 180R9221 521B1174 DKCFN PS 003 A1 02...

Page 39: ...www isave danfoss com Membrane cleaning of the RO system with iSave unit 180R9214 521B1165 DKCFN PI 003 G2 02 Instruction...

Page 40: ...isconnecting the pipes there will be no accumulation of contaminations in the HP piping and HP valves See P ID no 2 The procedures below are based on Dow s Cleaning and Sanitization Cleaning steps des...

Page 41: ...4 and stop the iSave 11 2 Stop the seawater supply pump 1 3 Disconnect pipe in joint 9 and connect the pipe to low pressure Full flow cleaning joint 16 4 Plug pipe in joint 9 5 Open valve 16 6 Pump mi...

Page 42: ...l that the water used for the final pre flush is pre filtered to a level described in the datasheet 11 Remove plug 9 Water will flow out of the iSave and the iSave may start to rotate backward this is...

Page 43: ...User manual iSave 21 43 180R9221 521B1174 DKCFN PS 003 A1 02 10 3 Data sheet...

Page 44: ...User manual iSave 21 44 180R9221 521B1174 DKCFN PS 003 A1 02...

Page 45: ...www iSave danfoss com Data sheet Energy Recovery Device iSave 21 40 MAKING MODERN LIVING POSSIBLE...

Page 46: ...low at different rpm 5 5 Temperature and corrosion 6 5 1 Operation 6 6 Noise level 6 7 Filtration 6 8 iSave drawings 7 8 1 Complete iSave 21 40 without electric motor 7 8 2 Complete iSave 21 40 with e...

Page 47: ...e with a constant high efficiency and minimum service required The vane pumps are fixed displacement pumps in which the flow is proportional to the number of revolutions of the driving shaft enabling...

Page 48: ...t at 60 bar and booster pressure of 3 bar 5 5 kW 7 5 hp 10 kW 15 hp Weight including electric motor 95 kg 209 5 lb 254 kg 560 lb 3 2 Performance iSave 21 iSave 40 Peak efficiency including high pressu...

Page 49: ...0721 2 1 Yes Yes The iSave can also be delivered with a marine motor an ATEX motor or any other special motor Please contact Danfoss RO Solutions for further information The diagram shows that the flo...

Page 50: ...10 UN S32750 or the like Always flush the iSave with fresh water at operation stop in order to minimize the risk of crevice corrosion 316L Super Duplex 80 C 70 60 50 40 30 20 100 160 1600 1000 16000 1...

Page 51: ...ription iSave 21 iSave 40 A Parallel key DIN 6885 mm inch 5 x 5 x 20 0 20 x 0 20 x 0 78 10 x 8 x 35 0 39 x 0 31 x 1 38 B High pressure connections 2 Victaulic 3 Victaulic C Low pressure connections 2...

Page 52: ...ta sheet Energy Recovery Device iSave 21 40 8 521B1116 DKCFN PD 003 A4 02 01 2012 8 2 Complete iSave 21 40 with electric motor iSave 21 Code no 180F7000 95 kg iSave 40 horizontal Code no 180F7001 254...

Page 53: ...and connect it to the electric motor min 3mm air space A B C A Flexible coupling B Bell housing C Motor shaft If alternative mounting is required please contact Danfoss RO Solutions sales organizatio...

Page 54: ...pplies the iSave together with a baseplate and support brackets Although the baseplate is of heavy design it can flex or bend when it is bolted to the foundation Therefore the baseplate requires a sol...

Page 55: ...r bleed valve 8 on the highest point of the high pressure piping to make sure air escapes the system in the bleeding process I The pressure relief valve 6 protects the whole system against pressure ov...

Page 56: ...Data sheet Energy Recovery Device iSave 21 40 12 521B1116 DKCFN PD 003 A4 02 01 2012 12 Performance curves 12 1 Performance curves iSave 21 Differential pressure Low pressure Lubrication flow...

Page 57: ...subsequential changes being necessary in specifications already agreed All trademarks in this material are property of the respective companies Danfoss and the Danfoss logotype are trademarks of Danfo...

Page 58: ...User manual iSave 21 58 180R9221 521B1174 DKCFN PS 003 A1 02...

Page 59: ...User manual iSave 21 59 180R9221 521B1174 DKCFN PS 003 A1 02 10 4 iSave part list...

Page 60: ...User manual iSave 21 60 180R9221 521B1174 DKCFN PS 003 A1 02...

Page 61: ...isave danfoss com iSave 21 Parts list 180R9209 DKCFN PC 003 A2 02 Parts list...

Page 62: ...rts list 2 180R9209 DKCFN PC 003 A2 02 03 2011 iSave 21 This part list provides an overview of the content of various service sets for the isave21 as well as exploded views of the iSave pressure excha...

Page 63: ...X 6 2 Valve plate Super Duplex X 7 1 Cylinder drum Super Duplex 8 1 Shaft Super Duplex 9 2 Retrainer Super Duplex 10 3 Port connection 2 victaulic Super Duplex 11 1 Flange for shaft seal Super Duplex...

Page 64: ...plate out PEEK X 6 1 Rotor Super Duplex 7 8 Vane PEEK X 8 4 Pin 7 x 55 PEEK 9 1 Side plate in PEEK X 10 2 Pin 6 x 10 AISI 303 X X 11 2 Pin 4 x 9 PEEK X 12 10 Bolt M8 x 16 CS A4 80 AISI 316 X 13 10 Bol...

Page 65: ...11 iSave on base plate Exploded view page 9 Pos Qnt Designation 1 1 iSave 21 2 1 Base plate 3 1 Bell housing 4 1 Electric motor 5 1 Coupling 6 4 Bolt M10 x 30 A4 7 4 Washer 8 6 Bolt M6 x 16 A4 9 1 Plu...

Page 66: ...Parts list iSave 21 Parts list 6 180R9209 DKCFN PC 003 A2 02 03 2011 Exploded view Vane pump...

Page 67: ...Parts list iSave 21 Parts list 7 180R9209 DKCFN PC 003 A2 02 03 2011 Exploded view Pressure Exchanger...

Page 68: ...Parts list iSave 21 Parts list 8 180R9209 DKCFN PC 003 A2 02 03 2011 Exploded view iSave...

Page 69: ...Parts list iSave 21 Parts list 9 180R9209 DKCFN PC 003 A2 02 03 2011 Exploded view iSave on base plate...

Page 70: ...User manual iSave 21 70 180R9221 521B1174 DKCFN PS 003 A1 02...

Page 71: ...User manual iSave 21 71 180R9221 521B1174 DKCFN PS 003 A1 02 10 5 iSave overload protection...

Page 72: ...User manual iSave 21 72 180R9221 521B1174 DKCFN PS 003 A1 02...

Page 73: ...isave danfoss com Overload protection iSave 21 180R9222 521B1175 DKCFN PI 003 L1 02 Instruction...

Page 74: ...tri cal motors and torque limitations on the iSaves must be provided by additional equipment This can be done by a mechanical coupling between the electrical motor and the iSave See page 7 or by a cur...

Page 75: ...Instruction iSave 21 3 180R9222 521B1175 DKCFN PI 003 L1 02 04 2011 Danfoss VLT302 with one iSave Electrical schematic diagrams according to EN60204 1...

Page 76: ...ue the relay sent a signal to a main switch that cut of the power to the electrical motor When using a current monitoring relays together with a VFD attention must be on choosing a VFD compatible rela...

Page 77: ...Instruction iSave 21 5 180R9222 521B1175 DKCFN PI 003 L1 02 04 2011 Soft starter with one iSave Electrical schematic diagrams according to EN60204 1...

Page 78: ...Instruction iSave 21 6 180R9222 521B1175 DKCFN PI 003 L1 02 04 2011 Soft starter with two iSaves Electrical schematic diagrams according to EN60204 1...

Page 79: ...03 L1 02 04 2011 The iSave can be protected against overload by using a Torque Overload Safety Coupling between the electric motor and the iSave The Coupling can be purchase by the company www rw amer...

Page 80: ...User manual iSave 21 80 180R9221 521B1174 DKCFN PS 003 A1 02...

Page 81: ...User manual iSave 21 81 180R9221 521B1174 DKCFN PS 003 A1 02 10 6 Hose assembly and installation...

Page 82: ...User manual iSave 21 82 180R9221 521B1174 DKCFN PS 003 A1 02...

Page 83: ...ve strain on the assembly and to provide well organized installations to facilitate access for inspection and maintenance To prevent hose collapse and ow restriction hose bend radii should be kept as...

Page 84: ...ll organized installations to facilitate access for inspection and maintenance To prevent hose collapse and ow restriction hose bend radii should be kept as large as possible Refer to hose s peci cati...

Page 85: ...User manual iSave 21 85 180R9221 521B1174 DKCFN PS 003 A1 02 10 7 Service instructions assembly and disassembly...

Page 86: ...User manual iSave 21 86 180R9221 521B1174 DKCFN PS 003 A1 02...

Page 87: ...isave danfoss com Assembly and disassembly iSave 21 180R9219 521B1171 DKCFN PI 003 K1 02 Service instruction...

Page 88: ...exchanger alone is 28 kg It is essential that the iSave is serviced in conditions of absolute cleanliness Tools needed for disassembly the iSave 6mm and 8 mm alien key 2 screwdrivers 2 M8 bolts Plast...

Page 89: ...two bolts 8 Unscrew the bolts in the flange 10 Gently remove the cylinder barrel 5 Screw in the two M8 bolts 7 Wet the shaft and shaft seal with clean fil tered soap water Gently lever the shaft seal...

Page 90: ...and the first valve plate onto the cylinder barrel NB don t scratch the valve plate by placing it on the plastic tube 13 Replace the O rings and the back up rings on the valve plate 15 Lubricate all t...

Page 91: ...his is not critical 20 Location hole in port plate There are two different port plates in the iSave One of them can be mounted on both flanges in the pressure exchanger Make sure that they are assembl...

Page 92: ...23 Check that the next port plate is correct 25 Position the port plate over the guide pin 27 Change the o ring in the flange and position the guide pin 24 Not correct port plate 26 Check that the po...

Page 93: ...e flange 33 Shaft seal in right position 30 Wet the shaft seal with soap Do not use silicone grease Fit the shaft seal with the carbon surface upward 32 Using the plastic assembly tool provided large...

Page 94: ...he flange Wet the parts with clean filtered soap water Before assembly 37 Gently adjust the spanner wrench around the Coupling and use it as back stop 39 In the table where the service is made place o...

Page 95: ...01 2011 41 Remove all the bolts in the flange 43 Remove side plate 45 Gently remove the rotor NB Loose parts inside the rotor 47 Gently remove side plate 42 Remove the flange 44 Side plate removed 46...

Page 96: ...in the rotor 53 Position the 8 vanes in the rotor The pins my be moved by use of a screwdriver 50 Position the side plate over the guide pin NB Make sure that the guide pin is located in the locating...

Page 97: ...ver the guide pin 59 Fit the flange into both the bearing in the flange and the location pin in the stator 56 Replace the o ring on the flange and wet the flange properly with filtered water 58 Make s...

Page 98: ...K1 02 01 2011 61 Change the o ring in the flange 63 Fit the coupling into the pump Glue the threat on the bolt with loctite 270 and tighten the bolt with 10 Nm Change the two o rings in the flange 62...

Page 99: ...eal coupling onto the shaft of the pressure exchanger 66 Orient both the seal coupling and the 2 guide holes on the vane pump to fit into the pressure exchanger 65 Fit the polymer coupling on the stee...

Page 100: ...Service instruction iSave 21 14 180R9219 521B1171 DKCFN PI 003 K1 02 01 2011 Exploded view Vane pump...

Page 101: ...Service instruction iSave 21 15 180R9219 521B1171 DKCFN PI 003 K1 02 01 2011 Exploded view Pressure Exchanger...

Page 102: ...Service instruction iSave 21 16 180R9219 521B1171 DKCFN PI 003 K1 02 01 2011 Exploded view iSave...

Page 103: ...User manual iSave 21 103 180R9221 521B1174 DKCFN PS 003 A1 02 10 8 Operating and maintenance instruction electric motor...

Page 104: ...User manual iSave 21 104 180R9221 521B1174 DKCFN PS 003 A1 02...

Page 105: ...inimum distances must be observed It is to be avoided that the heated up cooling air is taken in again In case of installation in the open the motors are to be protected against direct environmental i...

Page 106: ...e W rmebildung in den Wicklun gen The motor as well as possible accessories should always be kept clean free from dust traces oil or other grime As a good rule it is recommended to periodically check...

Reviews: