background image

hiptop

®


2


Reference Guide

27-2009-01 Rev. C - Release 2.1 - September 10, 2004 

Copyright © 2004 Danger, Inc. All rights reserved.

Summary of Contents for hiptop 2

Page 1: ...hiptop 2 Reference Guide 27 2009 01 Rev C Release 2 1 September 10 2004 Copyright 2004 Danger Inc All rights reserved ...

Page 2: ...one Controls 9 Control Buttons 10 II Registration 12 III Device Basics 16 Battery Charger 16 USB Port 17 Wrist Strap Holder 17 The Jump Screen 18 Title Bar and Indicators 19 Menus 20 Device Settings 21 Sound and Display Controls 21 Backlighting 22 Key Guard Mode 22 Device Privacy Code 23 ...

Page 3: ...code Characters 26 Cut Copy Paste 27 AutoText 27 IV The Desktop Interface 28 V Using the Applications 30 Phone Make a Phone Call 30 Answer a Phone Call 31 Add a Number to Your Speed Dial List 31 Change Your Phone Ringtone 32 Check Your Voice Mail 32 Import Contacts from Your SIM Card 33 Text Messaging Send a Text Message 33 Contents 3 ...

Page 4: ...tch Email Using Your Device s Web Browser 39 Attach a Photo to an Email Message 39 Address Book Add a Contact to the Address Book 40 Import Address Book Contacts 41 Calendar Add an Event to Calendar 42 Notes Create a Note 43 To Do Add a Task 43 Camera Take a Photo 44 Send a Photo by Email or Multimedia Message 44 4 Contents ...

Page 5: ...g Sign On 49 Send an Instant Message 50 Switch Between IM Conversations 50 VI Keyboard Shortcuts 51 VII Troubleshooting 52 VIII Handling and Safety Precautions 56 Battery Handling 56 Device Handling and Use 57 Battery Charger Handling 58 IX Regulatory Compliance Information 59 Regulatory Compliance Information for North America 59 Regulatory Compliance Information for Europe 61 Contents 5 ...

Page 6: ...ge instant messages send and receive email with image attachments and multimedia messages with voice notes Other features include a full featured phone personal information management PIM applications access to a personal Web portal entertainment applications and a built in camera For the latest instructions on all the hiptop applications open the online version of this Reference Guide by clicking...

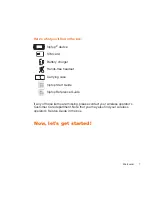
Page 7: ...harger Hands free headset Carrying case hiptop Start Guide hiptop Reference Guide If any of these items are missing please contact your wireless operator s Customer Care department Note that you may also find your wireless operator s Service Guide in the box Now let s get started ...

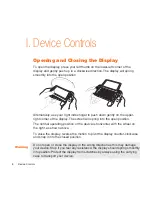
Page 8: ...he screen will spring into the open position The normal operating position of the device is horizontal with the wheel on the right as shown above To close the display reverse the motion to pivot the display counter clockwise and snap it into the closed position Do not open or close the display in the wrong direction as this may damage your device Stop if you feel any resistance the display should ...

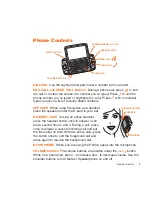
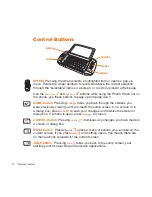
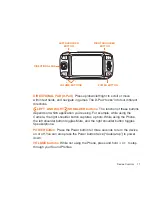
Page 9: ...e the speaker under the D pad to your ear HEADSET JACK If using an active headset press the headset button once to answer a call and a second time to end it During a call press once to answer a second incoming call and put the first caller on hold With two active calls press the button once to end the foreground call and press again to resume the background call MICROPHONE When you are using the P...

Page 10: ...he screens you were previously viewing until you reach the Jump screen On a screen or in a dialog box press DONE to save your changes and dismiss the screen or dialog box If a menu is open press DONE to close it CANCEL button Pressing CANCEL dismisses any changes you have made to a screen or dialog box MENU button Pressing MENU opens a menu of actions you can take on the current screen If you pres...

Page 11: ...ight shoulder button captures a photo While using the Phone the left shoulder button toggles Mute and the right shoulder button toggles Speakerphone POWER button Press the Power button for three seconds to turn the device on or off You can also press the Power button twice double tap to power down VOLUME buttons While not using the Phone press and hold or to step through your Sound Profiles Device...

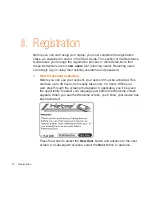
Page 12: ...ername and password 1 Wait for account activation Before you can use your account your account must be activated This can take up to 48 hours but usually takes only 1 3 hours While you wait step through the screens that appear If applicable you ll be given the opportunity to select your language just before the Welcome screen appears When you see the Welcome screen you ll know your device has been...

Page 13: ...s for example username example com Before you select a username read the following guidelines Usernames must start with an alphabetic character A Z and can include numbers and underscores _ but no other punctuation Usernames must be at least two but not more than 32 characters long Usernames are not case sensitive For example if your username is bridget you will be authenticated if you sign in by ...

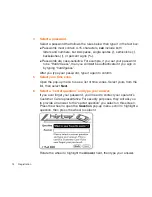
Page 14: ...our password type it again to confirm 5 Select your time zone Open the pop up menu to see a list of time zones Select yours from the list then select Next 6 Select a secret question and type your answer If you ever forget your password you ll need to contact your operator s Customer Care representative For security purposes they will ask you to provide an answer to the secret question you select o...

Page 15: ...r wireless operator The service will check to see if your username has already been taken If it has you will be offered alternatives You can either pick one of these alternatives or type a different username Note that If you are out of network coverage you ll be asked to try again to resume registration 9 Congratulations Once your account has been set up you ll see the Congratulations screen Selec...

Page 16: ...your device Locate the battery charger that came with your device in the box Insert the charger lead the small round end of the adapter into your device s power jack the small round hole located on the lower right side of your device and plug the power cord into a standard electrical wall outlet A lightning bolt icon will appear over the battery icon in the title bar indicating the charger is conn...

Page 17: ...e battery will discharge after two days if it is turned on and not attached to the charger If your device does fully discharge simply attach it to the charger all your data will be restored from the service USB Port The USB port is located under a cover between the power jack and headset jack on the right side of your device Although the current hardware version of the device has a USB port it is ...

Page 18: ...he Jump screen menu From this menu you can open device wide Settings and Controls screens You can also Sign In view Network Status open Hints place the device in Key Guard mode and Power Off your device from this menu 3 To select a particular application use the wheel to scroll through the ring of application icons When the application you want is highlighted simply press the wheel once to open th...

Page 19: ... GPRS network two dots getting IP address three dots connecting to the data service G fully connected to the data service GSM Phone service only A phone icon in the place of the G means you are using or only have access to GSM phone service If you have a call in progress you ll also see a timer Battery indicators The number of bars showing in the battery icon represents the charge remaining in the...

Page 20: ...check your new message or go to your Web page you ll see the appropriate icon in the title bar as a reminder The examples shown to the left illustrate a pending email message text message and loaded Web page Menus Almost every screen on your device has a set of actions you can take while on that screen These actions are listed in a floating window called a menu which you open by pressing the Menu ...

Page 21: ...ntrols by pressing MENU DONE Select a sound profile from the list Customize profiles from the Jump menu Settings Sound Profiles screen You can step through your sound profiles quickly by pressing the volume or buttons To adjust the display brightness open the Display Control by pressing JUMP DONE Press the wheel to open the slider for adjustment ...

Page 22: ...trols by entering key guard mode By default your device is set to enter key guard mode after one minute of idle time To enter key guard mode do the following 1 Press JUMP to open the Jump screen Press MENU to open the menu scroll to highlight Key Guard then press the wheel You can also enter key guard mode quickly by pressing and holding DONE for two seconds 2 Your device control buttons lock and ...

Page 23: ...es while in key guard mode Device Privacy Code If you want to secure your device from unauthorized access once your device has gone into key guard mode you will first need to set up a privacy code 1 Press JUMP to open the Jump screen Press MENU then select Settings Key Guard Security 2 On the Key Guard Security screen scroll down to highlight then press the wheel to select it 3 Enter a three digit...

Page 24: ...e Address Book Creating your own categories and labels for identifying contact information Address Book Setting different ringtones for individual callers Phone Address Book You specify most application specific preferences using the application Settings screens From the Jump screen open any application Web Browser Instant Messaging Email and so on Then from within the application open the menu an...

Page 25: ...g what appears on the screen when you type may no longer correspond to the characters printed on your keyboard If this pop up menu is dimmed then you have no other mappings available 4 Press DONE to save your setting and dismiss the Locale screen Your device will restart if you have changed your default language Typing and Editing Text It s easy to type and edit text in any text box using the keyb...

Page 26: ...elect specific characters Press the wheel to insert a highlighted character Here are some useful tips in using the Special Character selector With the selector open you can show the same characters capitalized by pressing Shift the character like a Toggle back to lowercase by pressing the letter again To see all special characters select All at the bottom of the selector or use the menu shortcut M...

Page 27: ...dard shortcuts Cut MENU X Copy MENU C Select All MENU A 4 You can paste text that you have copied to the device clipboard to any other text box in any application Simply position your cursor where you want to paste the text then use the Paste shortcut MENU V You can also open the menu and select Edit Text Paste Note that the device clipboard only stores one set of copied or cut text at a time Auto...

Page 28: ...nd sign in instructions provided in the Start Guide included in the box Once you ve signed in your Jump page will open Use the Jump page navigation buttons to open the various applications Open the online Help page by clicking the Help link Import existing contacts from the Address Book Import page Import existing Calendar events from the Calendar Import page To change your default language or tim...

Page 29: ...The Desktop Interface 29 Desktop Interface Jump Page ...

Page 30: ... the numbers on the top row Press SEND CALL to place the call In the Phone select to open the on screen dial pad Rotate the wheel to highlight a number then press to select it When you ve completed the number press SEND CALL to place the call In the Phone highlight then select to open a list of recently dialed numbers If the number you want to call is on the list highlight it using the wheel then ...

Page 31: ...ppear giving you the call details and options for handling the incoming call select either Switch Calls or Ignore Add a Number to Your Speed Dial List 1 Press JUMP to go to the Jump screen then press the wheel to open the Phone application 2 Press MENU to open the menu Select New Speed Dial to open the New Speed Dial Entry dialog box You can create 8 speed dial shortcuts 3 Select a Shortcut Key fr...

Page 32: ... you scroll through the songs you can preview each song by hovering over it for a few seconds 4 When you have decided on a ringtone press the wheel to select it Press DONE to assign your new ringtone Assign caller specific ringtones from the Address Book Check Your Voice Mail 1 Press JUMP to go to the Jump screen then press the wheel to open the Phone application 2 Press and hold the 1 key the spe...

Page 33: ...wheel to open the application 2 Press MENU to open the menu New Message is selected by default press the wheel to go to the Compose screen 3 Address your message using the recipient s phone number or start typing their name to bring up Address Book matches Add more recipients by typing a comma or semicolon in the To field 4 Use the wheel to scroll to the message body type your message or use one o...

Page 34: ...rop down menu then press the wheel To open Web pages faster press MENU and select Settings Scroll down the Settings screen and clear the Show pictures in Web pages check box Bookmark a Web Page 1 Open the Web page you want to bookmark 2 Press MENU N to open the Add Bookmark dialog box 3 Edit the bookmark name if you wish verify the URL and select a folder in which to store the bookmark from the Fo...

Page 35: ...pe your message To delete text in the forward direction press the SHIFT DEL keys together To delete the current line of text press the ALT DEL keys together 6 When ready to send either select the Send button at the bottom of the Compose screen or press MENU M Fetch Email from External Accounts When you register your device account you automatically receive an email account that you can use immedia...

Page 36: ... folder 3 Press MENU then select Settings Accounts to open the Accounts screen 4 On the Accounts screen press MENU then select New Account to open the New Account screen 5 Type your email account information in the fields on this New Account screen Read the sections below for more details on each field Protocol pop up menu Select the protocol your mail server uses or the type of account from this ...

Page 37: ... Mail pop mail yahoo com Mail com pop1 mail com Softhome net mail SoftHome net Port field Unless your email provider has specified otherwise do not alter this value Note that if you have selected a specific account type from the Type pop up menu the correct port value will be supplied automatically Username and Password fields Type your email account username and password Email Folder pop up menu ...

Page 38: ... in these fields as you wish 9 Select the Copy Outgoing Messages check box to have every message sent from this account copied to another email address Specify either CC or BCC from the pop up menu then type the email address in the field 10 Save your information by selecting Create or simply press DONE 11 Wait to send messages from this email account until you receive a confirmation message on th...

Page 39: ... the application 2 Begin typing the URL for your Internet email account Your entry will be inserted in the Go To dialog box automatically 3 Press the wheel to go to the Web site s sign in page Attach a Photo to an Email Message 1 Press JUMP to go to the Jump screen Scroll to highlight Email then press the wheel to open the application 2 Press MENU N to open the Compose screen Complete the To Subje...

Page 40: ...en press the wheel to select it To assign a Photo Caller ID icon select from the icon selector which will open your Photo Gallery Then from the Gallery To select a photo already in your Gallery rotate the wheel to highlight the photo you want to associate with the contact then press the wheel to select it a check mark will appear under the photo Press DONE To capture a new photo press Compose your...

Page 41: ... card from your wireless operator with contact information stored on it you can import that information to your device by following the instructions in Import Contacts from Your SIM Card on page 33 of this guide If you have existing contact information stored in a Personal Information Management PIM application you can import that data to your Address Book on the device and Web To do this first go...

Page 42: ...g you are connected to the service Calendar Add an Event to Calendar You can create and store up to 1000 events in Calendar 1 Press JUMP to go to the Jump screen Scroll to highlight Calendar then press the wheel to open the application 2 Press MENU to open the menu New Event is selected by default 3 Press the wheel to go to the Event Details screen 4 Name your event enter a location assign a durat...

Page 43: ... 3 Press the wheel to open a blank note Type your note it is saved as soon as you type it 4 Press the wheel to fold your note press again to unfold Notes must be unfolded before you can edit them To Do Add a Task You can create and store up to 50 To Do tasks 1 Press JUMP to go to the Jump screen Scroll to highlight To Do then press the wheel to open the application 2 Press MENU to open the menu Ne...

Page 44: ...ton to capture Remember the right shoulder button will be on your left as you re looking at the back of the device 4 Press the right shoulder button or select to take your photo 5 Check the photo preview on the display select CANCEL to discard it select to send the photo to an email or phone number multimedia message and save it to your Gallery or select DONE to save it to your Gallery without sen...

Page 45: ...n 2 Wait while the latest Catalog contents load then use the wheel to scroll through the categories The categories are organized like the Jump screen in a ring on the left with each category s splash screen on the right Highlight then press the wheel to open a category s Browse Items screen 3 Individual items are grouped into folders Highlight a folder then press the wheel to open a folder s items...

Page 46: ... To remove a purchased item check the download status of a purchased item or view a list of all the purchases you have made through the Catalog including details such as price subscription term upgrade information go to the Purchases screen 1 Press JUMP to go to the Jump screen Scroll to highlight Catalog then press the wheel to open the application 2 Scroll down to Purchases then press the wheel ...

Page 47: ... in the Go To dialog box then press Return or rotate the wheel to highlight a suggested URL in the drop down menu then press the wheel Receive WAP Messages WAP messages are really just pointers to WAP pages that the sender of the message wants you to visit If you have any unread messages they will be listed on your WAP Browser splash screen To open a WAP message do the following 1 Press JUMP to go...

Page 48: ...reen 3 Address your message using the recipient s phone number or start typing their name to bring up Address Book matches Add more recipients by typing a comma or semicolon in the To field Type a Subject for the entire message Each slide you create will have its own message as well 4 Create your first slide Add the slide s message by typing in the text field Add a voice recording by selecting the...

Page 49: ...ur message select the Preview button You can edit the attachments from the Compose screen first highlight the attachment then press and hold the wheel to bring up the context menu containing edit options 7 When ready to send either select the Send button at the bottom of the Compose screen or press MENU M Instant Messaging This feature is not available in all product configurations Product configu...

Page 50: ...more than one IM conversation open you can switch between conversations quickly by doing one of the following Menu Press MENU D to open the IM Conversations submenu which lists all your open conversations Scroll to highlight the conversation you want to open then press the wheel Conversation Number Each open IM conversation has a number 0 9 which is displayed in the IM Conversations submenu as wel...

Page 51: ...ent task to do or contact Insert special Unicode character Press the SYM key Discard item Highlight the item then press the DEL key Send a composed email text Press MENU M or multimedia message Delete all text in a single line Press ALT DEL Put device in key guard mode Press and hold DONE for two seconds plus lock controls Unlock device Press MENU DONE Power device on off Press and hold for three ...

Page 52: ...ft takeoffs and landings To turn off wireless connectivity to comply with FAA regulations follow these instructions 1 From the Jump screen press MENU and select Controls Wireless 2 In the Wireless Options dialog box that appears select the Wireless Off option then select DONE 3 Your device is now offline You should confirm offline status by looking next to the radio tower icon in the title bar it ...

Page 53: ...l from outside the car If you are near or directly under a cellular PCS radio tower walk at least one block away How can I protect my device from damage The best way to protect your device is to carry it with the display closed in the carrying case supplied in the box You may risk damaging your device if you do not protect the display My device has not connected to the service for quite a while Is...

Page 54: ...il server For example if your email address is joe example com then your username is joe Your password on the remote email server This is the same password you use to open the remote email directly Most Internet Service Providers and University email systems work with the POP3 protocol If you are not sure of the protocol use the Auto detect setting or you can call or email your remote service and ...

Page 55: ...The device does not contain a user replacable battery The battery is rechargable and it is recommended that you charge it nightly How can I clean my device screen The screen on your device is coated with a protective layer of polycarbonate You can safely use warm soapy water denatured alcohol or isopropyl alcohol to remove dirt and smudges from your screen Be sure to use a very soft cotton cloth s...

Page 56: ...ry Please contact customer care for as sistance should you need a replacement battery Lithium ion batteries are recyclable Never dispose of the battery or the unit by incin eration Never attempt to disassemble or modify the battery Never touch any fluid that may leak from the internal battery as doing so may result in injury to the skin or eyes Never drop your device or subject it to severe shock T...

Page 57: ...emitting devices Do not use the device when at a refuelling station Observe restrictions on the use of radio equipment in fuel depots chemical plants or where blasting operations are in progress It is advised that the device not be used by a driver while the vehicle is moving except in an emergency Speak only into a fixed neck slung or clipped on microphone when it would not distract your attention...

Page 58: ... of liquids Never use a worn or damaged battery charger cable or plug or a worn or damaged extension cord or plug When traveling abroad never plug the battery charger into a power source that does not correspond to both the voltage and frequency specified on the charger Always confirm that the battery charger plug has been fully inserted into the recep tacle to ensure a secure electrical connection ...

Page 59: ...ence that may cause undesired operation Responsible Party Danger Inc 3101 Park Blvd Palo Alto CA 94306 USA Tel 1 650 289 5000 www danger com FCC Notice This equipment has been tested and found to comply with the limits for a Class B digital device pursuant to Part 15 of the FCC Rules These limits are designed to provide reasonable protection against harmful interference in a residential installati...

Page 60: ...U S Government These limits are part of comprehensive guidelines and establish permitted levels of RF energy for the general population The guidelines are based on standards that were developed by independent scientific organizations through periodic and thorough evaluation of scientific studies The standards include a substantial safety margin designed to assure the safety of all persons regardle...

Page 61: ...address http www danger com consumers php Exposure to Radio Frequency RF Signals This wireless device has been designed so as not to exceed the limits for exposure to electromagnetic fields recommended by the Council of the European Union These limits are part of comprehensive guidelines developed by independent scientific organizations The guidelines include a substantial safety margin designed t...

Reviews: