15
NO
SE
FI
GB
DE
DK
PL
ET
Inserting the batteries
• Remove the battery cover from the
meat thermometer. Insert 2 new 1.5
V AAA batteries. Align the batteries
correctly, as shown in the battery
compartment. Replace the battery
cover.
To use as a meat thermometer
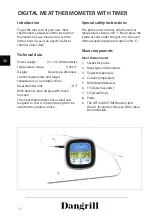
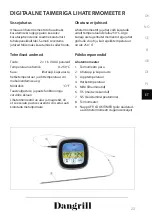
Insert the connector (1) for the probe (8)
into the meat thermometer.
Push the probe into the middle of the meat
(at the thickest point). Make sure not to go
right through the meat.
The probe must not be close to any meat
bone.
The probe must not be exposed to a naked
fl ame.
Slide the button (9) to COOK to switch the
meat thermometer on.
Press the M/M button (5) to choose the
desired meat type in this order:
Beef - Pork - Fish - Veal - Lamb - Chicken
- Turkey - Hamburger.
Press the T/S (6) button to chosen between
Rare, Medium Rare, Medium, Medium Well
Done or Well Done.
The target temperature for the selected
meat type and doneness is then shown in
the display.
Only the degrees of doneness suitable for
the selected meat type can be selected.
Once the meat has reached the target
temperature, the alarm sounds.
Changing the measurement unit
Press the S/S button (7) to switch the display
between Celsius and Fahrenheit.
To use as a timer
Push the button (9) to TIMER to switch the
meat thermometer on and use it as a timer.
Press the M/M button one or more times to
set the number of minutes between 1 and
99.
Press the T/S button one or more times to
set the number of seconds between 1 and
59.
Press the S/S button to start the countdown.
Once the set time has elapsed, the alarm
will sound.
You can cancel the set time by pressing the
M/M and T/S buttons.
Background light
When you press a button, the background
light automatically comes on for around 3
seconds and then goes off .
After cooking
Switch off the meat thermometer.
Remove the probe from the meat (use an
oven glove or pot holder).
Clean the probe with water and washing-up
liquid.
The meat thermometer can be cleaned with
a damp cloth.


