background image

23 

www.Daniel.com

USER MANUAL

3.2.3

Storage conditions

Store the control valve in a safe area to avoid damage.


WARNING

CRUSHING HAZARD
During installation or removal of a control valve, always place the unit on a stable
platform or surface that supports its assembled weight.
Failure to comply may allow the control valve to roll, resulting in death, serious injury or
equipment damage.

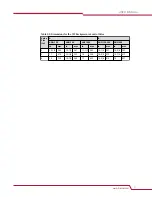
Table 3-1: Control valve storage conditions

Parameter type

Description

Storage environment
conditions

For long term storage, it is recommended that the complete control
valve assembly be stored under cover in a controlled environmental
atmosphere in the original packaging. The storage temperature limits
are: 20 ºC to 60 ºC (68 ºF to140 ºF) .

Shelf life for elastomers

Inspect O-rings for wear or damage during disassembly of the cover
and right before assembling the unit. Replace damaged elastomer.
Viton

®

 has an unlimited shelf life.

Inspect stored
equipment

Examine the internal surfaces and flange faces of the control valve at
least once every three months.
Repack the control valve as originally received.

Labels and nameplates

Do not remove nameplates or labels. Doing so will void the control
valve warranty.

Stacking conditions

When stacking equipment, follow all the safety standards taking into
account the type of box used, the maximum height of the equipment,
the maximum number of boxes stacked, etc.

3.3

Lifting conditions


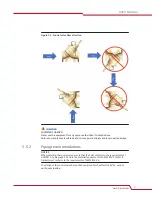
WARNING

CRUSHING HAZARD
During installation or removal of a control valve, always place the unit on a stable
platform or surface that supports its assembled weight.
Failure to comply may allow the control valve to roll, resulting in death, serious injury or
equipment damage.


WARNING

LIFTING HAZARD
The lifting instructions are for installation and removal of a Daniel control valve only and
do not address lifting the control valve while it is attached or bolted to piping.
Failure to follow these instructions may result in death, serious injury or equipment
damage.

Control valve handling

User manual

August 2019

DAN-20064957

28

707 Spring Loaded Back Pressure Valve

Summary of Contents for V707

Page 1: ...OCTOBER 2022 DANIEL SPRING LOADED BACK PRESSURE VALVE USER MANUAL SERIES 700 MODEL V707 NPS 2 THROUGH 4 CLASS 150 600 Decades Proven Field Chosen...

Page 2: ...if not avoided will result in death or serious injury WARNING Warning indicates a hazardous situation which if not avoided could result in death or serious injury CAUTION Caution indicates a hazardou...

Page 3: ...Use Daniel parts and work procedures specified in this manual Product owners Purchasers Use the correct product for the environment and pressures present See technical data or product specifications...

Page 4: ...ct If you do not understand an instruction or do not feel comfortable following the instructions contact your Daniel representative for clarification or assistance Install this product as specified in...

Page 5: ...ODUCT RESPONSIBILITY FOR PROPER SELECTION USE AND MAINTENANCE OF ANY DANIEL PRODUCT REMAINS SOLELY WITH THE PURCHASER AND END USER TO THE BEST OF DANIEL S KNOWLEDGE THE INFORMATION HEREIN IS COMPLETE...

Page 6: ...orized replacement parts storage or handling or any other cause not the fault of Daniel are not covered by this limited warranty and shall be at Buyer s expense Daniel shall not be obligated to pay an...

Page 7: ...personnel 29 3 5 Configure the control valve 31 Part II Install Chapter 4 Installation prerequisites 37 4 1 Pre start checks 37 4 2 Torque information 37 4 3 Torque values flanges 38 4 4 Torque patte...

Page 8: ...intenance tasks 53 Chapter 9 Corrective maintenance 55 9 1 Control valve troubleshooting 55 9 2 Verify the return to operational condition 55 Chapter 10 Spare parts 57 10 1 Recommended spare parts 57...

Page 9: ...9 www Daniel com USER MANUAL Part I Plan User manual Plan DAN 20064957 August 2019 User manual 11...

Page 10: ...stream of the valve The valve comes configured with a check valve to prevent reverse flow and an adjustment screw mechanism to adjust the spring pre load The Daniel 707 Control Valves have the followi...

Page 11: ...gs are as follow 707 Springs Set point range Psig Light 5 to 40 Medium 30 to 80 Combined 30 to 120 Once the operating pressure or set point is reached the valves opens and begins to flow The 707 has a...

Page 12: ...rol Figure 1 2 shows the valve in the open position The pressure at the bottom of the piston P1 is greater than the force of the spring F1 plus the check valve pressure P2 Figure 1 2 Valve in open pos...

Page 13: ...1 1 Part description for a 707 Control Valve Item number Description Quantity 1 Valve body 1 2 Cylinder 1 3 Piston Retainer 1 4 Retainer Set Screw 1 5 Piston 1 6 Jack Screw 2 7 Plunger 1 8 Plunger O r...

Page 14: ...ead O ring 1 15 Connector 3 8 NPT X 3 8 Tube 2 16 Stainless Steel Tubing 1 17 Cylinder Head 1 18 SPRING COVER 1 19 Spring Cover Bolts 1 4 20 Varies 20 Adjustment Scew 3 8 24 1 21 Spring Guide 1 22 Spr...

Page 15: ...e cat cracked gasoline Petrochemicals ie benzene toluene xylenes cumene olefins pyrolysis gasoline Natural gas liquids Viscosity limits Maximum valve viscosity is 8800 Cst Differential pressure The ma...

Page 16: ...ice operating pressure Service testing pressures Service process temperature and ambient site temperatures Chemical composition and toxicity of fluid in operating conditions Traffic wind and earthquak...

Page 17: ...s are free from corrosion and erosion The valve is not designed with corrosion allowance Inspect the valve s metal parts periodically for corrosion and erosion and inspect the seals and O rings for we...

Page 18: ...control valve NPS 2 to 4 are standard class 150 300 and 600 ANSI R F flanges which are available only in carbon steel For maximum working pressures at intermediate temperatures refer to ANSI B16 5 WAR...

Page 19: ...G EQUIPMENT HAZARD Never use this equipment for any purpose other than its intended use Failure to comply may result in death serious personal injury and or property damage User manual Operating condi...

Page 20: ...2 2 Dimensions of the control valve Table 2 4 Approximate weight table for the 707 control valve Line size ANSI 150 300 ANSI 600 DN Inches lbs Kg lbs Kg 50 2 60 27 100 45 80 3 105 48 150 68 100 4 140...

Page 21: ...0 ANSI 300 ANSI 600 ANSI 150 300 ANSI 600 in mm in mm in mm in mm in mm 2 10 1 4 260 10 1 2 267 11 1 2 292 12 7 8 327 14 3 8 365 3 11 279 13 1 8 333 14 356 14 3 4 375 16 1 4 413 4 13 330 14 1 2 368 17...

Page 22: ...t is received at the customer facility Procedure 1 Remove the control valve from the shipping container 2 Inspect the control valve for damage 3 See Installation procedure 3 2 Store the control valve...

Page 23: ...xamine the internal surfaces and flange faces of the control valve at least once every three months Repack the control valve as originally received Labels and nameplates Do not remove nameplates or la...

Page 24: ...4 Lifting requirements for personnel 3 4 1 Safety precautions using appropriately rated lifting slings WARNING LIFTING HAZARD The lifting instructions are for installation and removal of a Daniel con...

Page 25: ...slings to come in contact with the visual indicator position indicator pilots needle valves accessories or tubing Use a spreader bar on the sling to prevent contact Failure to comply may cause equipme...

Page 26: ...r serious injury 3 5 Configure the control valve The factory configures Daniel control valve internal components Inspect the internal components before installation 3 5 1 Orientation and position of t...

Page 27: ...ng recommendations NOTICE When installing the control valve ensure that the bolts conform to the requirements of ASME B16 5 paragraph 5 3 and to the material requirements of ASME B16 5 Table 1B Gasket...

Page 28: ...portant Ensure that piping or other attachments connected to the control valve are not under stress Important Provide fire prevention measures and equipment per local regulations User manual Control v...

Page 29: ...29 www Daniel com USER MANUAL Part II Install User manual Install DAN 20064957 August 2019 User manual 35...

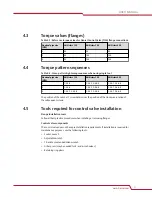
Page 30: ...Tightening procedure 1 Lubricate the nuts and bolts 2 Hand tighten until the nuts and bolts are snug against the flanges 3 Use the minimum pressure setting on an air wrench 4 Use the correct tighteni...

Page 31: ...6 4 8 1 5 3 7 2 6 4 8 1 5 3 7 2 6 4 8 The position of the number 1 screw determines the position of the clockwise rotation of the subsequent screws 4 5 Tools required for control valve installation Fl...

Page 32: ...w Table 5 1 Bolt material selection Bolt material selection Description ASTM SA 193 Grade B7 63 5 mm 2 5 in High strength low alloy steel ASTM SA 193 Grade B7M 63 5 mm 2 5 in Controlled strength low a...

Page 33: ...lt and nut storage Remove each nut and bolt as a pair Thread the matching nut back onto the bolt Stack them in a fashion that will not cause thread damage Reuse of stud bolts and nuts The reuse of thr...

Page 34: ...that proper mounting procedures have been followed and that flange connections are leak free 2 Evaluate the system setup to ensure that all components are in the correct operating sequence 3 Evaluate...

Page 35: ...35 www Daniel com USER MANUAL Part III Operate User manual Operate DAN 20064957 August 2019 User manual 43...

Page 36: ...k of the piston to inlet flow When pressure on bottom side of the piston exceeds the spring pre loaded force on the spring side of the piston the valve opens and begins to flow As pressure continue to...

Page 37: ...37 www Daniel com USER MANUAL Part IV Maintain User manual Maintain DAN 20064957 August 2019 User manual 47...

Page 38: ...The control valve does not have pre installation requirements If installation is required for maintenance purposes use the following tools Socket wrench Adjustable wrench T handle or extended Allen wr...

Page 39: ...s is to prevent sudden spring pressure from being released and causing injury or damage CAUTION SPRING PRESSURE HAZARD Follow the instructions in Step 4 Failure to comply may cause release of spring p...

Page 40: ...ring Turn the seat ring counterclockwise to remove the seat ring and then remove the O ring from the cylinder 8 4 Mechanical assembly 8 4 1 Valve torque specifications Table 8 1 Valve cylinder head t...

Page 41: ...end down into the cylinder on top of the seat ring Using a hammer handle or similar device press down on the piston to force the seat ring into position against the lip in the cylinder 5 Remove the pi...

Page 42: ...d 21 Install adjustment screw and locking cap 8 5 Planned maintenance tasks Table 8 3 Planned maintenance tasks Task Recommended action Inspect Implement a periodic inspection program to ensure all pa...

Page 43: ...ion allowance Periodically inspect the valve s metal parts for corrosion and erosion and inspect the seals and O rings for wear and chemical damage Lubricant information High viscosity silicone oil wi...

Page 44: ...s Check compatibility of O rings with product Valve opens too slowly Swollen O rings Disassemble valve and replace O rings Check compatibility of O rings with product Valve will not close off tightly...

Page 45: ...components are in the correct sequence for accurate product measurement Some components are isolation valves strainers flow straighteners turbine meters downstream sections etc Corrective maintenance...

Page 46: ...W520155 692 600 W526160 692 3 150 300 W530155 692 600 W536160 692 4 150 300 W540155 692 600 W546160 692 Order spare parts Contact Flow Lifecycle Services for Daniel products and provide the following...

Page 47: ...to comply may cause high pressure fluids to leak resulting in death or serious injury Procedure 1 Ensure that the valve is free of contaminants 2 Drain the valve of liquids 3 Clean the valve component...

Page 48: ...o engineer and offer superior products that are trusted to provide the most reliable and accurate measurements in the global oil and gas industry Contact Us Email Sales Daniel com Phone 1 346 509 3700...

Reviews: