


P
I
02 9604 1226 E
I
sales@danielaappliances.com.au W
|
danielaappliances.com.au
PA G E 1 4
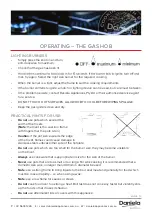
LOW FLAME SETTING
•
Check the low flame setting for each hob burner with the control engaged in the minimum
position. Turn the control until it engages in the minimum position & remove the control knob.
Insert a screwdriver in the adjusting screw (located next to the gascock flame failure shaft).
•
To increase the flame, turn the adjusting screw anti-clockwise.
•
To decrease the flame, turn the adjusting screw clockwise. Adjust for a minimum, stable and
clear flame.
ENSURE THAT THE MINIMUM FLAME WILL NOT BE EXTINGUISHED BY AIR DRAUGHTS
IGNITER OPERATION
•
Check that the igniter for each burner successfully ignites the gas and that the burner
remains alight.
•
If an igniter fails to work or a burner fails to remain alight:
1.
first remove the electrical supply plug from the electrical power outlet (GPO), and then check
that all the electrical connections are clean, dry and in place.
2. Also check burner to ensure ports are not blocked or dirty.
3. If the hotplate fails to operate correctly, contact Daniela Appliances Pty Ltd or their
appropriate agent for service.
ANCILLARY SERVICE INFORMATION
•
SERVICE TO BE CARRIED OUT ONLY BY AN AUTHORISED PERSON!
•
DO NOT ATTEMPT ANY REPAIRS YOURSELF.
•
DO NOT MODIFY APPLIANCE!
•
ALWAYS ENSURE THAT THE GAS AND ELECTRICAL SUPPLY IS DISCONNECTED
BEFORE SERVICING APPLIANCE.
It is also recommended that this appliance be serviced at 12-month minimum intervals or
sooner if required.
This service is not covered by warranty.
ELECTRICAL EQUIPMENT AND COMPONENTS
ALWAYS ENSURE THAT THE POWER SUPPLY IS DISCONNECTED BEFORE
SERVICING THE APPLIANCE.
•
The electrical component is primarily located below the hob surface. Removal of the hob is
straightforward by removing the control knobs, the trivets, the burner caps and burner head
assemblies and skirts.


