

.5.
.6.
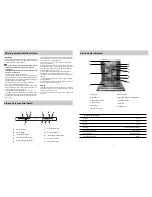
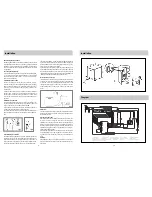
Starting the Appliance
Starting a wash cycle
After having completed all of the installation steps in the preced-
ing paragraphs, turn on the water to the unit, partially open the
door of the dishwasher, and press the ON-OFF button "A" lo-
cated on the control panel. The "B" indicator light will come on.
At this point, the appliance is on and ready to be programmed.
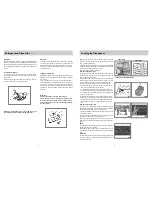
Setting and Starting a wash Cycle
Choose the desired cycle by pressing the cycle selection button
"G". Each time it is pressed, the cycle indicator lights "F" will
change to indicate the cycle selected.
Choose the wash cycle you feel is most appropriate for the type
of dishes that need washing (consult the wash cycle table con-
tained in this manual, especially when first using the appliance).
Close the door and after a few seconds, The wash cycle will begin.
Read the paragraph entitled, "Cancelling or changing a cycle while
underway. "The end of the cycle will be signalled by six beeps,
and the indicator light "F" will extinguish.
Cancelling or changing a cycle while underway...
Premise: A cycle that is underway can only be changed if it has
only been running for a short time.
Otherwise, the detergent may have already been used, and the
appliance may have already drained the wash water. If this is the
case, the detergent dispenser must be refilled (see the paragraph
entitled, "Loading the Detergent").
To change the cycle currently underway, open the door, press
the "G" programming button and hold it in for about 5 seconds.
Once the cycle has been cancelled, the dishwasher will emit a
short acoustic sound and the relative indicator light will turn off.
To set a new wash cycle, follow the instructions contained in the
paragraph entitled, "Setting and Starting a Wash Cycle."
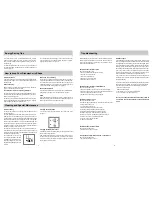
At the end of the wash cycle...
Six beeps will indicate that the wash cycle has finished and the
cycle indicator light “F” will begin to extinguish. Open the door,
turn off the appliance using the ON/OFF switch and turn off the
water supply to the unit. Wait a few minutes before removing the
dishes so as to avoid handling them while still hot (when they
are more susceptible to breakage) and to get better drying results.
Setting The Start Delay Time
Open the door of the dishwasher partially. Press button "J" (see,
Close-up View" Control Panel") to delay the starting time for a
wash cycle.
.1st press, “2h” indicator comes on, the cycle will start in 2 hours.
.2nd press, “4h” light indicator comes on, the cycle will start in 4
hours.
.3rd press, “6h” light indicator comes on, the cycle will start in 6
hours.
.4th press, “2h” and “6h” light indicators come on, the cycle will
start in 8 hours.
.5th press, “4h” and “6h” light indicators come on, the cycle will
start in 10 hours.
.6th press, “2h” , “4h” and “6h” light indicators come on, the cycle
will start in 12 hours.
.last press, all light indicators will extinguish and you can reset.
After selecting the delay time, the wash cycle can be set, as
explained in "Starting a wash cycle..." There will be a short acous-
tic signal, and at this point the delay period will begin to count
down. During this period the delay indicator light (I) will blink. At
the end of the delay time, the indicator will stop blinking and the
cycle will start.
NOTE:
a) During the delay period, none of the settings can be modified.
If necessary, they can be cancelled by pressing cycle selector
"P" for about 5 seconds.
b) If the power to the appliance goes off or the door is opened
during the delay period, the clock will stop the countdown. It will
start again when the power has come back on, or when the door
has been closed.
Wash Cycle Adjustment Buttons
1/2 Load Button
This button (see" Close-up View-Control Panel", letter "C") makes
it possible to wash dishes using only the upper rack if there are
not enough dishes for a full load, This will allow you to save on
water and electrical energy.
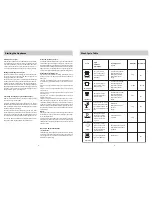
Wash Cycle Table
Cycle
Cycle
Selection
Information
Description of
Cycle
Normal Wash
Intensive
Light Wash
Glassware
Rapid Wash
Soak
ERF
Normal dirty dishes,
pots and pans. Stan-
dard daily cycle.
Very dirty dishes,
pots and pans. (Not
to be used with deli-
cate items)
Normal dirty dishes,
pots and pans without
dried on residue.
Economic, fast cycle to be
used for delicate items which
are sensitive to higher. Run
immediately after dishes are
used.
Economic, fast cycle to
be used to on not very
dirty dishes right after
they are used. No dry-
ing cycle.
Pre-wash of dishes,
pots and pans while
waiting for the load to
be completed after the
subsequent meal.
Pre-wash with hot water.
Extended wash at 70
K
Rinse with cold water.
Rinse with hot water
K
Drying.
Pre-wash with cold water.
Extended wash at 50
.
Rinse with cold water.
Rinse with hot water.
Drying.
Wash at 45
.
Rinse with warm water.
Hot rinse.
Drying.
Short wash at 40
.
Cold rinse.
Short cold wash to prevent
food residue from drying on
the dishes
K
30g
5+25g
15g
15g
Pre-wash with cold water.
Extended wash at 50
K
Rinse with cold water.
Rinse with hot water
K
Drying.
30g
Detergent
Rinse Aid
The cycle of heat wash-
ing and dry tableware.
Heat washing.
Heat wash


