background image

ENGLISH

15

UNDERSTANDING THE CONTROL BOARD


CONTROL

DESCRIPTION

PRIME

“P” SET

PROBE 1

ACTUAL

FC

COOK

FC

“P” SET

FC

PROBE 2

FC

SMOKE

OFF

200º

475º

HIGH

225º

450º

250º

400º

300º

350º

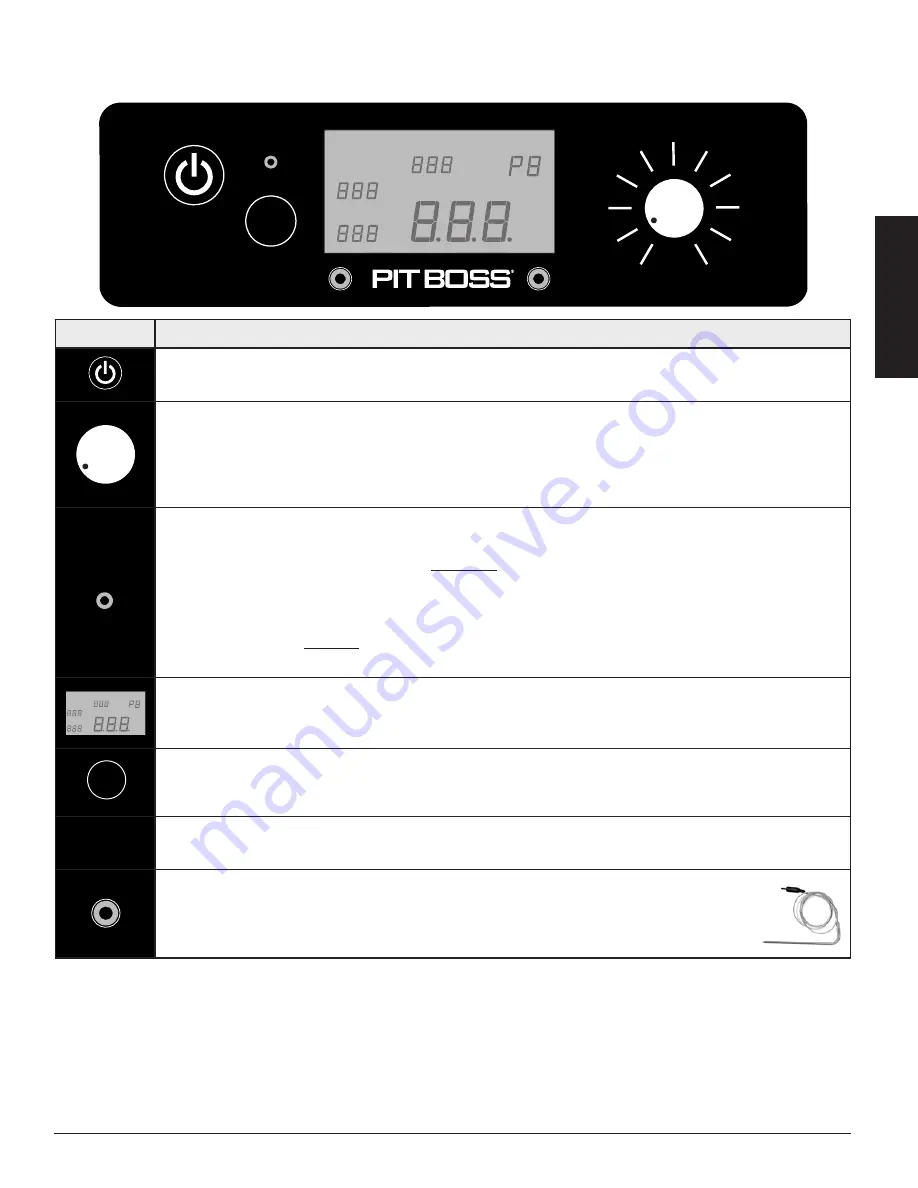
Press the 

Power Button 

to power on the unit. The button will glow blue if connected to a power source. 

Press the button again to turn the unit off.

The 

Temperature Control Dial 

allows you to set your desired smoking temperature. Once connected 

to a power source and the Power Button is pressed, turn the dial and select from any of the ten preset 

temperatures, between 82-260°C / 180-500°F. When the dial is turned to a temperature preset, the Digital 

LCD Screen with light up, displaying that it is ready to operate. When the dial is turned to off, the Digital LCD 

Screen will remain off. 

PRIME

“P” SET

PROBE 1

ACTUAL

FC

COOK

FC

“P” SET

FC

PROBE 2

FC

SMOKE

OFF

200º

475º

HIGH

225º

450º

250º

400º

300º

350º

The 

"P" Set Button

 is used to select one of the eight fine tunings when the Temperature Control Dial is set 

to the Smoke Setting . Press the button to change the "P" setting to accommodate to your cooking style and 

cooking environment, as preferred. With a short push of the button, the setting increases from P0 to P7, then 

repeats. Adjustments are only possible in the Smoke Setting. Factory default setting is "P4". If the "P" setting 

is adjusted, your preference will be locked-in (saved) until further adjustment is made.
The 

"P" Set Button

 is also used as a 

Temperature Switch Control

 to change the temperature readout on 

the LCD Screen. Press and hold the button for two seconds to switch to Celsius (ºC) or to Fahrenheit (ºF), as 

preferred. Default is set to Fahrenheit.

PRIME

“P” SET

PROBE 1

ACTUAL

FC

COOK

FC

“P” SET

FC

PROBE 2

FC

SMOKE

OFF

200º

475º

HIGH

225º

450º

250º

400º

300º

350º

The 

LCD Screen

 is used as the information center for your unit. The LCD screen will display your Desired Cook 

Temperature, Actual Cook Temperature, and Meat Probe Temperatures (if connected). If only one Meat Probe 

is connected, only one reading will be displayed. 

PRIME

“P” SET

PROBE 1

ACTUAL

FC

COOK

FC

“P” SET

FC

PROBE 2

FC

SMOKE

OFF

200º

475º

HIGH

225º

450º

250º

400º

300º

350º

Press and hold the 

Prime Button 

to activate an extra feed of pellets to the Burn Pot. This can be used to 

add more fuel to the fire before opening the barrel lid, resulting in a quick heat recovery time. It can also be 

used while smoking, to increase the intensity of clean smoke flavor. Requested from competition cookers. 

PRIME

“P” SET

PROBE 1

ACTUAL

FC

COOK

FC

“P” SET

FC

PROBE 2

FC

SMOKE

OFF

200º

475º

HIGH

225º

450º

250º

400º

300º

350º

The 

Smoke Setting 

on the Temperature Control Dial is the start-up mode for the unit. The grill operates at 

the lowest temperature, without the fire going out.

PRIME

“P” SET

PROBE 1

ACTUAL

FC

COOK

FC

“P” SET

FC

PROBE 2

FC

SMOKE

OFF

200º

475º

HIGH

225º

450º

250º

400º

300º

350º

The plug-in connection port(s) on the front of the Control Board are for a 

Meat Probe(s)

When a meat probe is connected, the temperature is displayed on the LCD Screen. When not in 

use, disconnect the meat probe from the connection port. 

Compatible with Pit Boss® branded 

meat probes only. Additional meat probe(s) sold separately.

PRIME

“P” SET

PROBE 1

ACTUAL

FC

COOK

FC

“P” SET

FC

PROBE 2

FC

SMOKE

OFF

200º

475º

HIGH

225º

450º

250º

400º

300º

350º

Summary of Contents for Pit Boss PB820FB1

Page 1: ...ppareil lectronique granules Le non respect de ces instructions peut entra ner des dommages aux biens des blessures ou m me la mort Communiquez avec les autorit s locales en mati re d incendie et de b...

Page 2: ...lear and free from combustible materials gasoline and other flammable vapors and liquids Should a grease fire occur turn the grill OFF and leave the lid closed until the fire is out Unplug the power c...

Page 3: ...and should always be stored in an airtight container If you are storing your grill without use for an extended period we recommend clearing all pellets from your grill s hopper and auger to prevent ja...

Page 4: ...to prevent this colorless odorless gas from poisoning you your family or others See a doctor if you or others develop cold or flu like symptoms while cooking or in the vicinity of the appliance Carbo...

Page 5: ...ing To A Power Source 12 Operating Instructions Grill Environment 13 Grill Temperature Ranges 14 Understanding The Probes 14 Understanding The Control Board 15 Understanding The P Setting 16 Hopper Pr...

Page 6: ...f Handle x1 21 Front Panel x1 22 Grease Bucket x1 23 Bottom Shelf x1 24 Locking Caster x2 25 Wheel x2 A Screw x22 B Washer x22 C Locking Washer x22 D Screw x4 E Wheel Cotter Pin x2 F Wheel Washer x2 G...

Page 7: ...eel Note 1A Install a Locking Caster Wheel to the bottom of a Support Leg by hand tightening into the hole The Locking Caster Wheel is inserted completely when it cannot rotate any further into the Su...

Page 8: ...h the three pre drilled holes Install screws from the inside of the Main Barrel Repeat installation for second Support Leg with Wheel Note 2A Mount the Bottom Shelf to each Support Leg using a screw l...

Page 9: ...the Main Barrel Repeat installation for second Support Leg with Caster Note 4B NOTE Once all screw for the cart are installed then tighten secure Carefully lift the grill into an upright position 5 A...

Page 10: ...void using the Side Shelf to move or lift the grill The weight of the unit will cause the Side Shelf to bend or break which is not covered by warranty 8 SECURING THE CHIMNEY Parts Required 1 x Chimney...

Page 11: ...he raised tab is closest to the front edge Note illustration 9B Both Flame Broiler parts are lightly coated with oil to avoid rusting when shipped Next remove the Flame Broiler Adjusting Bar Handle fr...

Page 12: ...FCI OUTLETS This appliance will work on most GFCI outlets with a recommended size of 15 amp service If your GFCI outlet is highly sensitive to power surges it will likely trip during the start up phas...

Page 13: ...ct cold Check local bylaws regarding the proximity of your grill in relation to your home and or other structures Put everything you need on a tray bundle up tight and get it done To help keep track o...

Page 14: ...d slow cooking is generally done between 82 125oC 180 257oF Hot smoking works best when longer cooking time is required such as large cuts of meats fish or poultry TIP To intensify that savory flavor...

Page 15: ...Screen Press and hold the button for two seconds to switch to Celsius C or to Fahrenheit F as preferred Default is set to Fahrenheit PRIME P SET PROBE 1 ACTUAL FC COOK FC P SET FC PROBE 2 FC SMOKE OF...

Page 16: ...ocate the Burn Pot in the bottom of the main barrel 3 Plug the power cord into a power source Press the Power Button to turn the unit on and turn the Temperature Control Dial to the SMOKE position Che...

Page 17: ...e igniter is protruding approximately 13mm 0 5 inches in the Burn Pot Visually confirm that the auger is dropping pellets into the Burn Pot Confirm that the combustion fan is working by listening for...

Page 18: ...e grill lid closed to choke out the fire If the fire does not go out quickly carefully remove the food turn the grill off and shut the lid until the fire is completely out Lightly sprinkle baking soda...

Page 19: ...pressure As the pellet is forced through the die it is cut cooled screened vacuumed and then bagged for consumer use Check with your local dealer for flavors available in your area NOTE Always store w...

Page 20: ...449 500 F POULTRY Size Rare 54 C 130 F Medium 60 C 140 F Well Done 77 C 170 F Turkey whole 4 5 5 0 kg 10 11 lbs 5 3 6 4 kg 12 14 lbs 6 8 7 7 kg 15 17 lbs 8 2 10 0 kg 18 22 lbs 10 4 11 3 kg 23 25 lbs...

Page 21: ...1 13 kg 2 2 lbs High Medium Sear 10 minutes grill 20 30 minutes Rib Roast 5 44 6 35 kg 12 14 lbs Medium 2 2 hours Veal Loin Chop 2 5cm 1 Medium 10 12 minutes direct Brisket 7 25 3 62 kg 16 18 lbs Hot...

Page 22: ...A BBQ floor mat is very useful Due to food handling accidents and cooking spatter a BBQ floor mat would protect a deck patio or stone platform from the possibility of grease stains or accidental spil...

Page 23: ...st be primed to allow pellets to fill the auger tube If not primed the igniter will timeout before the pellets reach the Burn Pot Follow Hopper Priming Procedure Auger Motor Is Jammed Remove cooking c...

Page 24: ...s too LOW Push the P SET button and increase the P setting Grill Will Not Achieve Or Maintain Stable Temperature Insufficient Air Flow Through Burn Pot Check Burn Pot for ash build up or obstructions...

Page 25: ...by product safety testing and certification services comply with a testing tolerance of 5 10 percent LOCATE AND REMOVE THE EIGHT SCREWS OF ACCESS PANEL ON UNDERSIDE OF UNIT FUEL INPUT RATING 2 48 LB...

Page 26: ...15 Support Leg Back x1 16 Support Leg for Wheel Front x1 17 Support Leg for Wheel Back x1 18 Flame Broiler Adjusting Bar Handle x1 19 Flame Broiler Adjusting Bar x1 20 Side Shelf x1 21 Tool Hooks x4 2...

Page 27: ...acement for parts returned freight prepaid if the part s are found by Dansons to be defective upon examination Dansons shall not be liable for transportation charges labor costs or export duties Excep...

Page 28: ...Dansons based on the breach of this warranty or any other type of warranty expressed or implied by law the manufacturer shall in no event be liable for any special indirect consequential or other dam...

Page 29: ...ered aluminum foil Pour 50 ml cup of basting mixture over the brisket in the pouch Close the pouch shut 8 Lay foil pouch carefully on the grill Steam for 1 to 1 hours 9 Open the pouch and use a meat t...

Page 30: ...slices thin 30 ml 2 tbsp Butter Suggested Wood Pellet Flavor Hickory Competition Instructions 1 Preheat grill then leave or reduce slightly 204 260 C 400 500 F 2 Combine meat seasoning eggs and bread...

Page 31: ...Butter 125 ml c Butter 30 ml 2 tbsp Onion chopped 15 ml 1 tbsp Fresh Dill 5 ml 1 tsp Curry Powder Dash Garlic Powder Suggested Wood Pellet Flavor Mesquite Competition Instructions 1 Soak wooden skewer...

Page 32: ...entilation Add a of the seasoning to the can 3 Rinse chicken thoroughly and pat the exterior dry with paper towel Add a 1 4 of the rub inside the cavity of the chicken With the remaining seasoning rub...

Page 33: ...surplomb combustible Gardez votre gril dans une zone d gag e et exempte de mati res combustibles d essence et d autres vapeurs et liquides inflammables En cas d incendie de graisse teignez le grill et...

Page 34: ...tique Si vous stockez votre gril sans l utiliser durant une longue p riode nous vous recommandons de retirer tous les granul s de la tr mie et de la vis sans fin afin d viter tout bouchon Le pouvoir...

Page 35: ...nt les effets de l empoisonnement au monoxyde de carbone Le monoxyde de carbone est particuli rement toxique pour la m re et l enfant pendant la grossesse pour les nourrissons les personnes g es les f...

Page 36: ...une source d alimentation 43 Mode d emploi Environnement du gril 44 Gammes de temp rature du gril 45 Comprendre les sondes 45 Comprendre le tableau de contr le 46 Comprendre le r glage P 47 Proc dure...

Page 37: ...e lat rale x1 20 Poign e de la tablette lat rale x1 21 Panneau avant x1 22 Seau de graisse x1 23 tag re inf rieure x1 24 Roulette pivotante frein x2 25 Roue x2 A Vis x22 B Rondelle x22 C Rondelle de b...

Page 38: ...Installez une roulette de verrouillage au bas d un pied de support en serrant la main dans le trou La roulette de verrouillage est compl tement ins r e lorsqu elle ne peut plus tourner dans le pied d...

Page 39: ...int rieur du baril principal R p tez l installation pour la deuxi me pied de support avec roue Remarque illustration 2A Fixer l tag re inf rieure sur chaque pied de support avec roue l aide d une vis...

Page 40: ...p tez l installation pour la deuxi me pied de support avec roulette Note 4B REMARQUE Une fois que toutes les vis sont install es serrez fermement Soulevez d licatement le grill en position verticale...

Page 41: ...iliser le tablette lat rale pour d placer ou soulever le gril Le poids de l unit entra nera une courbure ou une rupture de le tablette lat rale qui n est pas couverte par la garantie 8 S CURISER LA CH...

Page 42: ...ev que le c t droit Une mauvaise installation de cette pi ce peut endommager le baril de votre gril principal Placez la plaque coulissante du diffuseur de chaleur au dessus de la plaque principale rec...

Page 43: ...OFF PRISE STANDARD Cet appareil fonctionne 110 120 V 60 Hz 250 W Il doit s agir d une prise de terre 3 broches Veillez ce que la broche reli e la terre ne soit pas cass e avant utilisation Le panneau...

Page 44: ...droit prot g du vent et du froid V rifiez les r glements locaux concernant la proximit de votre gril par rapport votre maison et ou autres constructions Mettez tout ce dont vous avez besoin sur un pla...

Page 45: ...fait g n ralement 82 125 C 180 257 F Le fumage chaud fonctionne mieux lorsqu un temps de cuisson plus long est n cessaire comme pour les grandes coupes de viande de poisson ou de volaille CONSEIL Pour...

Page 46: ...ton d amor age pour acheminer plus de granul s vers le pot de combustion Ce processus peut permettre d ajouter plus de combustible au feu avant d ouvrir le couvercle entra nant une r cup ration de cha...

Page 47: ...le c ble lectrique une source d alimentation Appuyez sur le bouton d alimentation pour allumer l appareil et tournez la molette de contr le de temp rature sur la position SMOKE V rifiez les l ments su...

Page 48: ...sur le bouton d alimentation pour allumer l appareil V rifiez ce qui suit Confirmez visuellement que l allumeur fonctionne en pla ant votre main au dessus du pot de combustion en qu te de chaleur Con...

Page 49: ...re de bois et de d bris pour un nettoyage complet travers l cran de la tr mie V rifiez et nettoyez les d bris dans les bouches d a ration du ventilateur situ au bas de la tr mie Une fois que le pannea...

Page 50: ...ORMALE L MENT FR QUENCE DE NETTOYAGE M THODE DE NETTOYAGE Bas du gril principal Toutes les 5 ou 6 utilisations du gril Retirer aspirer l exc s de d bris Pot de combustion Toutes les 2 ou 3 utilisation...

Page 51: ...e il est cisaill refroidi tri aspir puis emball e pour la consommation V rifiez aupr s de votre distributeur local pour conna tre la gamme de saveurs disponibles dans votre r gion REMARQUE Conservez t...

Page 52: ...99 275 F 135 162 C 275 323 F 162 190 C 323 374 F 190 232 C 374 449 F 232 260 C 449 500 F VOLAILLE TAILLE Saignant 54 C 130 F point 60 C 140 F Bien cuit 77 C 170 F Dinde enti re 4 5 5 0 kg 10 11 lbs 5...

Page 53: ...ntes 0 9 1 13 kg 2 2 lbs Haut Moyen Saisir pendant 10 minutes griller pendant 20 30 minutes R ti de c tes 5 44 6 35 kg 12 14 lbs Moyen 2 2 heures C telettes de veau 2 5cm 1 po Moyen 10 12 minutes dire...

Page 54: ...isondelamanipulation des aliments et des diff rents styles de cuisson ce tapis aidera prot ger les dalles de votre patio ou de votre terrasse contre tout risque de tache de graisse ou d versements acc...

Page 55: ...allumeur stoppera avant que les granul s n atteignent le pot de combustion Suivez la Proc dure d amorce de la tr mie Le moteur de la vis sans fin est bloqu Retirez les composants de cuisson du corps...

Page 56: ...il ne parvient pas une temp rature stable ou n arrive pas la maintenir coulement d air insuffisant dans le pot de combustion V rifiez qu il n y a pas d accumulation de cendres ou d obstruction dans le...

Page 57: ...ts de s curit des produits et les services de certification sont conformes avec une tol rance de test de 5 10 TAUX D ENTR E DU COMBUSTIBLE 2 48 LB H 1 12 KG H INDICE W BLANC Y JAUNE P MAUVE R ROUGE K...

Page 58: ...avant x1 15 Pied de support dos x1 16 Pied de support pour roue avant x1 17 Pied de support pour roue dos x1 18 Poign e de la barre de r glage pour chaudi re x1 19 Barre de r glage pour chaudi re x1...

Page 59: ...acement d une pi ce ne prolonge pas la garantie limit e Pendant la p riode de la garantie limit e l obligation de Dansons sera limit e fournir le replacement des composants couverts et ou d fectueux T...

Page 60: ...ponsabilit l gale ou autre quant aux dommages accidentels ou cons cutifs la propri t ou aux personnes r sultant de l utilisation de ce produit Si une r clamation est retourn e contre Dansons bas e sur...

Page 61: ...u gril Faites cuire lentement jusqu ce que la viande soit tendre environ 10 12 heures 5 Badigeonner la poitrine avec le m lange pr par toutes les demi heures pendant les 3 premi res heures 6 Continuez...

Page 62: ...uce sur les c tes dans la poche Fermez la poche 7 D posez la poche d licatement sur le gril Faites fumer pendant 1 1 1 2 heures 8 Ouvrez la poche La viande aura expos les extr mit s des c tes et sera...

Page 63: ...er Mesquite Comp tition Instructions 1 Pr parez le riz mandarin en faisant sauter les amandes le c leri et les oignons avec du beurre dans une petite po le jusqu ce que les amandes soient l g rement g...

Page 64: ...pier absorbant 3 Dans un petit contenant m langez le beurre 1 4 de l assaisonnement et le paprika afin de former une p te Ins rez d licatement votre main entre la peau ext rieure et la viande de la po...

Page 65: ...apier absorbant 2 Placer les morceaux de poulet dans un sac en plastique lock top Ajouter la vinaigrette le sel et le poivre Fermez le sac en plastique et secouez d licatement le sac en vous assurant...

Page 66: ...dera no debe colocarse bajo un techo o saliente de material combustible Mantenga su asador en un rea despejada y libre de materiales combustibles gasolina y otros vapores y l quidos inflamables En cas...

Page 67: ...ndamos retirar todos los p lets de la tolva y del alimentador de espiral de la barbacoa para prevenir bloqueos El valor calor fico medio del combustible de p lets es de 18 6 20 4 MJ kg 8000 8770 Btu l...

Page 68: ...xido de carbono El mon xido de carbono es especialmente t xico para madres e hijos durante el embarazo as como para los beb s los ancianos los fumadores y las personas con problemas de la sangre y el...

Page 69: ...de alimentaci n el ctrica 76 Instrucciones de operaci n Entorno del asador 77 Rangos de temperaturas del asador 78 Uso de los sensores 78 Explicaci n del tablero de control 79 Qu significa el Valor P...

Page 70: ...ral x1 21 Panel frontal x1 22 Cubeta de grasa x1 23 Repisa inferior x1 24 Rueda pivotante de cierre x2 25 Rueda x2 A Tornillo x22 B Arandelas x22 C Arandelas de seguridad x22 D Tornillo x4 E Chavetas...

Page 71: ...serte cada rueda pivotante de cierre en la parte inferior de cada pata de soporte ajust ndola a mano en el orificio Aseg rese de que la rueda pivotante de cierre haya quedado totalmente insertada de f...

Page 72: ...ficios pretaladrados Instale los tornillos desde el interior del barril principal Repita la instalaci n con la segunda pata de apoyo con rueda Consulte 2A Fije el repisa inferior a cada una de las pat...

Page 73: ...del barril principal Repita la instalaci n con la segunda pata de soporte con rueda pivotante Nota 4B NOTA Una vez instalados todos los tornillos del carro apri telos firmemente Levante con cuidado la...

Page 74: ...E Nouseelrepisalateralparamoverolevantarelasador El peso de la unidad har que el repisa lateral se doble o se rompa y estos da os no est n cubiertos por la garant a 8 COLOCACI N DE LA CHIMENEA Partes...

Page 75: ...que la pesta a levantada est m s cerca del borde frontal Consulte la ilustraci n 9B Las piezas del asador tienen una fina capa de aceite para evitar la corrosi n durante el env o A continuaci n desmon...

Page 76: ...del sistema de ignici n TOMAS GFCI Este aparato funciona en casi todas las tomas GFCI con un suministro recomendado de 15 A Si su toma GFCI es muy sensible a las subidas de tensi n probable se descone...

Page 77: ...al exterior Durante el invierno mueva su asador a un rea que est a cubierto del viento y el fr o directo Revise las ordenanzas locales sobre la proximidad del asador a su hogar y o a otras estructura...

Page 78: ...para cocinar bajo y lento generalmente se hace a 82 125 C 180 257 F El ahumado caliente funciona mejor cuando se necesita un tiempo de cocci n m s largo como para cortes de carne pescados o aves grand...

Page 79: ...y mantenga pulsado el bot n dos segundos para cambiar a Celsius C o Fahrenheit F como prefiera El ajuste predeterminado es Fahrenheit PRIME P SET PROBE 1 ACTUAL FC COOK FC P SET FC PROBE 2 FC SMOKE OF...

Page 80: ...ambor principal 3 Conecte el cable de alimentaci n a una toma de corriente Pulse el bot n de Encendido para encender la unidad y gire el Dial de control de temperatura a la posici n AHUMAR Realice las...

Page 81: ...do para encender la unidad Compruebe lo siguiente Confirme visualmente si el sistema de ignici n funciona colocando la mano por encima de la chimenea y comprobando si percibe calor Confirme visualment...

Page 82: ...iado para el sistema de alimentaci n 2 SUPERFICIES INTERNAS Se recomienda limpiar la chimenea cada pocos usos As se asegurar de que el sistema de ignici n funcione correctamente y evitar cualquier acu...

Page 83: ...PONENTE FRECUENCIA DE LIMPIEZA M TODO DE LIMPIEZA Base de la parrilla principal Cada 5 6 usos de la barbacoa Eliminar los residuos con un recogedor o aspiradora en seco o h medo Chimenea Cada 2 3 usos...

Page 84: ...pasa por el troquel se corta se enfr a se inspecciona se aspira y se empaca para su venta al consumidor Consulte a su distribuidor local respecto a los sabores disponibles en su regi n NOTA Siempre gu...

Page 85: ...TAMA O Un cuarto 54 C 130 F Medio 60 C 140 F Bien cocido 77 C 170 F Pavo entero 4 5 5 0 kg 10 11 lbs 5 3 6 4 kg 12 14 lbs 6 8 7 7 kg 15 17 lbs 8 2 10 0 kg 18 22 lbs 10 4 11 3 kg 23 25 lbs Asar de 90...

Page 86: ...20 a 30 minutos Asado de costilla 5 44 6 35 kg 12 14 lbs Medio 2 a 2 horas Chuleta de ternera 2 5cm 1 pulg Medio 10 a 12 minutos Brisket 7 25 3 62 kg 16 18 lbs Ahumadocaliente Asar hasta que la tempe...

Page 87: ...til Debido a los accidentes al manejar la comida y las salpicaduras al cocinar un tapete protege su terraza patio o piso de piedra del riesgo de manchas de grasa o derrames accidentales 3 CONSEJOS Y T...

Page 88: ...o del alimentador de espiral Si no se ceba el sistema de ignici n agotar su tiempo de espera antes de que los gr nulos lleguen a la chimenea Siga el Procedimiento de cebado de la tolva El motor de ali...

Page 89: ...do BAJO Pulse el bot n de ajuste P e incremente el ajuste P La barbacoa no alcanza o no mantiene la temperatura estable Circulaci n de aire insuficiente en la chimenea Compruebe si la chimenea present...

Page 90: ...60 Hz 250 W CONECTOR DE 3 CLAVIJAS CON TIERRA NOTA Los componentes el ctricos que pasaron por pruebas y servicios de certificaci n de seguridad de productos cumplen con una tolerancia de prueba de 5...

Page 91: ...oyo espalda x1 16 Pata de apoyo con rueda delantero x1 17 Pata de apoyo con rueda espalda x1 18 Asa del regulador de la parrilla x1 19 Regulador de la parrilla x1 20 Repisa lateral x1 21 Ganchos para...

Page 92: ...ant a Dansons no cobrar por reparaciones o reemplazos de partes devueltas con env o prepagado si considera que las partes son defectuosas luego de haberlas examinado Dansons no ser responsable de cost...

Page 93: ...e realiza una demanda contra Dansons con base en una infracci n de esta garant a o de cualquier otro tipo de garant a expl cita o impl cita por la ley el fabricante de ninguna manera ser responsable d...

Page 94: ...180 225 F 4 Coloque el brisket con el lado de la grasa hacia arriba en el centro del asador Cierre la tapa del asador Cocine bajo y lento hasta que est tierno de 10 a 12 horas 5 Unte el brisket con l...

Page 95: ...S quela del asador Suba la temperatura del asador a 176 C 350 F 6 Coloque cada costillar en un envoltorio hecho de dos capas de papel aluminio Vierta 50 ml de taza de salsa sobre las costillas dentro...

Page 96: ...OZ MANDAR N Rinde 4 porciones Ingredientes 4 enteras Gallinas de Cornualles enteras 750 ml 3 tz arroz mandar n 15 ml 1 C aceite de oliva 5 ml 1 c paprika ahumada 250 ml 1 tz mermelada de naranja Arroz...

Page 97: ...e madera sugerido Cerezo Manzano Instrucciones 1 Remoje brochetas de madera en agua por 1 hora 2 Precaliente el asador y luego reduzca a 135 163 C 275 325 F 3 Envuelva un camar n y una hoja de albahac...

Page 98: ...riaci n POLLO DE LATA DE CERVEZA NO ALCOH LICA Use las mismas instrucciones anteriores pero sustituya la lata de cerveza con una lata de su refresco no diet tico favorito jugo de fruta o agua con sazo...

Page 99: ...including carbon monoxide which is known to the state of california to cause birth defects or other reproductive harm For more information go to WWW P65WARNINGS CA GOV AVERTISSEMENT Ce produit peut v...

Reviews: