9
Installation
Remove all packing materials from the CD Player. Check that all foam and plastic padding is removed.
Connect all cables.
Always disconnect from electric mains power supply before cleaning or servicing.
Damages caused by non-observance are not subject to warranty.
Set Up and Operation
Before plugging the unit in, always make sure that the power supply matches the product specification
voltage. The power supply is printed on the back of the device.
Do not attempt to operate a 120V specification product on 230V power, or vice versa.
Connections
1.
Turn off the
power (1)
switch.
2.
Connect the
line out L/R (28 or 25/26)
outputs to the input of your mixer.
Caution:
Be sure that the power is off, when connecting the cables.
Names and functions
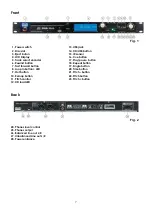
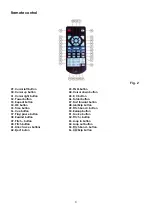
Below is a description of the functions of the controls.
1. Power switch
This is the main
power
switch. Push to turn the device on.
2. Disc slot
Place the disc gently in the slot. The disk will load automatically. Stop playback and press the
eject (3/44)
button to eject the disk.
3/42. Eject button
Use this button to eject the disc. The disc can’t be ejected during Playback. Pause playback before
pushing the eject button.
4.
LCD Display
5. Track select encoder
Dialing the encoder clockwise, allows you to skip a track forwards, dialing counterclockwise will skip a
track backwards.
Pushing the encoder when in playback mode, allows you to skip 10 tracks forwards or backwards.
Pushing and holding while dialing the encoder, allows you to select a folder when in MP-3 mode.
6/38.
Search button
Push and hold this button to play the track fast backwards.
7/47.
Search button
Press and hold this button to play the track fast forward.
8/53.
Loop in button
The loop in button allows you to set the start point for the loop.
9/54.
Loop out button
The loop out button allows you to set the end point for the loop. Pushing the button again, allows you to
exit the loop.
10/50.
Reloop button
Use this button to start the last saved Loop. Push the
loop out (9/54)
button to exit the loop playback.
Summary of Contents for CDMP-150
Page 18: ...2013 DapAudio...


