background image


Functions 


NAMES AND FUNCTIONS  

Below is a description of the functions of the controls. 


  1/29. Open/ close     button 

      Use this button to open and close the disc holder. The disc holder cannot be opened during  
      Playback. Stop playback before opening the disc holder.       

  2.


CD/ USB


button


      Use this button to select CD or USB mode. 

  3. Scratch button 

      Use this button to toggle the scratch mode on or off. The built in LED Indicates the CDMP-2200 is in  
      scratch mode.  

  4.


Time button


      Use this button to switch the 

TIME

 indication in the 

LCD display (13)

 between the elapsed time and  

      remaining time. The selected mode is indicated by 

ELAPSED

 or 

REMAIN

  5. Rec/auto button 

      Pushing this button allows you to store a hot cue. 
      Pushing and holding the 

rec/auto (5)

 button and dialing the 

jogwheel (14).


      allows you to set the length of the auto Loop. See page 13 “Auto loop recording”  
  

6. Hot cue A button 


Use this button to store a hot cue point. See page 12 “Setting a hot cue point”. 

  7. Hot cue B button 
      

Use this button to store a hot cue point. See page 12 “Setting a hot cue point”. 

  8. Folder button 
      

Use this button to open the folder menu. While in the folder menu, 

Folder 

will appear in the display. 

      Select a folder by pushing the 

Track/trim         (19) 

and 

Track/trim         (20) 

buttons and open the  

      folder by pushing the 

folder (8)

 button again. 

  9.


Prog button


      This button allows toggle program mode on or off. See page 13 “Program play”. 

10.


Pitch button


      This button allows you to select the maximum pitch range deactive the pitch control fader.  


Fig. 3


11.


Pitch Control


Fader


      Use this fader to adjust the CD pitch. Move the fader upwards to decrease the pitch, move the fader  
      downwards to increase the pitch. 

12. Relay button   

      This button allows you to toggle the relay play mode on or off.  
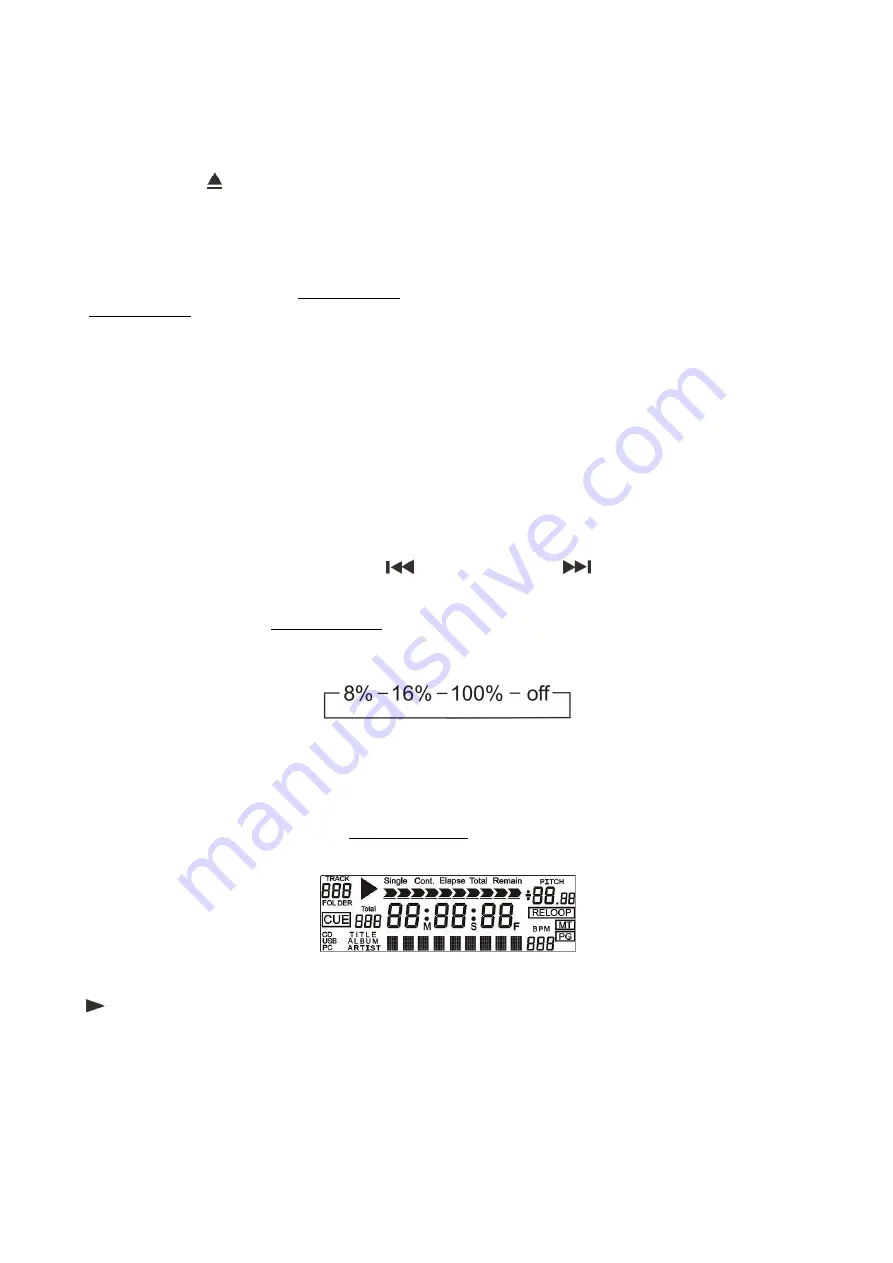
13.


LCD Display 


Fig. 4


TOTAL TRACK:


Shows the current track number or the folder number while selecting folders. 


Indicates that the unit is in playback mode. 

  C

UE:

  indicates that a cue point has been memorized. 


CD:

 Indicates that the unit is in CD mode. 


USB:

 Indicates that the unit is in USB mode. 


PC:

 No function in the CDMP-2200. 

SINGLE:

 When lit, the unit is in continuous play mode and will not stop after each track. 

CONT:

 When lit, the unit is in continuous play mode and will not stop after each track. 

ELAPSE:

 Shows the actual playing time. 

TOTAL:

 Shows the total paying time for the complete CD. 

REMAIN:

 Shows how much time is left for the track playing at this moment. 

Summary of Contents for CDMP-2200

Page 1: ...CDMP 2200 ORDERCODE D1166 Highlite International B V Vestastraat 2 6468 EX Kerkrade The Netherlands...

Page 2: ...P Audio for more excellent audio products We design and manufacture professional audio equipment for the entertainment industry New products are being launched regularly We work hard to keep you our c...

Page 3: ...r 10 Loading CD s 10 Selecting tracks 10 Starting playback 11 Stop playback 11 Pausing 11 Setting a cue point 11 Setting a hot cue Point 11 Cueing 11 Frame search 12 Scanning fast forward fast backwar...

Page 4: ...dition and to ensure a safe operation it is absolutely necessary for the user to follow the safety instructions and warning notes written in this manual Please consider that damages caused by manual m...

Page 5: ...t use fuses of same type and rating only WARRANTY Till one year after date of purchase OPERATING DETERMINATIONS This system is not designed for permanent operation Consistent operation breaks will ens...

Page 6: ...ged due to shipping Transportation damage has to be reported to us within one day after receipt of the delivery Any return shipment has to be made post paid at all times Return shipments must be accom...

Page 7: ...io LCD display with blue backlight Pitch control 8 16 100 Electronic anti shock buffer 8 seconds Seamless loop function Beat related auto loop function Scratch function Cue function 2 hot cues Program...

Page 8: ...21 MT button 6 Hot cue A button 22 Cont button 7 Hot cue B button 23 Cue button 8 Folder button 24 Play pause button 9 Prog button 25 Pitch Button 10 Pitch button 26 Pitch Button 11 Pitch control fade...

Page 9: ...pply before cleaning or servicing Damages caused by non observance are not subject to warranty Set Up and Operation Before plugging the unit in always make sure that the power supply matches the produ...

Page 10: ...menu While in the folder menu Folder will appear in the display Select a folder by pushing the Track trim 19 and Track trim 20 buttons and open the folder by pushing the folder 8 button again 9 Prog...

Page 11: ...or the loop 17 Loop Out button The loop out button allows you to set the end point for the loop Pushing the button again allows you to edit the loop 18 Reloop Exit button Use this button to either exi...

Page 12: ...in damage 38 AC power cable Connect the CDMP 2200 to a 230Vac wall socket only Operations Opening and closing of the disc holder Turn the unit s power on Press the open close 1 29 button to open the...

Page 13: ...pause 24 button to enter pause mode 2 The play pause 24 button and the cue 23 button will blink while the unit is in pause mode 3 Dial the jogwheel 14 to go to your desired cue point if necessary 4 P...

Page 14: ...REMAIN This display mode can only be activated if a disc is formatted as CD Changing pitch There are three tools available for matching the BPM of the CD Use the pitch control fader to adjust the BPM...

Page 15: ...ars you plan to record for the auto loop The range is 1 32 to 32 32 1 bars Default the loop length is 2 1 Auto loop play 1 Push the rec auto 5 button The LED in the button will light up 2 Push the loo...

Page 16: ...ays store the disc in the jewel case to protect from dirt or damage Do not place discs in the following areas 1 Areas exposed to face sunlight for a considerable time 2 Areas subject to accumulation o...

Page 17: ...rating temperature 5 C 35 C Weight 8 76 kg Dimensions DxWxH Main unit 250 482 89 mm Controller 73 482 89 mm MP3 Format DISC USB Devices Applicable file extensions MP3 mp3 Mp3 mP3 File Systems Compatib...

Page 18: ...2011 Dap Audio...

Reviews: